Do you have a question about the Revopoint RANGE and is the answer not in the manual?
Download the necessary Revo Scan software for Windows, macOS, Android, or iOS devices.
Details the minimum hardware and OS requirements for PC usage.
Step-by-step guide to connect the scanner to a PC using a USB cable.
Instructions for establishing a wireless connection between the scanner and a PC.
Guidelines for safe handling, cleaning, and operating the scanner.
Common issues and solutions for operating the Revopoint RANGE 3D scanner.
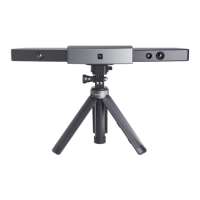
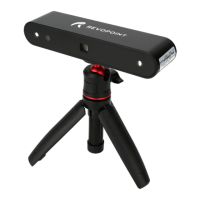
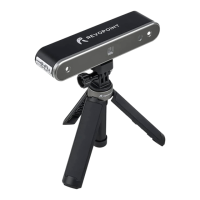
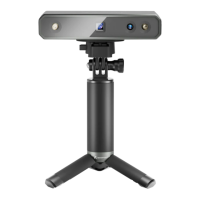
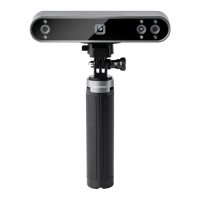
The Revopoint RANGE 3D Scanner is an infrared structured light scanner designed for capturing large objects such as cars, people, and furniture. It utilizes a self-developed chip and intelligent algorithms, combined with a powerful projector and dual IR cameras equipped with aspheric lenses. This design allows for a single capture range of 360mm x 650mm, a working distance of 300mm to 800mm, and a scanning speed ranging from 12fps to 18fps, achieving a single-frame precision of up to 0.1mm.
To use the RANGE 3D Scanner, users must download the "Revo Scan" software, which is available for Windows, macOS, Android, and iOS devices. The software can be found on Revopoint's website or by searching in the Google Play or Apple App Store. For detailed instructions on Revo Scan's functions, users should refer to the in-app how-to-use guide.
The scanner offers versatile connectivity options. For Windows and Mac devices, it can be connected via USB or Wi-Fi. When connecting to a PC via USB, users need to screw the Quick Mount Kit onto the Tripod, clip the RANGE to the top, connect the Micro-B end of the USB cable to the scanner's back, and plug the Type-A end into the computer. It is crucial to connect the RANGE to a USB 3.0 port or above, as USB 2.0 may not provide sufficient operating power. If a laptop lacks a Type-A port, a Type-A-to-C adapter can be used. For Wi-Fi connection to a PC, the RANGE needs to be powered on using a power bank or an AC adapter (without plugging it into the PC to avoid defaulting to USB mode). Users then connect their PC to the "RANGE-XXXXXX" Wi-Fi network (no password required) and wait for the scanner to connect.
For smartphones, Android devices support both USB and Wi-Fi connections, while iOS devices only support Wi-Fi mode. To connect to an Android phone via USB, users screw the Phone Holder onto the Power Bank, clip the RANGE to the top of the Phone Holder, and then fit their smartphone into the holder's clamps. The 2-in-1 Mobile Cable is then used to connect the Micro-B end to the RANGE's port, the Type-A end to the Power Bank, and the Type-C end to the Android smartphone. For Wi-Fi connection to either Android or iOS phones, the RANGE is powered on via the Power Bank Handle or a socket. Users then connect their smartphone to the "RANGE-XXXXXX" Wi-Fi network. If an iPhone user wishes to use the 2-in-1 Mobile Cable for scanning, it can be used for power supply, but the Type-C cable cannot directly connect to iPhones.
The RANGE 3D Scanner has specific requirements for optimal performance. For Windows, it requires Win 8/10/11 (64-bit) with at least 8GB RAM and an Intel Core i5 processor or better. Windows 7 is not supported. For Mac, it requires Mac OS 10.15 or later for Intel x86 chips, or Mac OS 11.0 or later for Apple M1 chips, with at least 8GB RAM. The minimum PC display screen resolution is 1344x768, with 1920x1080 being recommended. For Android, it requires Android 9.0 or later (Harmony OS is supported) with at least 6GB RAM. For iOS, it requires iPhone 8 Plus or later models, or 6th generation iPad or later models, with iOS 13.0 or later.
Scanning certain types of objects requires special preparation. Dark, transparent, or reflective objects, like most 3D scanners, will be challenging to scan without first treating their surfaces with scanning spray, baby powder, or dry shampoo. For objects with plain surfaces or simple geometric features (e.g., a football or wine bottle), Marker stickers or marker points are necessary, and scanning should be done in Marker Mode. Users should place Marker stickers irregularly on the object's surface, ensuring at least 5 markers are visible in the frame throughout the scan to prevent tracking loss. If using other complex features as markers, 2 to 3 should be placed around the object. For accurate color capture, the object must be evenly lit with soft light, free from dark or hard shadows.
The RANGE 3D Scanner features LED indicators to show its status. A red indicator signifies that the scanner is powered on and starting, while a green indicator means it is working properly. The scanner also includes a Start/Pause Scan button.
Maintenance and troubleshooting are important aspects of using the RANGE. Firmware updates are notified via a pop-up in Revo Scan when the scanner is connected. Users should follow the install wizard's prompts and ensure a stable power supply during updates. The scanner is factory-calibrated and typically only requires recalibration after a year of use or if scanned results do not match the specified accuracy.
Safety maintenance instructions include keeping small parts (markers, USB adapters) out of reach of children and animals to prevent injury. The scanner and accessories should be stored in a cool, dry place away from direct sunlight. It is crucial to prevent the scanner from coming into contact with or being immersed in water or other liquids; if it gets wet, it should be wiped dry with a soft, absorbent cloth, as operating a water-damaged scanner can cause permanent component damage. The cameras (two IR cameras, one RGB camera, and a projector) should be kept clean using 95% isopropyl alcohol and a soft cloth. The scanner should be handled with care to avoid hitting the cameras. The operating temperature range is 0°C to 40°C (32°F to 104°F). Users are advised not to disassemble the scanner. The RANGE uses a Class 1 Laser, and direct eye exposure for extended periods should be avoided.
Troubleshooting tips are provided for common issues. If a "check internet connection" error occurs during a firmware update, users should check their device's Firewall Settings to ensure Revo Scan is not blocked and try accessing api.infly3d.com in a web browser to confirm server functionality. If the RANGE turns on but its LED never turns solid green, indicating it's not ready to connect, users should connect it to a power source and press the Start/Pause scan button ten times to reset it. If the issue persists, customer support should be contacted. For consistent tracking loss, users should try using scanner spray, dry shampoo, or baby powder on shiny, dark, or plain surfaces, or use Marker stickers in Marker Mode, ensuring at least five markers are always in the frame. Even lighting with soft light is also recommended. If the object is not clear in the preview window, increasing the brightness in Revo Scan until the object is clearly defined with minimal red and blue patches can help. If scanned model surfaces lack detail or are smeared, it often means the scan needs to be redone, focusing on scanning each area only once to maintain quality. If the scanner runs out of memory, especially with large objects, users should pause the scan, fuse the model, and start a new scan from where they left off. These separate scans can be merged in Revo Studio. To reset the scanner, connect it to a power source and press the Start/Pause scan button ten times.
For further assistance, customers can contact Revopoint customer service via email at customer@revopoint3d.com, by phone at +1 (888) 807-3339, or through the online chat on their website www.revopoint3d.com. The product cannot be returned if the "Warranty Void If Seal Is Broken" label is damaged or removed. Revopoint also encourages users to follow them on social media platforms like Facebook, Instagram, YouTube, and Twitter.
| Scan Accuracy | Up to 0.1 mm |
|---|---|
| Frame Rate | Up to 18 fps |
| Light Source | Infrared VCSEL |
| Output Formats | PLY, OBJ, STL |
| Connectivity | USB 3.0 |
| Single Capture Range | 360 mm x 650 mm @ 500 mm |
| Power Supply | 5V |
| Minimum Scan Volume | 50 x 50 x 50 mm |