Do you have a question about the RIDGID BS14002 and is the answer not in the manual?
Guidelines for selecting and using extension cords based on length and wire gauge requirements.
Discusses the tool's no-load speed and the importance of shop wiring for power tool motors.
Explains the necessity of grounding for safety and proper connection of the tool's plug.
Details the required power supply voltage, frequency, and current for the tool's electric motor.
Step-by-step instructions for converting the band saw's motor voltage from 120V to 240V.
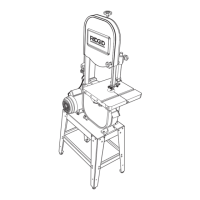
Lists the technical specifications of the band saw, including blade width, length, table size, and weight.
Encourages familiarization with the tool's operating features and safety rules before use.
Explains the function of the blade tension knob for adjusting blade tension.
Describes the tracking knob's purpose in centering the blade on the wheels.
Details how blade guides provide support for the adjustable blade.
Explains that thrust bearings support the blade's back and are adjustable for different widths.
Instructions on using adjustment knobs to set the blade guide assembly for stability.
Notes the saw table's tilt capability for angular cuts and the 90° stops for perpendicular alignment.
Explains how table lock knobs secure the saw table at different tilt angles.
Describes how to use the housing cover knob to access wheels for changes or cleaning.
Details the dust exhaust port for dustless cutting and connecting dust collection systems.
States the blade guard's function in protecting the operator from blade contact.
Mentions blade hangers as a storage location for extra blades.
Instructions for carefully removing the tool and accessories from the box and inspecting for damage.
Step-by-step guide to attaching the leveling feet to the saw's legs for stability.
Detailed instructions for assembling the leg stand using carriage bolts, washers, and nuts.
Steps to mount the band saw body onto the assembled leg stand using bolts and nuts.
Instructions for mounting the motor assembly onto the leg stand using bolts and rubber grommets.
Guide for installing the V-belt and adjusting pulley alignment and belt tension.
Steps to attach blade hangers to the pulley cover using screws, nuts, and washers.
Instructions for mounting the pulley cover to the leg stand with screws, washers, and nuts.
Instructions for mounting the switch assembly to the band saw chassis.
Steps to install the dust chute onto the lower blade guard cover.
Guide for mounting the table trunnion support to the saw body using bolts and nuts.
Instructions for mounting the bevel scale to the saw table with screws, washers, and nuts.
Steps to install the scale indicator onto the trunnion support using a screw.
Procedure for attaching the saw table to the saw body, including removing the throat plate and table pin.
Guide on how to adjust blade tension using the tension knob and gauge for optimal performance.
Instructions for adjusting the blade tracking to keep it centered on the wheel using the tracking knob.
Steps to adjust the table stop bolt to set the saw table's resting position.
Procedure for aligning the saw table perpendicular to the blade using a combination square.
Instructions for adjusting the upper blade guide assembly height relative to the workpiece.
Guide on adjusting blade guides and thrust bearing for proper blade support and alignment.
Steps to adjust lower blade guides and thrust bearing for optimal blade support and contact.
Lists the intended uses and applications of the band saw, such as scroll and relief cutting.
Overview of basic band saw operation, including safety checks and common issues.
Detailed steps for holding the workpiece and feeding it into the blade for safe and effective cutting.
Explains how to perform relief cuts for intricate curves to reduce blade pressure.
Guidance on general scroll cutting techniques, emphasizing workpiece control.
Procedure for safely removing jammed material, including unplugging and securing the switch.
General safety tips for operating the saw, including ensuring stability and proper workpiece support.
Instructions on how to lock the switch using the switch key to prevent accidental startup.
Steps to take before leaving the saw unattended, including turning off and unplugging.
Instructions on how to tilt the saw table for angled cuts using lock and adjustment knobs.
Guide for circle cutting, including adjusting blade guides and using appropriate blade sizes.
Comprehensive guide on installing, tensioning, and tracking a new band saw blade.
Instructions for adjusting the blade guide assembly height relative to the workpiece to prevent blade twisting or breaking.
Advice on keeping the saw clean, removing sawdust, and cleaning pitch from surfaces.
Tips for cleaning the motor and handling electrical components safely during maintenance.
Instructions for cleaning and replacing the band saw tires.
Guidance on maintaining blade guides by filing or replacing them when worn.
States that no further lubrication is required as bearings are pre-lubricated for life.
Details the brush location, function, and how to adjust or replace it.
Motor is making unusual or loud noises, indicating a potential mechanical issue requiring inspection.
Motor output is reduced due to overloaded circuits, undersized wires, or low voltage conditions.
Motor performance is impaired by overload, poor cooling from sawdust, or insufficient air circulation.
Issues with the starting switch, shorted capacitor, or loose electrical connections prevent motor operation.
Motor stops unexpectedly, causing fuses to blow or circuit breakers to trip due to switch or power supply issues.
Fuses or circuit breakers repeatedly trip due to motor overload or inadequate circuit capacity for the tool's load.
Blade tracking is improper, causing it to deviate from the center of the upper wheel, requiring adjustment.
Reduced cutting speed is caused by loose belts, tight cutting radius, dull blades, or motor overloading.
Band saw blades break due to excessive tension, sharp radius cuts, or improper material handling techniques.
Blade sharpness degrades rapidly due to blade guides set too close or cutting unsuitable materials.
Unwanted vibration in the band saw is primarily caused by excessive tension on the motor belt.
Details the terms and conditions for the 3-year limited service warranty applicable to specific RIDGID® power tools.
Outlines the policy allowing customers to return the tool within 90 days for a full refund or exchange if dissatisfied.
Specifies the defects in workmanship and materials covered by the 3-year warranty, excluding normal wear items.
Provides instructions for seeking warranty service, including contacting authorized centers and presenting proof of purchase.
Lists conditions like misuse, abuse, or unauthorized repairs that are excluded from warranty coverage.
Addresses implied warranties and limitations on damages, as permitted by applicable state law.
| Type | Bandsaw |
|---|---|
| Voltage | 120 V |
| Blade Size | 93-1/2 inches |
| Cutting Capacity | 13-3/4 inches |
| Table Tilt | 45 degrees |