Do you have a question about the RIDGID R4516 and is the answer not in the manual?
Emphasizes understanding the operator's manual and tool applications.
Advices preventing body contact with grounded surfaces.
Stresses keeping guards in good working order.
Highlights the importance of a clean work area.
Warns against using tools in damp or wet locations.
Advises keeping children and visitors away from the work area.
Suggests securing the workshop to prevent unauthorized access.
Recommends using the tool at its designed feed rate.
Advises using the correct tool for the job.
Details selecting appropriate extension cords.
Provides guidance on appropriate clothing and accessories.
Stresses wearing safety glasses with side shields.
Recommends securing workpieces for safer operation.
Advises maintaining proper footing and balance.
Guides on tool maintenance for performance and safety.
Emphasizes disconnecting tools before servicing.
Advises ensuring the switch is off before plugging in.
Warns against using unrecommended accessories.
Advises against standing on the tool to prevent injury.
Instructs to check for and repair damaged parts.
Details the correct direction to feed work into the blade.
Emphasizes turning off the tool when unattended.
Recommends wearing a dust mask if operations are dusty.
Suggests wearing hearing protection during extended use.
Advises against yanking cords to disconnect.
Specifies using outdoor-rated extension cords.
Stresses keeping guards and spreaders in place.
Advises keeping blades clean, sharp, and properly set.
Emphasizes securely mounting the saw.
Warns against operating the saw directly on the floor.
Explains kickback and how to avoid it.
Advises using the rip fence for ripping operations.
Recommends supporting large panels to prevent pinching.
Advises removing accessories before moving the saw.
Stresses using safety features for through-sawing.
Advises securely holding work against guides.
Recommends push sticks for narrow stock ripping.
Warns against reaching near the blade while it's rotating.
Notes that the blade continues to spin after power is off.
Warns against using in potentially explosive environments.
Advises inspecting tool cords for damage.
Advises inspecting extension cords for damage.
Explains the importance of grounding tools.
Recommends consulting an electrician for grounding questions.
Specifies using correct electrical devices and cords.
Warns against modifying the provided plug.
Guides on keeping the tool clean.
Emphasizes staying alert and in control while operating.
Advises against using a faulty switch.
Stresses using only correct and properly sized blades.
Advises securing all adjustments before cutting.
Recommends checking the blade path for foreign objects.
Warns against touching moving parts during operation.
Advises against starting the tool with components in contact with work.
Prohibits operation under the influence of substances.
Stresses using identical replacement parts for servicing.
Recommends using only manufacturer-approved accessories.
Advises double-checking all setups before powering on.
Warns against freehand cutting operations.
Advises staying out of the blade's path.
Prohibits reaching near the blade.
Advises moving the rip fence for cross cuts.
Warns against using the rip fence as a cutoff gauge.
Stresses unplugging before freeing a stalled blade.
Advises supporting workpieces properly.
Lists methods to avoid kickbacks.
Instructs on handling damaged power cords.
Warns against awkward hand positions.
Recommends only approved accessories.
Advises ensuring adequate lighting in the work area.
Stresses turning off the saw before unplugging.
Advises using blades within the specified thickness range.
Highlights important tool markings and their meanings.
Advises saving and referring to the instructions.
Indicates a potential personal injury hazard.
Advises reading the manual to reduce injury risk.
Mandates wearing eye protection compliant with ANSI Z87.1.
Warns against keeping hands away from the blade.
Advises against using in damp locations or rain.
Alerts to watch for potential pinching areas.
Explains symbols for Volts, Amperes, Hertz, Watt, Minutes, AC/DC.
Defines symbols for No Load Speed and Class II Construction.
Indicates an imminently hazardous situation leading to death or serious injury.
Indicates a potentially hazardous situation leading to death or serious injury.
Indicates a potentially hazardous situation leading to minor injury.
Indicates a situation that may result in property damage.
Advises professional servicing and using identical parts.
Re-emphasizes wearing safety goggles or glasses.
Details proper selection and use of extension cords.
Discusses tool speed and the importance of shop wiring.
Explains the grounding requirements for safety.
Warns about the risks of improper grounding installation.
Details power supply requirements (120V AC, 60 Hz).
Defines anti-kickback pawls for preventing workpiece kickback.
Defines the shaft mounting the blade.
Explains a cut made at an angle other than 90°.
Defines a cut removing a wedge to angle an edge.
Explains a cut combining miter and bevel angles.
Defines a cut made across the grain or width of the workpiece.
Defines the rotating part with blades on planers/jointers.
Explains a non-through cut for notches or troughs.
Defines a device for controlling workpieces against guides.
Explains units for blade or stroke movement.
Defines a cut without workpiece guidance aids.
Describes sap-based residue that can affect tools.
Defines blade alignment to the fence.
Explains the material removed by a blade cut.
Defines kickback as a workpiece being thrown back.
Defines the first part of the workpiece entering the tool.
Explains a cut made at an angle to the blade.
Defines cuts not extending through the workpiece thickness.
Defines a small hole used as a guide for larger holes.
Defines aids for feeding work over planer cutterheads.
Defines aids for feeding work through a saw blade.
Defines an operation to reduce workpiece thickness.
Describes hardened sap-based residue.
Defines unit for rotational speed.
Defines a cut made along the length of the workpiece.
Defines a metal piece that keeps the kerf open.
Defines the area around the blade.
Defines the outward bend of blade teeth.
Defines depression made by planer blades.
Defines cuts extending completely through the workpiece.
Defines workpiece being thrown back by the blade.
Defines the item being worked on.
Defines the surface where work is performed.
Lists blade arbor, diameter, tilt, and power rating.
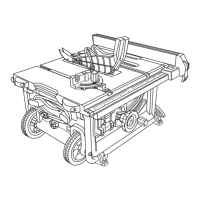
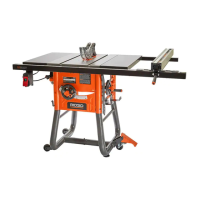
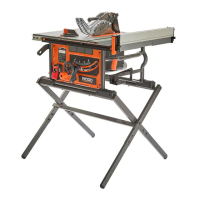
Identifies major parts of the table saw via illustration.
Advises familiarizing with the tool and manual.
Explains the function of anti-kickback pawls.
Describes the lever that locks blade angle settings.
Details the scale for indicating blade angle.
Describes the provided 10-inch, 36-tooth carbide blade.
Warns against using blades rated below tool speed.
Advises keeping the blade guard down for through-sawing.
Explains the handwheel for blade height and angle adjustments.
Describes the miter gauge for aligning wood for cross cuts.
Explains the grooves where the miter gauge rides.
Describes the table extension for supporting long workpieces.
Details the fence for guiding workpieces.
Explains the scale for measuring rip cut distances.
Describes the table extension for wide workpieces.
Explains the function of the spreader/riving knife.
Describes the power switch with a locking feature.
Describes the upper blade projection and table rails.
Details how to turn the saw on, off, and lock it.
Warns against workpiece contact before operating the switch.
Advises ensuring the switch is off before plugging in.
Lists tools required for assembly and alignment.
Provides illustrations of the necessary tools.
Lists all included loose parts with quantities.
Identifies loose parts with labels and illustrations.
Guides on unpacking the saw carefully.
Warns against operating with missing or damaged parts.
Warns against altering the tool or using unrecommended accessories.
Emphasizes securely mounting the saw to a workbench or stand.
Details how to mount the saw using bolt holes.
Provides steps for attaching the handle assembly.
Warns against connecting power before assembly is finished.
Warns against standing near the blade or reaching over it.
Guides on storing saw accessories securely.
Explains how to operate the saw's handle.
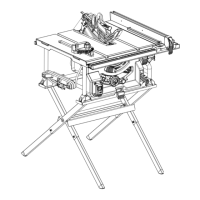
Details how to move the table saw using its wheels.
Provides instructions for removing and reinstalling the throat plate.
Explains how to switch the spreader/riving knife positions.
Details setting the spreader for through cutting operations.
Details setting the riving knife for non-through cutting operations.
Guides on verifying correct blade installation and orientation.
Warns that blade teeth must point down towards the saw front.
Provides steps for loosening the blade nut.
Provides steps for securely tightening the blade nut.
Details the installation of anti-kickback pawls and the blade guard.
Specifies that pawls are for through cuts only.
Guides on installing the anti-kickback pawls.
Provides instructions for installing the blade guard.
Mentions adjusting blade alignment for different widths.
Guides on checking and aligning the spreader/riving knife.
Details how to check the alignment using a square.
Explains how to adjust the spreader/riving knife position.
Warns against becoming careless with tool familiarity.
Re-emphasizes wearing safety glasses with side shields.
Warns against using unrecommended attachments.
Advises operating the saw with the blade guard installed.
Re-emphasizes mounting the saw securely.
Lists the types of cuts the saw is designed for.
Explains basic plug-in and power supply requirements.
Details various actions that can cause kickback.
Lists preventative measures to avoid kickback.
Introduces push sticks and push blocks.
Explains the purpose and use of featherboards.
Warns to place featherboards in front of the blade.
Provides instructions for making a featherboard.
Guides on how to mount a featherboard on the saw.
Lists and illustrates six basic types of cuts.
Stresses using safety features for cuts.
Describes how to perform cross cuts.
Explains how to perform rip cuts.
Describes how to perform miter cuts.
Advises using a push stick for ripping narrow pieces.
Explains bevel cross cuts and bevel rip cuts.
Describes compound miter cuts.
Provides general tips for making cuts.
Warns against using blades rated below tool speed.
Guides on setting the correct blade depth.
Explains how to adjust the blade's bevel angle.
Details how to adjust the bevel indicator's zero point.
Stresses ensuring the rip fence is parallel to the blade.
Guides on setting the rip fence scale indicator.
Explains how to position and lock the rip fence for use.
Describes how to use the miter gauge for angled cuts.
Explains how to use the sliding table extension.
Warns that blade must be square to prevent kickback.
Details how to align the blade parallel to the miter gauge groove.
Guides on checking blade squareness with a combination square.
Explains how to adjust the blade alignment using bolts.
Advises realigning the rip fence after blade adjustments.
General advice on making cuts and blade safety.
Reiteration of warning about using appropriate blade speeds.
Advises using the miter gauge for specific cut types.
Recommends making test cuts on scrap wood.
Step-by-step instructions for performing a cross cut.
Stresses the importance of the blade guard for safety.
Warns against using the rip fence as a cutoff gauge.
Step-by-step instructions for performing a rip cut.
Reiterates safety regarding the blade guard.
Step-by-step instructions for performing a miter cut.
Advises on proper hand placement during miter cuts.
Step-by-step instructions for performing a bevel cross cut.
Reiterates safety regarding the blade guard.
Step-by-step instructions for performing a bevel rip cut.
Warns about rip fence placement to avoid kickback.
Step-by-step instructions for compound miter cuts.
Reiterates safety regarding the blade guard.
Guides on safely cutting large panels.
Warns against making freehand cuts.
Details how to perform a large panel cut.
Step-by-step instructions for non-through cuts.
Alerts to exposed cutter during non-through cuts.
Advises using push blocks/sticks for non-through cuts.
Step-by-step instructions for making a dado cut.
Warns about proper spacer placement when changing blades.
Advises using push aids for dado cuts.
Warns about storing blade washers and throat plates securely.
Stresses unplugging the tool before making adjustments.
Advises checking setups carefully before adjusting.
Step-by-step instructions for replacing the saw blade.
Guides on installing a new standard blade.
Details how to set the blade to 0° and 45° angles.
Guides on adjusting the blade to a perfectly vertical position.
Guides on adjusting the blade to an exact 45° angle.
Explains how to adjust the miter gauge for accurate angles.
Guides on checking and ensuring rip fence parallelism to the blade.
Stresses the importance of rip fence parallelism for safety.
Advises using only identical RIDGID replacement parts.
Recommends wearing safety glasses and dust masks during maintenance.
Stresses unplugging the tool before performing maintenance.
Provides guidance on cleaning plastic parts and the tool.
Warns against using solvents on plastic parts.
Details lubrication points and procedures.
Guides on cleaning the blade guard and blade.
Lists causes and solutions for excess vibration.
Covers problems with the rip fence moving or locking.
Addresses issues where cutting binds or burns wood.
Solves issues with wood moving away from the rip fence.
Solves problems with inaccurate angle cuts.
Addresses issues with the handwheel being stiff.
Lists causes and solutions for the saw not starting.
Solves problems related to poor cut quality from the blade.
Addresses issues with the blade not lowering correctly.
Solves problems with the motor straining during rip cuts.
Details the 3-year limited service warranty.
Explains the 90-day satisfaction guarantee policy.
Specifies what defects are covered by the warranty.
Provides instructions on how to get warranty service.
Lists exclusions from warranty coverage.
States limitations on company warranties.
Details limitations on implied warranties and damages.
| Type | Table Saw |
|---|---|
| Blade Diameter | 10 inches |
| Motor Power | 15 Amps |
| Table Size | 27 inches x 36 inches |
| Weight | 90 lbs |
| Arbor Size | 5/8 inches |
| Maximum RPM | 5000 RPM |
| No-Load Speed | 5000 RPM |
| Max Cutting Depth at 90 Degrees | 3-1/2 inches |
| Max Cutting Depth at 45 Degrees | 2-1/2 inches |
| Cut Depth at 90 degrees | 3-1/2 inches |
| Cut Depth at 45 degrees | 2-1/2 inches |
| Bevel Capacity | 0 to 45 degrees |
| Dust Port Size | 2-1/2 inches |