Do you have a question about the Roadmaster Tracker and is the answer not in the manual?
Do not back up the motorhome with the towed vehicle attached to prevent damage and voiding warranty.
Ensure the towed vehicle is properly equipped for towing (e.g., lube pump, axle disconnect).
Tow bar must be approximately level with the ball hitch to prevent strain and potential detachment.
Steering wheel must be unlocked to prevent tire and equipment damage.
Always use safety cables connecting frame to frame, ensuring proper length and capacity.
Inspect mounts, brackets, bolts, fasteners, wiring, and cables before each tow.
Towed vehicle and contents must not exceed 5,000 lbs. All components must match or exceed this rating.
Tow bar must be secured with linch pins (or padlocks) to prevent detachment.
Tow bar is designed for paved roads only; off-road use is not recommended or warranted.
Never tow a vehicle of comparable weight to avoid jackknifing and severe damage.
Test turning radius with towed vehicle attached to prevent damage.
Never tow more than one vehicle with the tow bar to prevent damage or injury.
Use a two-inch diameter hitch ball; smaller sizes may disengage.
Keep tow bar clean and lubricated for better performance and longevity.
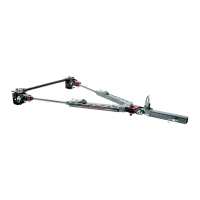
Bolt the crossbar to both ends of the baseplate, torquing bolts to 75 ft./lbs.
Position collars and insert mounting pins through tabs and collars, securing with clevis clips.
Align quick-disconnect parts 'A' and 'B' to the crossbar holes and secure with carriage bolts.
Position safety plates over carriage bolts and secure with lock washer and nut.
Attach 'C' and 'D' to the baseplate with vertical pins pointing up, securing with bolts and washers.
Lower the crossbar over the quick-disconnects to ensure pins fit through holes.
Position quick-disconnects to ensure the tow bar is centered on the front of the vehicle.
Torque crossbar bolts to 75 ft./lbs. and re-test fit to ensure easy sliding.
Insert linch pins through vertical pins and ensure they are properly locked (pin touches ring).
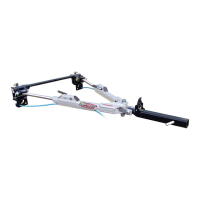
Refer to previous sections for attaching the Tracker to the classic or removable baseplate.
Drive towed vehicle to rear of motorhome, put in park, set brake, and chock wheels.
Lower tow bar to position coupler over hitch ball and engage locking lever.
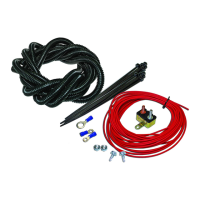
Attach safety cables and plug in the electrical wiring cord per supplier instructions.
Ensure steering is unlocked, transmission is set, brake is released, and wheel chocks removed.
Park on level ground with vehicles aligned to reduce tension for easier disconnection.
Disconnect electrical wiring, safety cables, and other towing system accessories.
Put towed vehicle in park, set emergency brake, and chock wheels before lifting coupler.
Pull the coupler locking lever back to release the coupler from the hitch ball.
Remove linch pins (removable baseplate) or clevis clips/pins (classic baseplate) to detach tow bar.
Safety cables must be rated at 5,000 lbs, matching the tow bar capacity.
Connect safety cables from the towing vehicle frame to the towed vehicle frame.
Ensure sufficient slack at the motorhome to allow for sharp turns.
Cables must not be too short; use extensions if needed to avoid damage.
Cables must not be too long to drag or snag on obstructions.
Cross cables under the hitch receiver to prevent pole vaulting if tow bar separates.
Use both sets of safety cables if required by your mounting kit for maximum safety.
Attach second snap hook to a quick-link at the towed vehicle.
Cross cables under the coupler to prevent the tow bar from hitting the road.
Wind excess cable around tow bar arms to adjust slack, ensuring the last pass is to the inside.
Connect snap hooks to steel loops on the hitch receiver or motorhome frame.
Do not route cables between hitch ball and coupler; use cable guide if needed.
Baseplates with removable arms may use short and long safety cables; follow specific instructions.
Refer to installation instructions for kits containing short safety cables.
Route cables to prevent pinching, fraying, or dragging on the ground.
Do not use damaged cables; replace immediately to prevent failure.
Ensure quick links are fully tightened to prevent safety cable detachment.
Use both long and short safety cables if required by your system.
Use a water-soluble cleaner like Voom RV to break down dirt and grease.
Do not use petroleum products; they attract dirt and can corrode components.
Spray cleaner on tow bar, collars, and pins, moving coupler to work it in.
Clean the coupler interior, removing old grease, dirt, and debris.
Lubricate collars and pins with silicone spray; use wheel bearing grease for coupler socket/clamp.
Clean and lubricate tow bar before storing in a dry, enclosed area.
Follow safe towing practices; ensure ball is inserted, clamp closed, and handle latched.
Open latch handle, place coupler on ball, push handle forward to latch, and secure with padlock.
Lubricate socket/clamp with wheel bearing grease; check for wear; lubricate moving parts monthly.
| Brand | Roadmaster |
|---|---|
| Model | Tracker |
| Category | Automobile Accessories |
| Language | English |