Do you have a question about the Robolink CoDrone EDU and is the answer not in the manual?
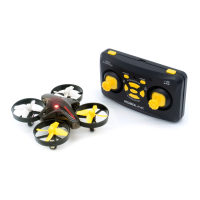
List of parts included with the CoDrone EDU drone.
List of parts included with the Smart Controller.
Includes propeller removal tool, screws, labels, and landing pads.
Ensure a safe flight area, free from obstacles and hazards.
Inspect the drone for damage, correct component placement, and sensor obstruction.
Follow safety rules: no flying over people, walls, or near propellers.
Use stickers to label drones and controllers for identification.
Keep drone and controller firmware updated for optimal performance.
Refer to the full safety guide for comprehensive information on safe drone usage.
Overview of range, color, and optical flow sensors and their functions.
Description of action button, pairing button, and LED light.
Details on the frame, battery slot, and Micro USB port.
Explanation of joysticks, direction pad, and buttons for drone operation.
Information on the LCD screen, antenna, and Micro USB port.
How to power the controller on and off using batteries or USB.
Steps to insert and remove the battery to power the drone on and off.
How the drone and controller signal a low battery status.
Procedure for charging the drone battery using a charger and Micro USB.
Step-by-step guide to pair the drone and controller and verify connection.
Visual cues to distinguish between paired and unpaired drone/controller states.
Commands for takeoff, landing, stopping, and changing flight speed.
Using joysticks for movement, emergency stop, and drone trimming.
Understanding clockwise (cw) and counter-clockwise (ccw) propeller types.
Using red propellers at the front for easy drone orientation.
Instructions for using the tool to remove and replace propellers.
Identifying motor types by wire color and their correct directions.
Common signs of motor problems and how to check for damage.
Guidance on replacing motors, referencing a replacement video.
Addressing drone drift, unresponsiveness, and takeoff failures.
Resolving controller discharging quickly and battery charging problems.
Interpreting blinking red lights, vibrations, and beeping sounds.
Steps to take after a crash, including component checks.
Using Robolink Help for extensive troubleshooting articles and support.
Tips for creating a safe and fun learning environment for drone activities.
Strategies for efficient battery usage and charging to minimize wait times.
Access online lessons to start learning drone programming.
Links for technical questions, help, library functions, and documentation.
The CoDrone EDU is an educational drone designed for learning to code and fly. It comes with a smart controller and various accessories to facilitate a comprehensive learning experience. The drone is equipped with multiple sensors and programmable features, making it suitable for both beginners and advanced users in classroom settings or individual learning.
The CoDrone EDU functions as a programmable drone that can be controlled manually or through code. It is designed to teach fundamental concepts of drone operation, coding, and robotics. The drone features front and bottom range sensors to measure distance to surfaces, front and rear color sensors to detect colors when landed, and an optical flow sensor to estimate its X and Y positions. An action button on the drone allows for programmable actions, while an LED light indicates its different states. The drone's frame protects its propellers and body from impact, ensuring durability during learning.
The smart controller is the primary interface for piloting the drone and connecting it to a computer for coding. It features an LCD screen that displays drone information and settings, and can also be programmed with code. The controller includes a micro USB port for coding and firmware updates, an antenna for best connectivity, and various buttons and joysticks for control. The L1 button changes flight speed and initiates take-off/landing. The H button controls the LCD backlight and triggers the "return home" function. The S button navigates display modes and accesses settings. The P button navigates display modes and initiates pairing. The right joystick controls roll (left/right) and pitch (forward/backward), while the left joystick controls yaw (rotate left/right) and throttle (move up/down). A direction pad on the controller is used for trimming the drone to stabilize it during flight.
Before flying, users are advised to go through an online "Getting Started" course for an in-depth understanding of the manual. The drone is designed for indoor use, as it cannot withstand wind. Users should designate an open area for flight, remove fragile items, and keep hands, fingers, and other objects away from propellers. It's crucial to avoid flying over or at people and walls. Maintaining a visual on the drone is recommended, and the antenna on the controller should be extended and pointed at the drone for optimal signal strength.
The drone and controller come pre-paired. If re-pairing is needed, the drone is put into pairing mode by inserting a battery and holding the pairing button for 3 seconds until its LED flashes yellow. The controller is then put into pairing mode by holding the P button for 3 seconds. A chime and solid lights on both devices indicate successful pairing.
For manual flight, the controller offers various commands. To take off, both joysticks are pushed downward and angled toward the middle, then the left joystick is pushed up. Alternatively, holding L1 for 3 seconds will make the drone take off and hover at about 1 meter. To land, L1 is pressed and held for 3 seconds during flight. The drone's speed can be changed by pressing L1, cycling through 30%, 70%, and 100%. If the drone drifts during flight, the direction pad buttons are used to trim it in the opposite direction of the drift.
The controller is powered by two AA batteries (not included) or via a micro USB cable. To power on, the power button is held for 3 seconds. To power off, it's held for 3 seconds or the USB cable is unplugged. The drone is powered on by inserting the battery with the small tab facing downward. To power off, the battery is firmly pulled out.
The CoDrone EDU supports coding through its controller, which can be connected to a computer via a USB cable. The button on the controller switches between remote control and LINK state for coding. Firmware updates for both the drone and controller are available online.
Proper propeller placement is critical for correct flight. The CoDrone EDU comes with spare propellers, and there are two types. While propeller color does not indicate rotation, red propellers are recommended for the front of the drone for easy identification. Propellers should be replaced if bent, chipped, or cracked, as this affects flight. A propeller removal tool is included for this purpose. The fork-shaped end of the tool is inserted under the propeller hub, and the handle is pushed down to lever off the old propeller. New propellers are pushed onto the motor shaft, ensuring full insertion. After replacement, a quick flight check is recommended.
Motor placement is also important, with two types of motors indicated by wire color (red/blue for clockwise, black/white for counter-clockwise). Motor directions must match propeller directions. If the drone experiences flight issues, motors should be inspected after checking propellers. Signs of motor issues include difficulty rotating, wobbling, or breakages in wiring, often resulting from hard crashes. The drone's bottom chassis can be removed to check for disconnected motors. Replacement motors are sold separately, and a motor replacement video is available for guidance.
Battery maintenance is crucial. The drone battery is rechargeable, and its level can be checked on the controller's LCD screen. A low drone battery will trigger beeping, a flashing red LED, and controller vibration. The controller itself is not rechargeable and uses replaceable AA batteries or an external power source. When charging drone batteries, they should be inserted into the multi-charger with the tab facing the middle, then plugged into a power source (5 Volts, 2 Amps for two batteries) via a micro USB cable. A solid red light indicates charging, and the light turns off when fully charged. Users are cautioned to practice safe battery use, never leave charging batteries unattended, and store them away from extreme heat or cold to extend their lifetime. Damaged or expanded batteries should be discarded safely according to local e-waste guidelines.
Troubleshooting resources are available online for common issues like drone drifting, blinking red lights (indicating un-paired devices), vibrating controller and beeping drone (low battery), and flight issues after a crash. For technical support, users can reach out to Robolink Help.
| Type | Educational Drone |
|---|---|
| Flight Time | 8 minutes |
| Battery | LiPo |
| Programming | Blockly, Python |
| Charging Time | 60 minutes |
| Connectivity | Bluetooth |
| Sensors | Gyroscope |
| LEDs | RGB LED |
| Compatibility | iOS, Android |