15. [CURSOR/VALUE] knapper
Disse knapper bruges til at flytte markøren rundt i displayet for at vælge parametre og
16. [ENTER/SELECT] knap
18. [PERFORMANCE WRITE] knap
Right Front Panel
11
Right Front Panel
14
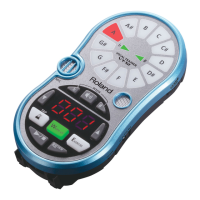
Display
This display shows information related to your operation.
15
Cursor and value buttons
These buttons can be used to move the cursor in the display, to
select parameters and to set values.
16
ENTER/SELECT/DESELECT button
Press this button to conrm your selection or deselection of the
display item where the cursor is.
17
PERFORMANCE LIST button
This button calls up the Performance List (see p. 36).
18
PERFORMANCE WRITE button
The main function of this button is to save Performance settings.
Depending on the selected display page, it can also be used to save
Rhythms, Songs and One Touch.
19
KEY button
This button calls up BK-3’s transposition function. Its settings can
be applied to rhythms, Songs and the 2 real-time parts (UPP, LWR).
If the button indicator doesn’t light, the rhythm, Songs and the 2
real-time parts use their normal pitch.
Pressing and holding this button locks the key (see p. 39).
20
TRACK MUTE/CENTER CANCEL button
This button lets you mute the accompaniment parts of the selected
rhythm, so that only the bass and drum parts are played back. It
also lets you mute the melody part of the selected MIDI File, or
attenuate the vocal part at the center of an audio le (WAV or mp3),
allowing you to sing or play that part yourself.
Pressing and holding this button calls up a display page where you
can select the Standard MIDI File or rhythm part(s) that you don’t
want to hear.
21
METRONOME button
Switches the metronome on/o. If you hold down this button, a
screen will appear in which you can make settings, such as the time
signature and volume of the metronome (see p. 35).
22
USB MEMORY button
Press this button to call up a list of the les stored in the USB
memory connected to BK-3‘s USB MEMORY port.
23
AUDIO REC button
This button is used to start audio recording of your performance.
This function records everything the BK-3 transmits to its
PHONES/OUTPUT sockets (audio signals you play back and audio
versions of the MIDI parts you control). See p. 41.
24
MENU button
This button allows you to open BK-3’s menu page where you can
view and select all available functions.
Press it together with the [EXIT] button to listen to BK-3’s demo
songs.
25
EXIT button
This button is used to return to a higher menu level.
Press and hold it to return to BK-3’s main display page.
26
ONE TOUCH button
This button is used to enable the recall of One Touch memories.
Pressing and holding it calls up a display page where you can edit
and save One Touch memories.
MEMO
Use the TONE buttons [1]~[4] to select or deselect a One Touch memory
(see p. 26).

 Loading...