Do you have a question about the Roland EM-15 OR and is the answer not in the manual?
Functions for creating and simplifying musical arrangements by combining or adjusting style parts.
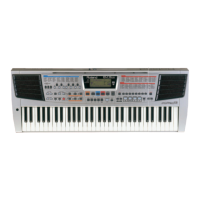
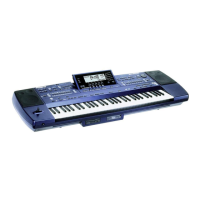
Backlit display showing instrument status with icons for quick information.
Memories to save custom panel settings including style, tone, and tempo.
Includes 226 western and 22 oriental sounds, compatible with General MIDI System Level 1.
Switches the EM-15 OR on and off.
Save and recall tuning settings for ORIENTAL SCALE buttons.
Change the tuning of each note of the scale by a quarter tone.
Set the global volume of the EM-15 OR.
Listen to the EM-15 OR's demo songs.
Adjust volume balance between accompaniment and keyboard parts.
Create new Music Styles by combining parts from two existing styles.
Temporarily change the pitch of melody notes.
Transpose the keyboard pitch by semitones.
Activate or deactivate the metronome.
Engage the recorder function or activate 2nd TRACK for re-recording.
Choose desired orchestration for the selected Music Style.
Accesses musical games for learning basic music concepts.
Selects the Song mode and assigns buttons for recorder operation.
Selects Music Styles and assigns buttons for style division/memory.
Assigns sounds ('Tones') to the selected Keyboard part.
Selects or saves User Programs (custom settings).
Accesses the FUNCTION menu for advanced settings.
Control Music Style divisions or the Recorder playback.
Select tone banks, numeric keypad for sounds/styles/programs.
Adjust tempo, set values, confirm or cancel operations.
Specify how to use the EM-15 OR (drum, organ, arranger, piano modes).
Add harmony voice or second tone to melody playing.
Select preset One Touch memories for automatic settings.
Connect to computers or other MIDI instruments for data exchange.
Connect an optional footswitch for note sustain effect.
Connect the supplied AC adapter for power.
Connect to amplifiers, mixers, or cassette decks.
Connect a second pair of optional stereo headphones.
Steps to play back individual Tone demonstration songs.
Steps to play back individual Style demonstration songs.
Game to identify sounds heard.
Game to identify musical genres played.
Game to learn how to play unfamiliar chords.
Detailed instructions and feedback for the Guess Tone game.
Detailed instructions and feedback for the Guess Style game.
Detailed instructions for playing chords in the Chord Finder game.
How to stop the Arranger playback using START/STOP or ENDING.
Starts Arranger playback automatically when a chord is played.
How to select different accompaniment styles from banks.
Assigning different sounds to the right-hand melody part.
Activates the ORGAN mode for keyboard splitting.
Instructions for playing with separate sounds on each hand.
Starts the drum accompaniment for the current Music Style.
How to activate and use the metronome for practice.
Lowering specific notes by a quarter tone using ORIENTAL SCALE buttons.
Save and recall custom oriental tuning settings to/from Scale Memories.
Hold a note while applying pitch shift.
Briefly press Pitch Shift buttons for pitch alteration.
Return to normal pitch after applying pitch shift.
How to select different drum sets for keyboard playing.
Select a sound for the right-hand melody part.
Selects the recording mode.
Initiates recording using various methods.
Halts the recording process using START/STOP or ENDING.
Playback controls and navigation for recorded songs.
Overdubbing melody or drums onto an existing recording.
Automates tempo, reverb, and tone settings for selected styles.
Assign a different sound to the harmony voice (Upper 2).
Choose a music style to use with the Orchestrator function.
Select the musical complexity level (Drum & Bass, Combo, Big Band).
Select the drum part from the 'other' Style (A or B).
Select the bass part from the 'other' Style (A or B).
Assign a different Style to the 'B' part for morphing.
Play two sounds simultaneously by activating the LAYER function.
Accesses the Tone list to select sounds.
Select a sound using A/B banks and numeric keypad.
Step through available Tone Variations.
Increase Arranger/Song part volume if too low.
Increase Keyboard part volume if solo playing should be louder.
Activate the Transpose function.
Adjust transposition interval using TEMPO buttons.
Switch off the Transpose function.
Navigate playback position within a recorded song.
Record organ music or songs requiring different left/right hand sounds.
Initial recording of parts for ORGAN mode.
Methods to stop recording in various modes.
Overdubbing parts onto an existing recording.
Initial recording of parts for PIANO mode.
Halts recording in PIANO mode.
Overdubbing parts onto an existing PIANO recording.
Initial recording of drum parts using M.Drums.
Halts recording in M.DRUMS mode.
Overdubbing parts onto an existing M.DRUMS recording.
Alternative recording methods in Song mode.
Adjust the tempo for a recorded song.
General steps for accessing and modifying Function menu parameters.
Overview of adjustable parameters like Velocity, Master Tune, Transpose, Metronome.
Adjust the metronome volume level.
Activate/deactivate the digital Reverb effect.
Select the type of Reverb effect (Room, Hall, Plate, Delay).
Activate/deactivate the digital Chorus effect.
Set volume levels for Upper 1, Upper 2, and Lower parts.
Set volume level for the M.Bass part in ORGAN mode.
Set volume parameters for specific Arranger parts.
Shift the octave of Upper 1, Upper 2, or Lower parts up or down.
Memorizes played chords to continue accompaniment.
Change how the Arranger plays bass notes based on chords.
Plays major/minor chords with one/two touches in ORGAN mode.
Memorizes left-hand chords in ORGAN mode.
Enable/disable M.Bass part in ORGAN mode.
Set the keyboard split point for the Arranger mode.
Set the keyboard split point for the ORGAN mode.
Specify which part is muted during Song playback.
Specify pitch change amount for Pitch Shift buttons.
Prevent tempo changes when selecting new Music Styles.
Assign Scale Tune function to Upper or all parts.
Recalls the EM-15 OR's factory Function settings.
Save current settings (except MIDI) to User Program memories.
Exit the User Program mode, returning to normal operation.
Memorizing the current mode (Arranger, Organ, etc.) with User Programs.
Indicates when current settings differ from the saved User Program.
Load settings from a previously saved User Program.
Steps to confirm and select a User Program.
Defines MIDI (Musical Instrument Digital Interface) for music data exchange.
Explains MIDI's role in connecting instruments and computers.
Describes MIDI channel capabilities for controlling multiple instruments.
Parameters within the FUNCTION menu related to MIDI.
Specify which EM-15 OR parts transmit/receive MIDI messages.
Control reception of 'Note-to-Arranger' MIDI data.
Channel for receiving/transmitting program changes for style selection.
Set how the EM-15 OR synchronizes to external MIDI sequencers.
Determine whether Arranger/Recorder send MIDI Clock messages.
Control sending Start/Stop/Continue messages for Arranger/Recorder.
Control sending Song Position Pointer messages.
Establish or remove connection between keyboard/recorder and internal tone generator.
Connect to external devices like cassette decks or amplifiers.
Connect a footswitch to sustain notes after keys are released.
Features for teachers and classroom use.
Disable or enable the Demo function for classroom use.
Prevent the Arranger from starting or stopping.
Disable both Demo and Arranger functions simultaneously.
Restore factory default settings, clearing recorded songs and user programs.
| Number of Keys | 61 |
|---|---|
| Voices/Tones | 128 |
| Effects | Reverb, Chorus |
| Display | LCD |
| Weight | 5.5 kg |
| Speakers | 2 x 12 cm |
| Velocity Sensitivity | Yes |
| Connections | Headphones |
| Power Supply | DC 9V, AC Adaptor |