Assembly
5
Attaching a Strap
You can attach a commercially available taiko strap and play this
instrument.
To attach a strap, wrap it around the tip of the rod as shown in the
illustration (two locations).
Attach the strap to these two locations.
Wrap in a gure-eight, and then tie.
NOTE
If the wrapping is insucient, the strap might be displaced or
disconnected. Fasten it securely to prevent the instrument from
dropping.
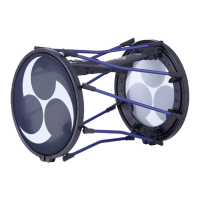
Disassembly
1. Detach the sound module
1-1. Disconnect all connection cables such as the AC
adaptor and trigger cables.
1-2. One by one, pull and detach each rubber ring
that is attached to the rod hooks (four locations),
and detach the sound module.
2. Loosen all bolts for the rods of one pad
2-1. Use the drum key to loosen the
bolts until you can see their
heads.
Do not remove them from the
rods; leave them attached.
Loosen all eight bolts of the rods.
3. Pull the rods out of the pad
3-1. Taking care not to apply excessive force
to the connector section, pull out the rod
perpendicularly from the pad.
4. Disassemble pad 2 in the same way
4-1. Loosen the bolts of the other pad in the same way, and pull out the rods.
Gap
Watch a video that explains TAIKO-1 assembly.
Access the following URL on your
computer or smartphone.
http://roland.cm/taiko_qs
Specifying the pads to use
(Active Pad)
The TAIKO-1 lets you use both pads, but if you want to use only
one pad, you can enable just one pad.
This lets you prevent unintended operation of the lower surface.
1. Press the “MENU”
(F2 button)
.
2. Use the [
H
] [
I
] buttons to select “Trigger,” press the “SELECT”
(F2 button)
.
3. Use the [
H
] [
I
] buttons to select “Active Pad,” press the “SELECT”
(F2 button)
.
4. Use the [
H
] [
I
] buttons to select a pad, and use the [+] [-] buttons to
switch ON / OFF.
Parameter
[
H
] [
I
] button
Value
[+] [–] button
Explanation
PAD1
PAD2
ON Enable the pad.
OFF Disable the pad.
5. Press the “BACK”
(F1 button)
several times to return to the top screen.
Handling caution (about the screws)
Do not touch the screws of the
projections, since doing so might
cause the heads to loosen.
Caution when replacing the head
(do not insert your hand or ngers)
Do not insert your hand or ngers into the area indicated by the
arrow in the illustration. Doing so might cause injury or damage.
Frame
Head
Gap
Gap
The rubber components of the head and rim are consumable
parts whose performance will decline with use over time.
If the head becomes torn, or if the surface of the head sags even
when the head tension is correctly adjusted, replace the head.
If the rubber of the rim is damaged, contact the retailer from
whom you purchased the product, or the nearest Roland Service
Center.
 Loading...