RCP-ME User Guide (v4.0) Functions • 49
• Shift 2
5. In the Val ue field, select an output or input assignment for the shift.
6. Close the Button dialog.
The simulated RCP-ME in DashBoard shows the type of shift and shift page on the selected button. For
example, SRC SH2.
7. Send the current configuration file to the device (see “To send the current configuration to a panel” on
page 74).
Using a Shift Button
When a shift button is enabled, the Shift 1 or Shift 2 value is used for the particular source or destination button
instead of the default value.
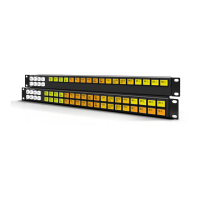
For example, the user has assigned the following button maps for the sources:
Figure 6.1 Example of Button Mapping with Shift Buttons
The user would perform the following to select the source VTR 2:
The user would perform the following to select the source
SAT 3:
Assigning a Panel Lock Button
It may be necessary at times to lock the RCP-ME from access to the front panel. If this function is required, assign
a panel lock button. You can also lock the RCP-ME using the Panel Locked check box on the Configuration tab.
When a panel lock is applied, changes to the RCP-ME can still be made through the Panel Config interface in
DashBoard.
To assign a panel lock button
1. Open the RCP-ME Panel Config interface (see “To open the RCP-ME Panel Config interface” on page 22).
2. On the simulated RCP-ME, select the button that you want to use for the panel lock.
The Button dialog opens.
HD 1 HD 2 HD 3 HD 4 HD 8HD 7HD 5 HD 6
SRC
SH 1
SRC
SH 2
VTR 1 VTR 2 VTR 3 VTR 4 VTR 8VTR 7VTR 5 VTR 6
SRC
SH 1
SRC
SH 2
SAT 1 S AT 2 SAT 3 S AT 4 SAT 8SAT 7SAT 5 SAT 6
SRC
SH 1
SRC
SH 2
Button mapping when Shift 1 is selected
Button mapping when no Shift is selected
Button mapping when Shift 2 is selected
HD 1 HD 2 HD 3 HD 4 HD 8HD 7HD 5 HD 6
SRC
SH 1
SRC
SH 2
VTR 1 VTR 2 VTR 3 VTR 4 VTR 8VTR 7VTR 5 VTR 6
SRC
SH 1
SRC
SH 2
HD 1 HD 2 HD 3 HD 4 HD 8HD 7HD 5 HD 6
SRC
SH 1
SRC
SH 2
SAT 1 S AT 2 SAT 3 S AT 4 SAT 8SAT 7SAT 5 SAT 6
SRC
SH 1
SRC
SH 2
 Loading...