31
Instruction Manual
Instruction Manual
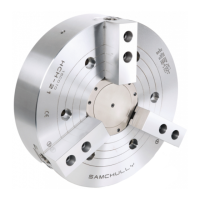
Disassemble and clean the chuck
at least once per 6 months or every
100,000th used (once every two
months for the casting). See if parts
are worn or cracked and replace it if
required. Lubricate the chuck before
reassembling.
척은 적어도 6개월에 1회 또는 10만회 작
동 시 (주물 등의 절삭에는 2개월에 1회 이
상) 분해 청소를 해주십시오. 부품의 마모
나 균열 등이 발생한 부품은 교환하여 주십
시오. 점검 후에 충분히 급유를 하고 조립
하여 주십시오.
For safety, use the lifting belt or eye-
bolt and fix the chuck.
(1) Loosen jaw mounting bolts to
remove the soft jaws and T nut.
(2) Remove the cover.
(3) loosening chuck mounting bolts,
turn the drawscrew with the joint
handle to remove the chuck.
(4) Remove the wedge plunger toward
rear chuck.
(5) Move the master jaws to center
and remove it then toward rear
chuck. Coat recommended grease
before assembling chuck. At this
time, do not mistake the numbers
marked on the body, master jaw
and wedge plunger.
안전을 위하여 리프팅 벨트를 이용하여 충
분히 고정하고 낙하를 방지한 후에 작업해
주십시오.
(1) 죠 체결볼트를 풀어 소프트 죠와
T-너트를 분해 하십시오.
(2) 커버를 분해 하십시오.
(3) 척 체결볼트를 풀고 척 핸들을
사용하여 드로우 너트를 회전 시켜
척을 분해 하십시오.
(4) 웨지플런져를 척 뒷방향으로 분해
하십시오.
(5) 마스터 죠를 바디 중심쪽으로 이동
시킨후 뒤로 빼냅니다. 조립은
그리스를 충분히 도포하여 분해의
역순으로 해주십시오. 이때 몸체와
마스터 죠, 웨지 플런져의 번호가
틀리지 않게 주의하십시오.
5-2 분해순서
5-2 Disassembling steps
CAUTION
CAUTION
주의
CAUTION
注意