CAUTION!
If you intend carrying out mainten
-
ance work on the valve, first depres
-
surize the relevant plant section and,
depending on the process medium,
drain it as well. Let the plant section
cool down to reach ambient tempe
-
rature, if high temperatures prevail.
Prior to starting any work, discon
-
nect the electric or pneumatic control
signal for the actuator. On pneuma
-
tic actuators, additionally remove the
signal pressure line.
As the process medium cannot drain
completely out of the valve, be awa-
re that some of the process medium
could still be trapped in the valve.
We recommend that you remove the
valve from the pipeline.
Note:
The tightening torques and special tools re-
quired for installing and removing the seat
are listed in the table on page 20.
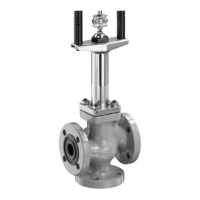
NOTICE
Prior to carrying out any repairs, always
separate the actuator from the valve by re
-
moving screws on the stem connector (7)
and undoing the nut (9). Then lift the actua
-
tor off the valve (see Fig. 2).
EB 8135/8136 EN 9
Maintenance–replacing parts
 Loading...