EasyManua.ls Logo

Samsung QB65H - User Manual

Samsung QB65H
2 pages
Print Icon
To Next Page IconTo Next Page
Loading...
Quick Setup Guide
Recommended hours of use per day of this product is under 16 hours. If the product is used for longer than
16 hours a day, the warranty may be void.
The colour and the appearance may differ depending on the product, and the specifications are subject
to change without prior notice to improve the performance.
Download the user manual from the website for further details.
http://www.samsung.com/displaysolutions
QB65H QB75H
BN68-07849G-00
The terms HDMI and HDMI High-Definition Multimedia Interface,
and the HDMI Logo are trademarks or registered trademarks of
HDMI Licensing LLC in the United States and other countries.
Reverse Side
1 Connect to a USB memory device.
The USB ports on the product accept a maximum constant
current of 1.0A. If the maximum value is exceeded, USB ports
may not work.
2 Connects to MDC using a LAN cable.
3 Connects to MDC using an RS232C adapter.
4
DVI: Connects to a source device using a DVI cable or HDMI-DVI cable.
MAGICINFO IN: To use MagicInfo, make sure to connect the
DP-DVI cable.
5 Connects to a source device using a HDMI cable or HDMI-DVI
cable.
6 Connects to a PC using a DP cable.
7 Connect to a USB memory device.
The USB ports on the product accept a maximum constant
current of 0.5A. If the maximum value is exceeded, USB ports
may not work.
8 Receives sound from a PC via an audio cable.
9 Connects to the audio of a source device.
0 Supplies power to the external sensor board or receives the light
sensor signal.
! Connects to MDC using an RS232C adapter.
Issues Solutions
The screen keeps
switching on and off.
Check the cable connection between
the product and PC, and ensure the
connection is secure.
No Signal is displayed
on the screen.
Check that the product is connected
correctly with a cable.
Check that the device connected to the
product is powered on.
Depending on the type of external device,
the screen may not display properly. In
this case, connect it with the HDMI Hot
Plug function turned On.
Not Optimum Mode is
displayed.
This message is displayed when a
signal from the graphics card exceeds
the product’s maximum resolution and
frequency.
Refer to the Standard Signal Mode Table
and set the maximum resolution and
frequency according to the product
specifications.
The images on the
screen look distorted.
Check the cable connection to the
product.
The screen appears
unstable and shaky.
Check that the resolution and frequency
of the PC and graphics card are set within
a range compatible with the product.
Then, change the screen settings if
required by referring to the Additional
Information on the product menu and the
Standard Signal Mode Table.
There are shadows or
ghost images left on
the screen.
Issues Solutions
There is no image on
the screen and the
power LED blinks
every 0.5 to 1 second.
The product is in power-saving mode.
Press any key on the keyboard or move the
mouse to return to the previous screen.
Picture quality of the
product is different
from the dealer
shop where it was
purchased.
Use an HDMI cable to obtain high-
definition (HD) picture quality.
The remote control
does not work.
Make sure that the batteries are correctly
in place (+/-).
Check if the batteries are flat.
Check for power failure.
Make sure that the power cord is connected.
Check for any special lighting or neon
signs switched on in the vicinity.
A beeping sound is
heard when my PC is
booting.
If a beeping sound is heard when your PC
is booting, have your PC serviced.
When I try to change
the PC resolution, a
message The
defined resolution
is not supported.
appears.
The message The defined resolution
is not supported. appears if the input
source resolution exceeds the maximum
resolution of the display.
To resolve the issue, change the PC
resolution to a resolution supported on
the display.
Troubleshooting Guide
Checking the Components
Control Panel
Contact the vendor where you purchased the product if any
components are missing.
The pictures may look different from the actual components.
1 Spacer logo
Do not pull on the spacer logo using force. The logo may tear or break off.
2 Remote sensor
Press a button on the remote control pointing at the bottom of the
product face to perform the function. The remote control sensor is
located on the bottom of the product.
- Using other display devices in the same space as the remote
control of this product can cause the other display devices to be
inadvertently controlled.
3 Panel Key
4 Power on the product. If you press the button when the product
is turned on, the control menu will be displayed.
-
To exit the OSD menu, press and hold the panel key for at least one second.
5
Move to the upper or lower menu. You can also adjust the value of an option.
6 Move to the left or right menu.
Quick Setup Guide
Warranty card
(Not available in some
locations)
MagicInfo Software
DVD
Power cord
Batteries
(Not available in some
locations)
Remote Control
RS232C(IN) adapter
HOLDER-CABLE
(3 EA)
QB65H
QB75H
Speaker
Speaker
QBH_INDIA_QSG_BN68-07849G-00.indd 1 2017-10-13 오후 5:51:01
Question and Answer IconNeed help?

Do you have a question about the Samsung QB65H and is the answer not in the manual?

Summary

Quick Setup Guide

Checking the Components

Lists the items included in the product package and advises contacting the vendor if any are missing.

Control Panel Overview

Details the function of each button on the product's control panel, including power and navigation.

Troubleshooting Common Issues

Provides solutions for common display problems like screen flickering, no signal, and distorted images.

Connection Guides

Connecting to a PC

Illustrates how to connect the display to a personal computer using various ports like HDMI and DP.

Connecting to an Audio System

Shows how to connect an audio system to the display using the AUDIO OUT port.

Connecting to MDC

Explains how to connect the display to MDC (Multi-Device Control) using LAN or RS232C cables.

Connecting to a Video Device

Guides on connecting external video devices via HDMI or DVI ports.

Product Specifications

Model and Size Details

Details the model names (QB65H, QB75H) and their physical screen sizes.

Power Supply Requirements

Specifies the AC voltage and frequency requirements for the product.

Operating and Storage Conditions

Outlines the recommended temperature and humidity ranges for operation and storage.

Safety and Compliance

Important Safety Instructions

Provides critical safety warnings regarding electric shock, ventilation, and product placement.

Environmental Precautions

Includes warnings about potential radio interference and RoHS compliance.

Waste Disposal Guidelines

Advises on the responsible disposal and recycling of electronic accessories and the product.

Overview

This document provides a comprehensive guide for the setup, usage, and troubleshooting of the Samsung QB65H and QB75H display models. It covers everything from initial component checks and control panel functions to various connection methods and important safety information.

Component Check and Control Panel

Upon unboxing, users should first verify all components against the provided list. The package typically includes the Quick Setup Guide, a power cord, a remote control with batteries (though batteries may not be included in all regions), an RS232C(IN) adapter, and three HOLDER-CABLE units. For the QB75H model, a MagicInfo Software DVD is also provided. If any components are missing, users are advised to contact their vendor.

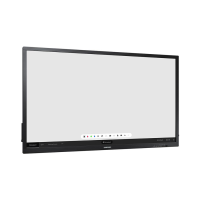
The display features a user-friendly control panel and remote control for easy operation. The control panel includes a "Spacer logo" which should not be pulled with force to avoid damage. The remote sensor, located at the bottom of the product face, receives signals from the remote control. It's important to note that using other display devices in the same space might inadvertently control this product. The panel key, when pressed while the product is on, displays the control menu. To exit this menu, the panel key must be pressed and held for at least one second. Navigation through menus and adjustment of option values are done using the upper/lower and left/right keys.

Connectivity Options

The display offers a wide range of connectivity options to accommodate various devices and setups.

Connecting to a PC: For PC connections, the display supports HDMI IN 1 (ARC) and HDMI IN 2, DP IN, DVI/MAGICINFO IN, and DVI/HDMI/AUDIO IN.

  • HDMI: Connects to a PC using an HDMI cable.
  • DP IN: Connects to a PC using a DisplayPort cable.
  • DVI/MAGICINFO IN: Connects to a source device using a DVI cable or HDMI-DVI cable. For MagicInfo functionality, a DP-DVI cable connection is required.
  • DVI/HDMI/AUDIO IN: Receives sound from a PC via an audio cable.

Connecting to an Audio System: An AUDIO OUT port is available for connecting to an external audio system, allowing users to output sound from the display to speakers or other audio devices.

Connecting to MDC (Multi Display Control): The display can be integrated into a Multi Display Control system, offering centralized management.

  • RS232C: Connects to MDC using an RS232C adapter. The display has both RS232C IN and RS232C OUT ports, enabling daisy-chaining for multiple displays.
  • LAN (RJ45): Connects to MDC using a LAN cable. The RJ45 port also supports a HUB for network connectivity. For detailed instructions on using the MDC program, users can refer to the help section after installation, or access the program from the Samsung website.

Connecting to a Video Device: Similar to PC connections, video devices can be connected via HDMI IN 1 (ARC), HDMI IN 2, and DVI/HDMI/AUDIO IN. This versatility ensures compatibility with a broad spectrum of media players, set-top boxes, and other video sources.

Usage Features

The display is designed for continuous operation, with a recommended daily usage of under 16 hours to maintain warranty validity. Exceeding this limit may void the warranty. The product's color and appearance may vary, and specifications are subject to change for performance improvements. Users are encouraged to download the full user manual from the Samsung website for comprehensive details.

The display supports HDMI High-Definition Multimedia Interface, with the HDMI Logo being a registered trademark of HDMI Licensing LLC. It also features DOLBY AUDIO™ for enhanced sound quality and HEVCAdvance™ technology, covered by patents, for efficient video compression.

Troubleshooting Guide

A dedicated troubleshooting section helps users resolve common issues.

Screen keeps switching on and off:

  • Check the cable connection between the product and the PC to ensure it is secure.

No Signal is displayed on the screen:

  • Verify that the product is correctly connected with a cable.
  • Ensure the connected device is powered on.
  • If the screen does not display properly with certain external devices, try enabling the HDMI Hot Plug function.

"Not Optimum Mode" message:

  • This indicates that the signal from the graphics card exceeds the product's maximum resolution and frequency.
  • Refer to the Standard Signal Mode Table in the user manual and adjust the resolution and frequency accordingly.

Distorted, unstable, or shaky images:

  • Check the cable connection to the product.
  • Ensure the PC's resolution and frequency are within the product's compatible range. Adjust screen settings if necessary, referring to the Additional Information in the product menu and the Standard Signal Mode Table.

Shadows or ghost images:

  • This can also be addressed by checking cable connections and adjusting PC resolution and frequency.

No image and power LED blinks (0.5-1 second interval):

  • The product is in power-saving mode. Press any key on the keyboard or move the mouse to return to the previous screen.

Poor picture quality compared to the dealer shop:

  • Use an HDMI cable to achieve high-definition (HD) picture quality.

Remote control not working:

  • Ensure batteries are correctly inserted (+/-).
  • Check if batteries are flat.
  • Verify power supply and cord connection.
  • Check for any special lighting or neon signs in the vicinity that might interfere with the remote signal.

Beeping sound during PC boot:

  • If a beeping sound is heard, the PC may require servicing.

"The defined resolution is not supported" message:

  • This appears if the input source resolution exceeds the display's maximum resolution. Change the PC resolution to a supported one.

Maintenance and Safety

The manual emphasizes important safety instructions to ensure safe operation and longevity of the device.

Electrical Safety:

  • CAUTION: Risk of electric shock. Do not remove the cover or back. There are no user-serviceable parts inside. Refer all servicing to qualified personnel.
  • High voltage is present inside the device, so avoid contact with internal parts.
  • The product includes important literature concerning operation and maintenance.
  • If using an AC adapter, only use the one provided by Samsung and do not use the power cord with other products.
  • The apparatus must be connected to an earthed MAINS socket-outlet (Class I Equipment only).
  • To disconnect the apparatus from the mains, the plug must be pulled out from the mains socket, which should be readily operable.
  • The unit remains connected to the AC wall outlet even when turned off by power.

Installation and Environment:

  • Do not install the equipment in a confined space.
  • Ensure proper ventilation by not blocking the slots and openings in the cabinet.
  • Locate the product away from heat sources like radiators or heat registers.
  • Do not place water-containing vessels (vases, etc.) on the apparatus to prevent fire or electric shock. The apparatus should not be exposed to dripping or splashing.

RoHS Compliance and Recycling:

  • This product is RoHS compliant.
  • The marking on the product indicates that it and its electronic accessories should not be disposed of with other household waste at the end of their working life.
  • To prevent harm to the environment and human health from uncontrolled waste disposal, separate these items from other waste types and recycle them responsibly to promote sustainable reuse of material resources.
  • For more information on safe disposal and recycling, visit www.samsung.com/in or contact Samsung's helpline numbers.

For any questions or comments, users can contact the SAMSUNG customer care center via the provided telephone numbers or website.

Samsung QB65H Specifications

General IconGeneral
Panel life- h
Color gamut72 %
Pixel pitch0.105 x 0.315 mm
Response time8 ms
Display diagonal65 \
Display brightness300 cd/m²
Display technologyLED
Vertical scan range48 - 75 Hz
Horizontal scan range30 - 81 kHz
LED backlighting typeEdge-LED BLU
Contrast ratio (typical)4000:1
Display number of colors-
Display diagonal (metric)163 cm
Active display area (W x H)1428.48 x 803.52 mm
Dynamic contrast ratio marketing nameMega Contrast
L2 cache2000 KB
Bezel width12.2 mm
User memory4.12 GB
Memory clock speed1600 MHz
Temperature indicatorYes
Video compression formatsAVC, AVS, H.263, H.264, HEVC, MPEG, MPEG1, MPEG2, MPEG4, VC-1, VP8, VP9
AC input voltage100 - 240 V
AC input frequency50 - 60 Hz
Power consumption (off)0 W
Power consumption (standby)0.5 W
Power consumption (typical)122 W
RMS rated power20 W
Number of built-in speakers2
Product colorBlack
Product designDigital signage flat panel
Placement supportedIndoor
Panel mounting interface400 x 400 mm
PurposeUniversal
Operating hours (hours/days)16/7
VGA (D-Sub) input ports0
Ethernet LAN (RJ-45) ports1
Operating temperature (T-T)0 - 40 °C
Operating relative humidity (H-H)10 - 80 %
Package depth212 mm
Package width1571 mm
Package height956 mm
Package weight32400 g
Internal memory3 GB
Processor cores4
Processor modelA72
Processor familyARM Cortex
Processor frequency1.7 GHz
Audio formats supportedMP3
Internal storage capacity8 GB
Operating system installedTizen 3.0
Certification60950-1, EMC A
Cables includedAC
Weight and Dimensions IconWeight and Dimensions
Depth37.6 mm
Width1456.1 mm
Height835.6 mm
Weight22800 g

Related product manuals