81
S4179544
81
S4179544
11
11
1
AS
33
33
3
X
00
00
0
C
22
22
2
S
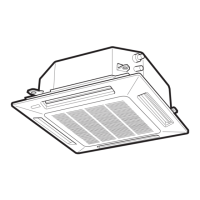
■ 4-Way Air Discharge Semi-Concealed Type
(X Type)
Never touch or attempt to
move the air-direction louver
by hand or you may damage
the unit. Instead, use the
remote controller unit if you
want to change the direction
of air flow.
10-6. Before Installing the Ceiling Panel
(1) Remove the air-intake grille and air filter from the
ceiling panel. (Figs. 10-8 and 10-9)
(a) Remove the 2 screws on the latch of the
air-intake grille. (Fig. 10-8)
(b) Press on the 2 latches of the air-intake grille
with your thumb in the direction of the arrow
to open the grille. (Fig. 10-8)
(c) With the air-intake grille open about 45˚,
remove the safety string (hook on the grille
side). (Fig. 10-9)
(d) Pull the air-intake grille towards you to
remove it from the ceiling panel.
(2) Pull down the two panel catches on the body of
the indoor unit. (Fig. 10-10)
Fig. 10-8
Fig. 10-9
Safety string
Air filter
0150_X_I
45°
CAUTION
a
Ceiling panel
Air intake grille
Latch
0149_X_I
Screw
Air-intake grille
 Loading...