– 22 –
3-13. Firmware uploading procedure
1. Uploading the firmware should be carried out if the version
number (COMPL PWB XX-X) on the replacement circuit
board is lower than the version of the distributed firmware.
For XX-X, enter the name of the circuit board containing the
firmware.
2. The firmware is distributed by e-mail in self-extracting archive
format. Change the extension of the distributed file to .EXE
and save it in your preferred folder.
3. When you double-click the saved file, the firmware (binary
file) will be saved in the same folder.
4. The firmware must not be distributed without permission.
1. Overwriting firmware from the SD card
Preparation:
SD card: SD card with firmware rewritten into the root direc-
tory
Data: S411Nxxx.BIN (xxx: version)
Overwriting method:
1. Insert the above SD card.
2. Turn on the camera.
3. Set the NORMAL mode.
4. Press the MENU button.
5. Choose the OPTION MENU 3.
6. Choose the FORMAT.
7. Toggle the arrow button to the left for 2 seconds.
FIRMWARE UPDATE will display.
8. Choose YES.
9. Press the SET button. Update is starting.
Note:
Do not turn off the camera’s power or remove the SD card
while the firmware is being updated.
The power will turn off after the update is complete.
2. Overwriting firmware from the calibration software
Preparation:
PC with overwriting firmware copied to the preferred folder in
the HD.
Data: S411Nxxx.BIN (xxx: version)
Overwriting method:
1. Connect the camera’s USB/AV terminal to the computer’
USB connector.
2. The USB Connection screen appears on the camera’s LCD
monitor. Choose the “COMPUTER”, and press the SET
button. Next, choose the “CARD READER”, and press the
SET button.
3. Double-click on the DscCalDi.exe.
4. Click the Firmware.
5. Choose the fimware file to use for overwriting, and click
the Yes.
6. Update is starting. The message will appear, and choose
OK.
7. After the update is complete, disconnect the USB cable
and turn the camera’s power off.
Note:
Do not turn off the camera’s power while the firmware is be-
ing updated.
3-9. Factory Code Setting
1. Check the "Factory Code" display within the Setting group.
2. For U.S.A., Canada and NTSC general area
If "FC_SANYO_U" does not appear, click on the " " mark
located on the right of the "Factory Code" display BOX and
select "FC_SANYO_U".
3. For Europe and PAL general area
If "FC_SANYO_EX" does not appear, click on the " " mark
located on the right of the "Factory Code" display BOX and
select "FC_SANYO_EX".
3-10. Language Setting
1. Click on the " " mark located on the right of the
"Language" display BOX.
2. Select language. (Default is English.)
3. End "DscCal" and remove the camera before turning the
camera power OFF.
3-11. Reset Setting
Carry out reset settings after replacing CP1 board.
1. Turn on the camera.
2. Set the NORMAL mode, and press the MENU button.
3. Choose the OPTION MENU 3.
4. Choose the RESET SETTINGS, and press the SET button.
5. Select YES, and press the SET button.
3-12. The Compulsive boot starting method
1. Keep SHUTTER button, and the power button depressed
while switching on the power.
2. Connect the camera and the computer with USB cable.
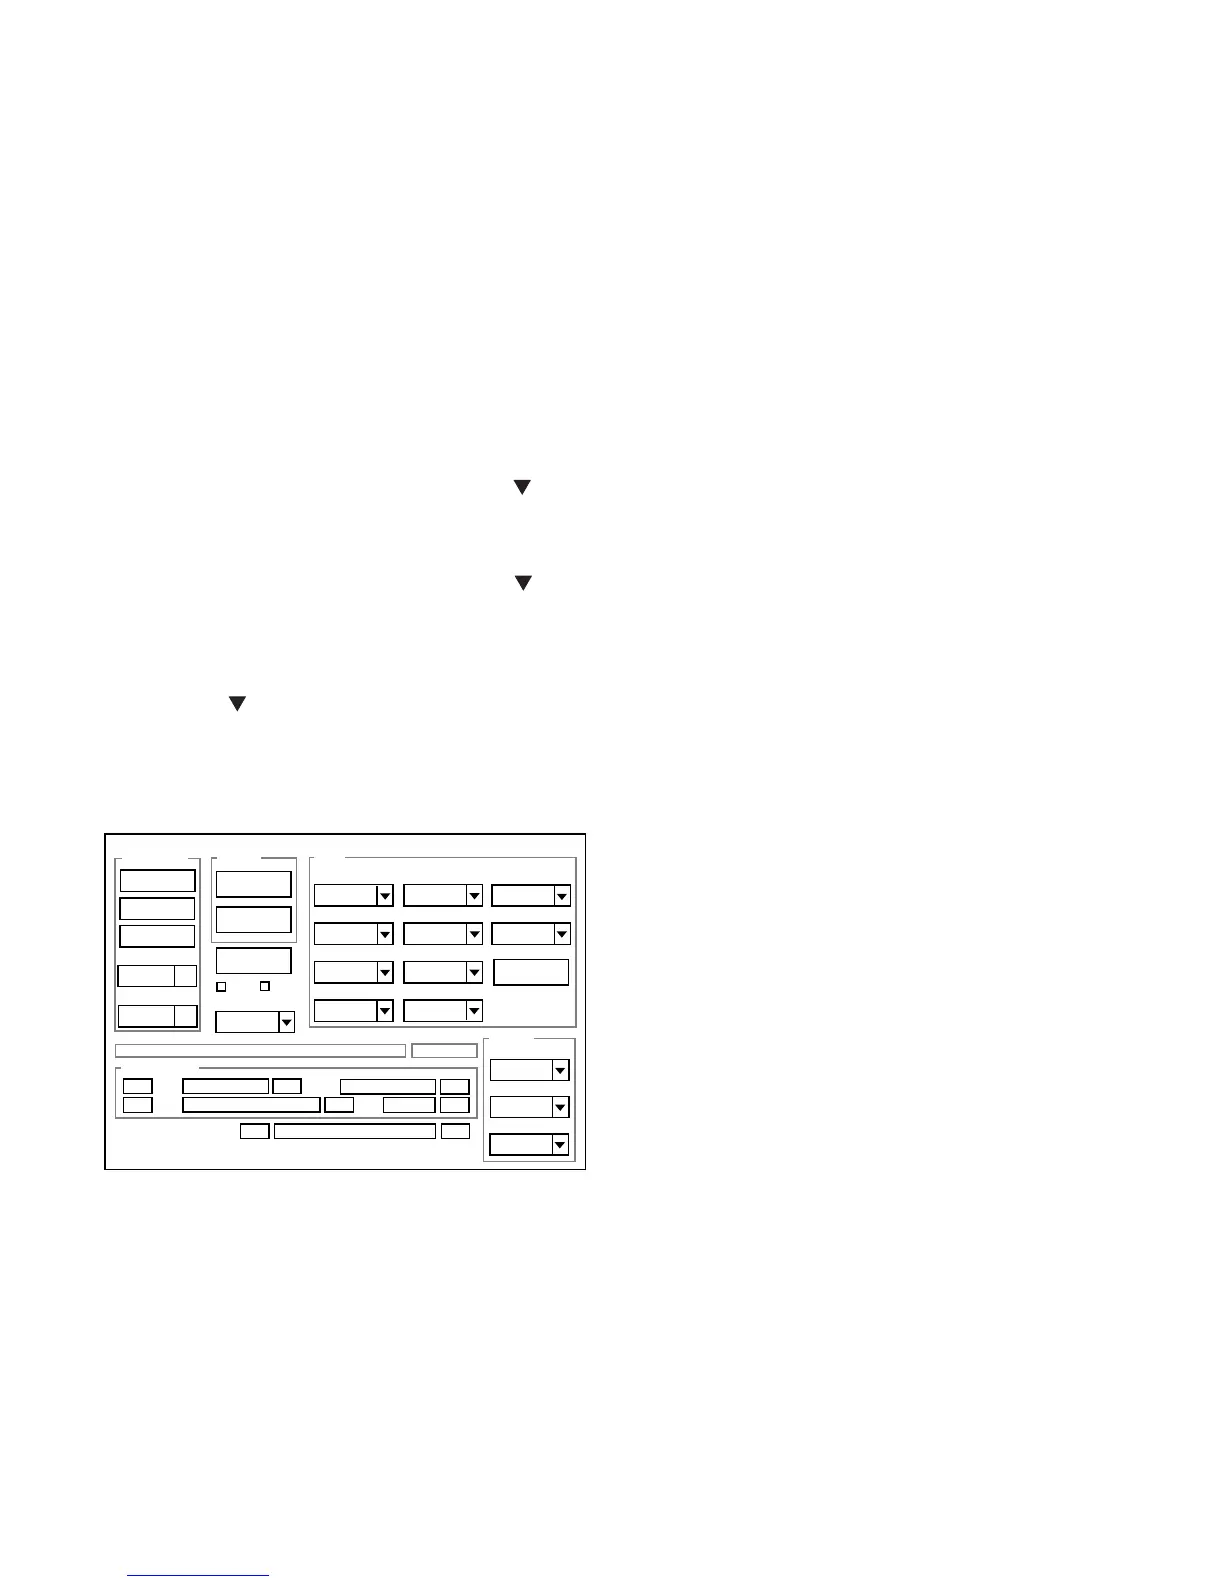
Firmware
QrCode
AWB
Focus
UV Matrix
R Bright
RGB Offset
Tint
B Bright
Gain
Phase
LCD
Calibration
Upload
Initialize
LCD Type
H AFC Test
VCOMDC
VCOMPP
Cal Data
Cal Mode
OK
OK
EVF
USB storage
Get
Set
VID
Set
PID
Set
Serial
Set
Rev.
Set
Setting
Language
Video Mode
VCO
Factory Code
Hall Cal.
Backrush pulse :
Set
Get
2. Double-click on the DscCalDi.exe.
3. Input “241” to the “CalMode”, and click the OK.
4. Adjustment value will appear on the screen.
5. Click the OK.
LED light AWB adjustment value determination is effectuated
using the “LCHECK" value. If
LCHECK = lwc0, lwc1, lwc2
the adjustment values fulfill the conditions below, they are
determined as within specifications.
Adjustment value determination
lwc0=128 ± 10, lwc1=128 ± 10, lwc2=130 ± 60
 Loading...