Contents Warnings and Safety Instructions
Contents 2
Warning and Safety Instructions 2
General View of the Equipment 3
Installation 5
Storage and Shipping Conditions 5
Incoming Inspection 5
Equipment Supplied 5
Installation Instructions 5
Connecting the Weigh Cell
to the Electronics Unit 5
Connecting the Device to AC Power 6
Securing the Weigh Cell 7
Leveling the Load Receptor 7
Securing the Transducer 7
Operation 9
Notes on Analytical Weighing 9
Below-Cell Weighing 10
Configuration 13
Parameter Settings (Overview) 16
Data Interface Port: RS-232 24
Pin Assignment Chart 26
Cabling Diagram 27
Error Codes 28
Overview 30
Specifications 30
Dimensions (Scale Drawings) 31
Accessories (Options) 36
EC/EU Declaration of Conformity 37
Form: Returns 38
Decontamination Declaration 39
Intended Use
Weigh cells have been developed for
– Use in measuring devices and
production machinery
– High-precision weighing within limited
space
– Precise weight determination on active
production lines
! The weigh cells are not devices; they are
modules to be added on. Only create an
EC Declaration of Conformity once the
device has been finalized. Direct sale to
end customers is not permitted due to
the lack of a CE marking.
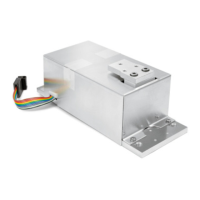
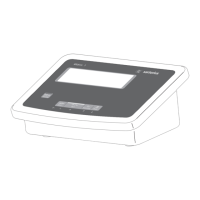
System Description
The products are comprised of two
components:
– A compact weigh cell that must be
secured at three points
– Electronics unit
– These compact weigh cells can be used
to determine weights within restricted
space.
Safety
§ The user of the weigh cell should take
into account at least the following
points with regards to the complete
product with the installed weigh cell:
– Compliance with directives and
standards for electrical equipment
– Electromagnetic compatibility of the
complete device
– Compliance with mandatory safety
regulations.
§ Read these installation instructions
thoroughly before using your weigh
cell. That way you will prevent damage
to the equipment.
§ These installation instructions only
describe the technological specifications
of the weigh cell and the conditions
that must be observed during
installation.
! Always make sure that the equipment
is disconnected from power before
performing any work on it.
Installation
! Do not use this equipment in hazardous
areas, zones exposed to explosive
gases or dusts, nor areas exposed to
potentially explosive materials.
! Use of the weigh cell in areas where
medical equipment is operated is not
permitted.
! Do not mix up weigh cell and
electronics unit:
Only connect devices that are made to
be operated together. Make sure that
the serial numbers match.
! Any improper handling, modifications
or installation work will result in
forfeiture of all claims under the
warranty.
! The requirements pertaining to
applicable installation regulations
must be followed when using
electrical equipment in systems
and environmental conditions with
increased safety requirements.
! Installation of electronics unit:
The electronics must be installed
as set out in the guideline for
EMC compatibility.
– Warning: RS-232 cables purchased from
other manufacturers: RS-232 cables
purchased from other manufacturers
often have incorrect pin assignments
for use with Sartorius equipment.
Be sure to check the pin assignments
against the chart in this manual before
connecting the cable, and disconnect
any lines identified differently from
those specified by Sartorius.
– Note on Installation:
The operator shall be responsible for
any modifications to the equipment
and for any connections of cables or
equipment not supplied by Sartorius
and must check and, if necessary,
correct these modifications and
connections.
$ If there is visible damage to the
components: Disconnect from the
supply voltage and replace the weigh
cell and electronics unit:
$ Do not unnecessarily expose the device
to aggressive chemical vapors or to
extreme temperatures, moisture, shocks,
or vibration.
$ If you have any problems with your
device:
contact your local Sartorius office,
dealer or service center.
Hotline
§ Please direct technical questions on
design, specifications and installation
to your operating partner or directly
to Sartorius:
www.sartorius.com
2

 Loading...