ww w.scheppach.com
GB
|
25
• Adjust the workpiece supports (8) periodically to
compensate for wear on the dry grinding wheel.
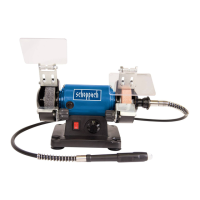
Changing the grinding wheel (Figs. 1/7-9)
Loosen the 3 fastening screws (12) for side cover (12)
holding the grinding wheel side cover (13), turn an-
ti-clockwise and take it o (Fig. 7). Slacken the nut
(Fig. 8/A) (important: the grinding/ sanding wheel is
fastened with a lefthanded thread) by holding the nut
(Fig. 9/A) of the grinding/sanding belt roller on the op-
posite side.
Then remove the ange (B) and replace the grinding
wheel (6). The grinding wheel is mounted with the help
of a rag. Mount the ange (B) on the shaft and screw on
the nut (A) hand-tight (Fig. 8).
To tighten the nut (A), hold the grinding wheel (6) with a
rag and tighten the nut (A) (Fig. 8).
Changing the grinding/sanding belt (Fig. 1/10-12)
• Loosen the fastening screw for side cover (12) and
remove the side cover (13).
• Slacken the clamp screw for the top belt roller (11)
by a few turns.
• Push the top belt roller downwards and pull the
grinding/sanding belt out o the rollers.
• Place the new grinding/sanding belt (9) in the center
of the top and bottom rollers and release the clamp-
ing top belt roller.
• Now tighten the clamp screw for the top belt roller
(11) and t the side safety guard.
• With the belt guidance adjustment screw (10) on the
side you can adjust the belt run by turning. Precise
adjustment of the belt run is best done by turning the
grinding/sanding belt by hand.
•
m Attention!
After replacing the grinding wheel or sanding belt, all
guards must be reassembled.
8. Operation
On/O switch (16)
• To switch on the equipment set the On/O switch
(16) to position 1.
• Move the On/O switch (16) to position 0 to switch
o the equipment. After switching on, wait for the
equipment to reach its maximum speed of rotation.
Only then should you begin with the grinding.
7. Before operation
Before you connect the equipment to the mains supply
make sure that the data on the rating plate are identical
to the mains data.
Always pull the power plug before making adjust-
ments to the equipment.
• The machine must be set up so that it stands rmly,
i.e. it must be securely screwed to a work bench or
similar.
• The grinder should be xed permanently at a suit-
able place. To attach the grinder to a hard and at
surface, there are two mounting points on the grind-
er. The tool support should be approximately at the
height of your elbow. The working area is in front of
the machine - keep it free of obstacles.
• All covers and safety devices have to be properly
tted before the equipment is switched on.
• It must be possible for the grinding wheel to run
freely.
Assembling the spark deector (Fig. 1-3)
• Slide the spark deector (2) under the guard hood (5).
Screw the spark deector (2) to the guard hood (5) by
using the spark deector adjustment screw (3).
• Use the spark deector adjustment screw (3) with the
spring washer and the washer to x the spark deec-
tor (2). To secure you will need a screwdriver (Fig. 2).
• Adjust the spark deector (2) using the spark deec-
tor adjusting screw (3) so that the distance between
the dry grinding wheel (6) and the spark deector
(2) is as small as possible and certainly does not
exceed 2 mm. (Fig.3)
• Adjust the spark deector (2) periodically to com-
pensate for wear on the wheel.
Fitting the workpiece supports (Fig. 1/4/5/6)
• Secure the workpiece supports (8) to the grinder/
sander using the workpiece support star screw (7)
on belt side and the 2 fastening screws for work-
piece support (18) on grinding wheel (5) side.
Adjusting the workpiece supports (Fig. 5+6)
• Adjust the workpiece supports (8) using the fasten-
ing screws for workpiece support (18) and the work-
piece support star screw (7)so that the distance
between the dry grinding wheel (6) or the grinding/
sanding belt (9) and the workpiece supports (8) is
as small as possible and certainly does not exceed
2 mm.
 Loading...