www.scheppach.com
24
|
GB
• Remove the grinding/sanding belt (6) to the rear.
• Mount and the new grinding/sanding belt in reverse
order. Important. Note the running direction: On the
housing and on the inside of the grinding/ sand-
ing belt!
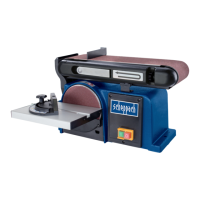
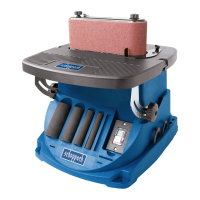
8.3 Adjusting the grinding/sanding belt (6)
• Pull out the power plug
• Push the grinding/sanding belt (6) by hand slowly in
the running direction.
• The grinding/sanding belt (6) must run centrally on
the grinding/sanding surface. If not, you can use the
knurled screw (8) to make adjustments.
8.4 Moving the grinding/sanding position of the
grinding/sanding belt (6) (g. 10-12)
• Loosen the Allen screw (5)
• Move the grinding/sanding belt (6) upwards into the
desired position.
•
• In this position you can use the grinding/ sanding
-
en the two Allen screws (17) and then remove the
stop rail (7). The grinding table can now be pushed
the screw (1)
8.5 Replacing the abrasive paper on the grinding/
sanding disk (11)
Dismantle the bottom wheel guard (15) by removing
the 2 screws (16). Pull the sanding/ grinding paper
Mounting belt/disc sander to work bench
If your belt/disc sander is to be used in a permanent
location, it is recommended you secure it to a work-
bench or other stable surface.
• Mark holes on workbench where belt/disc sander is
to be mounted using holes in the base as a template
for hole pattern.
• Drill holes through workbench.
• Place belt/disc sander on workbench aligning holes
in the base with holes drilled in the workbench.
• Insert bolts (not included) and tighten securely with
lock washers and hex nuts (not included). Note: All
bolts should be inserted from the top. Install the
lock washers and hex nuts from the underside of
the workbench.
Wear hearing protection.
vibration values (vector sum - three directions) deter-
mined in accordance with EN 62841-1.
8. Attachment and operation
Before starting the equipment
Before you connect the equipment to the mains supply
make sure that the data on the rating plate are identi-
cal to the mains data.
Warning!
Always pull the power plug before making adjustments
to the equipment.
• All covers and safety devices have to be properly
• It must be possible for the grinding/sanding belt
and disk to run freely.
• When working with wood that has been processed
before, watch out for foreign bodies such as nails
or screws, etc.
•
the equipment‘s moving parts run smoothly.
8.1 Assembling the machine (g. 1 - 5)
• Mount the lower wheel guard (15) with the screws
• Mount the grinding/sanding table (14) and secure
with the miter scale (2) and the thumb screw (1).
• The adjustable cross stop (13) ensures safe guid-
ance of the workpiece. Important. The grinding/
sanding disk (11) must be able to run freely, but the
distance between the grinding/sanding table (14)
and the grinding/sanding disk (11) is not allowed to
exceed 1.6 mm.
• Put on the stop rail (7) and secure with the screw
must be able to run freely.
8.2 Changing the grinding/sanding belt (6)
(g. 6 - 9)
• Pull out the power plug
• Remove the screws (18).
• Remove the grinding/sanding belt guard (19).
• Turn the grinding/sanding tensioner (10) to the right
in order to reduce the tension on the grinding/sand-
ing belt (6).

 Loading...