www.scheppach.com
GB
|
25
10. Working instructions
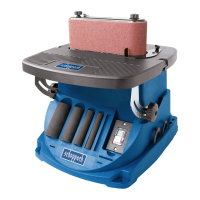
Bevel sanding, g. 14
The worktable can be tilted from 0° to 45° for bevel
sanding. To tilt the worktable:
•
• Set worktable to desired angle. Note: Position the
worktable not further than 1/16 in. (1.6 mm) from the
sanding surface.
•
Sanding small end surfaces using the miter gauge,
g. 15
A miter gauge (13) is included with your tool for in-
creased accuracy. Use of a miter gauge is recom-
mended for sanding small end surfaces on the sanding
disc.
Note: Always move the workpiece across the sanding
disc from the left side towards the right side.
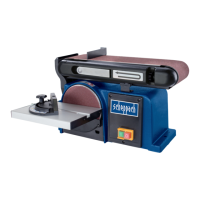
Horizontal and vertical sanding, g. 10-12+16
Your belt/disc sander can sand both vertically and
horizontally. Depending on the workpiece, the work
support can be used with either the horizontal or verti-
cal sanding operation.
• Loosen the Allen screw (5)
• Move the grinding/sanding belt (6) upwards into the
desired position.
•
• In this position you can use the grinding/ sanding
-
en the two Allen screws (17) and then remove the
stop rail (7). The grinding table can now be pushed
the screw (1)
Note: Sand long workpieces with the sanding belt in
the vertical position by moving the work evenly across
the sanding belt.
Surface sanding on the sanding belt, g. 17
•
from the sanding belt.
• -
port (X) moving work evenly across the sanding
belt.
Note: Use extra caution when sanding very thin pieces
and when sanding extra long pieces, remove the work
support (X). Apply only enough pressure to allow the
sanding belt to remove the material.
Clamping belt/disc sander to work bench
If your belt/disc sander is to be used as a portable
tool, it is recommended you fasten it permanently to a
mounting board that can easily be clamped to a work-
bench or other stable surface.
avoid tipping while belt/disc sander is in use. Any good
grade plywood or chipboard with a 3/4 in. (19 mm)
thickness is recommended.
• Mark holes on board where belt/disc sander is to
be mounted using holes in the base as a template
for hole pattern.
• Follow last three steps in section Mounting Belt/
Disc Sander to Workbench.
If lag bolts are used, make sure they are long enough
to go through holes in belt/disc sander base and ma-
terial the belt/ disc sander is being mounted to. If ma-
chine bolts are used, make sure bolts are long enough
to go through holes in belt/disc sander, the material
being mounted to, and the lock washers and hex nuts.
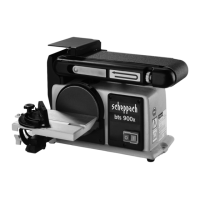
8.6 On/O switch (12)
• The grinder/sander can be switched on by pressing
the green button „1“.
•
red button „0“.
Warning: Do not reach across the sanding disc to turn
the belt/disc sander ON or OFF. Contact with the sand-
ing disc can result in serious personal injury.
8.7 Grinding/sanding
•
sanding.
• Do not exert excessive pressure.
• To prevent the abrasive paper from becoming worn
on one side, the workpiece should be moved to and
from on the grinding/sanding belt or grinding/sand-
ing plate as you grind/sand.
• Important! Pieces of wood should always be sanded
with the grain to prevent them splitting. Important. If
the grinding wheel or the grinding/sanding belt be-
comes jammed during operation, please remove the
workpiece until the tool reaches its top speed again.
9. Transport
disconnect the equipment from the power supply and
set it up in the new position you want to use it in.

 Loading...