www.scheppach.com
36
|
GB
• It is possible to secure the clamping devices (7) to
the left or right on the xed saw table (15). Insert the
clamping devices (7) in the holes on the rear side
of the stop rail (16) and secure it with the star grip
screws (7a).
• You can press the quick locking button (7b) to adjust
the clamping device’s pressure plate (7) easily to the
workpiece height.
• For 0°- 45° mitre cuts, the clamping device (7) must
only be mounted on the right side (see g. 11-12).
• It is possible to tilt the machine head (4) a max. 45°
to the left by loosening the set screw (22).
• Workpiece supports (8) must always be secured and
used during work. Set the desired table size by loos-
ening the set screw (9). Then tighten the set screw
(9) again.
8.2 Precision adjustment of the stop for crosscut
90° (g. 1, 2, 5, 6)
No stop angle included.
• Lower the machine head (4) and secure it using the
locking bolt (23).
• Loosen the set screw (22).
• Position the angle stop (A) between the saw blade
(6) and the rotary table (14).
• Loosen the lock nut (26a).
• Adjust the adjusting screw (26) until the angle be-
tween the saw blade (6) and rotary table (14) is 90°.
• Re-tighten the lock nut (26a).
• Subsequently check the position of the angle indi-
cator. If necessary loosen the pointer (19) using a
Philips screwdriver, set to position 0° on the angle
scale (18) and re-tighten the retaining screw.
8.3 Crosscut 90° and turntable 0° (g. 1, 2, 7)
In the case of cutting widths up to approx. 100 mm it
is possible to x the traction function of the saw with
the set screw (20) in the rear position. In this position
the machine can be operated in cross cutting mode. If
the cutting width is over 100 mm then it is necessary to
ensure that the set screw (20) is loose and the machine
head (4) can move.
Attention!
For 90° crosscuts, the moveable stop rail (16a) must be
xed in the inner position.
• Open the set screw (16b) for the moveable stop rail
(16a) and push the moveable stop rail (16a) inwards.
• The moveable stop rail (16a) must be locked in a po-
sition far enough from the inner position that the dis-
tance between the stop rail (16a) and the saw blade
(6) is no more than 8 mm.
• The equipment must be set up where it can stand
securely. Secure the machine on a workbench or a
base frame with 4 screws (not included in delivery)
using the holes on the xed saw table (15).
• Pull out the pre-installed tilt protection (35) com-
pletely and secure it with an Allen key.
• Adjust the adjusting screw (36) to the level of the tab-
letop to avoid wobbling of the machine.
• All covers and safety devices have to be properly
tted before the equipment is switched on.
• It must be possible for the blade to run freely.
• When working with wood that has been processed
before, watch out for foreign bodies such as nails
or screws, etc.
• Before you press the ON/OFF switch check that the
saw blade is tted correctly. Moving parts must run
smoothly.
• Before you connect the equipment to the power sup-
ply make sure the data on the rating plate are denti-
cal to the mains data.
7.1 Checking the moving saw blade guard safety
device (5)
The saw blade guard protects against accidental con-
tact with the saw blade and from chips ying around.
Check function
To do so, fold the saw downwards:
• The saw blade guard must provide free access to
the saw blade without touching other parts.
• When folding the saw upwards into the starting posi-
tion, the saw blade guard must cover the saw blade
automatically.
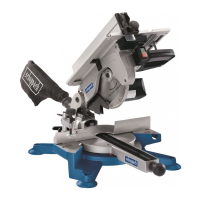
8. Attachment and operation
8.1 Assembling the trim, chop and mitre saw
(g. 1, 2, 4, 5, 21)
• In order to adjust the rotary table (14), fold the lock-
ing handle (11) upwards and pull up the latched posi-
tion lever (34) with your index nger.
• Turn the rotary table (14) and pointer (12) to the de-
sired angle measurement of the scale (13). To x the
setting, fold the locking handle (11) downwards.
• Pressing the machine head (4) lightly downwards
and removing the locking bolt (23) from the motor
bracket at the same time disengages the saw from
the lowest position.
• Swing the machine head (4) up.

 Loading...