www.scheppach.com / service@scheppach.com / +(49)-08223-4002-99 / +(49)-08223-4002-58
38
|
GB
8. Attachment and operation
Assembly
When assembling this machine, please follow the
instructions for assembly printed.
1. Assemble the handle on the machine. Fig. 2-3
• Install the front handle as shown on the image 2.
• Make sure that you align the pin with the hole.
Tighten the screws only loosely before you have
the most comfortable working position set to the
risers. The front handle should be aligned as in
pictures 2+3 shown, then tighten the screws.
2. Mounting the shaft. Fig. 4
• Pull out the locking pin (a) and press the lower part
of the shaft (b) downward until the locking pin en-
gages. The bolt (a) is in the right position when it
is fully seated in the bore.
• Lastly, tighten the knob (d) securely.
3. Assemble the safe guard. Fig. 5-7
• Fix the safe guard with hex key and wrench en-
closed as standard accessories for tighting the
nuts enough. Please see the below pictures show-
ing.
m Warning! . Never use the machine without the
guard assembled!
4. Assemble and disassemble the cutting head
grass trimmer / nylon cutting head. Fig. 8-9
• Release the nut.
Line up the two holes of ange and shield, use
one screw driver to hold the ange as below and
turn the socket wrench clockwise, the nut will be
released.
• Fit the Nylon cutting head.
Remove another shield after release the nut. Still
hold the ange, take the Nylon cutting head on the
shaft and rotate counter-clockwise, the Nylon cut-
ting head is tted. Fig. 19
• Release the Nylon cutting head.
Use screw driver to hold ange and then rotate the
Nylon cutting head clockwise, it will be replaced.
Brush cutter / Cutter blade Fig. 10-12
• Fit the blade.
• Take the outer ange o after release the nut, then
put the blade (17), outer ange (17b), shield (17a)
and nut according to priority as below picture. Note
the blade rotation direction needs be same as be-
low picture. Use screw driver to hold ange and
tighten nut counter-clockwise, ensure the nut is
tightened enough.
• Release blade. Use screw driver to hold ange and
release nut, the blade can be took o.
•
•
m Warning!
Please make sure the cutting head has been assem-
bled correctly before use!
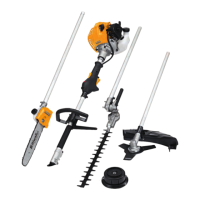
Operation
When working with the equipment as grass trimmer
and brush cutter, the appropriate plastic guard hood
for cutting blade mode or cutting line mode must
be tted to prevent objects being thrown out by the
equipment.
The integrated blade (A) in the cutting line guard
hood automatically cuts the line to the optimum
length. Fig. 18
5. Fit the belt. Fig. 13-15
• The Combined gasoline grass trimmer, pole saw,
brush cutter must be used with the strap.
• Balance the machine when the tool is switched o.
• Wear the shoulder strap.
• Adjust the strap length so that the snap hook (k) is
about a hand‘s breadth below the right hip.
• Hang the petrol brush cutter on a hook.
• Hang the machine.
• When standing in a normal working posture, the
blade should touch the ground during normal work-
ing position.
• Thereby, it is important that the petrol brush cutter
is always well balanced.
• For operation, hook the petrol brush cutter into
the snap hook (k) of the carrying strap while the
engine is running.
• ATTENTION! In an emergency, the safety latch (l)
can be pulled from the harness. The machine then
detaches immediately from the carrying strap (9)
and falls to the ground.
6. Mounting the hedge trimmer (Fig. 40-42)
• Remove the screw (d), align the holes (c) so that
they are ush and screw the screw (d) back in.
• Place the hedge trimmer (15) precisely as shown in
Figure 40 on the connecting rod (3).
• Tighten with screw (a).
• Adjust the slope by unlocking the lock (Fig. 41)
• The hedge trimmer can be tilted from 0 ° to 90 °
(Fig. 42).
7. Fitting the cutter bar and the chain
(Fig. 43-45)
• Remove the chain wheel cover (Fig. 45/ Item J) by
undoing the fastening nut (Item I). Lay the chain
(Item F) as shown into the groove which runs
around the cutter bar (Item E).
• Note the alignment of the chain teeth (Fig. 44).
Insert the cutter bar as shown in Fig. 44 into the
mount at the gear unit.
 Loading...