9
Montage- und Betriebsanleitung
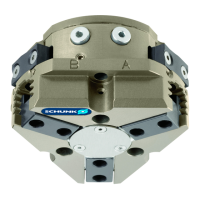
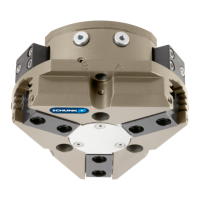
für 3-Finger-Zentrischgreifer Type PZN
Assembly and Operating Manual for
for 3-Finger-Centric Gripper Type PZN
Fahren Sie fort wie beim Greifer ohne Greifkraftsicherung von
Punkt 5. bis Punkt 9.
Beim Zusammenbau montieren Sie den Greifer in der umgekehr-
ten Reihenfolge bis auf die Feder (Pos. 39), den Zylinderkolben
(Pos. 38), die Schraube (Pos. 40), den Deckel (Pos. 37), und die
Schrauben (Pos.11). Diese Teile können nur mit einer Montage-
vorrichtung montiert werden.
(Zeichnungen der Montagevorrichtung sehen Sie in Kapitel 7.3).
Montage mit Vorrichtung für
PZN 50, 64, 80, 100
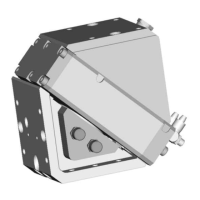
1. Vorrichtung 1 montieren (siehe Abb.) und die
Zentrierbohrung mit Renolit HLT 2 fetten.
2. Feder (Pos. 39) durch die Zentrierbohrung in das Gehäuse
stecken.
3. Zylinderkolben (Pos. 38) an der Zentrierbohrung ansetzen
und von Hand gleichmäßig in die Bohrung drücken
(Achtung: nicht verkanten!), bis der Zylinderkolben an der
Feder anstößt.
4. Schraube (Pos. 40) einsetzen und mit leichtem Druck in den
Kolben (Pos. 3 / 8) einschrauben.
5. Vorrichtung entfernen, die Dichtung (Pos. 17) einlegen und
den Deckel (Pos. 37) montieren (siehe Zusammenbau-
zeichnung, Kapitel 9).
Montage mit Vorrichtung für PZN 125 und 160
Beginnen Sie mit der Montage wie oben von 1. bis 3. be-
schrieben.
4. Schraube (Pos. 40) in den Zylinderkolben einsetzen.
5. Vorrichtung 2 ansetzen und gleichmäßig auf die Vorrichtung
1 aufschrauben (siehe Abb.).
6. Schraube (Pos. 40) in den Kolben (Pos. 3 / 8) einschrauben.
7. Vorrichtungen entfernen, die Dichtung (Pos. 17) einlegen und
den Deckel (Pos. 37) montieren (siehe Zusammenbau-
zeichnung, Kapitel 9).
Continue the disassembly process as discribed for the gripper
without gripping force safety device from point 5 up to point 9.
When assembling the gripper, mount it in reverse order besides
the spring (item 39), the cylinder piston (item 38), the screw
(item 40), the cover (item 37), and the screws (item 11). These
parts can only be mounted by using a mounting device.
(For drawings of the mounting device, see chapter 7.3).
Assembly with workholding fixtures for
PZN 50, 64, 80, 100
1. Fit fixture 1 (see illustration) and grease the centering hole
with Renolit HLT 2.
2. Push spring (item 39) through the centering hole into the hou
sing.
3. Fit the cylinder piston (item 38) to the centering hole and press
it evenly into the hole by hand (make sure that it doesn’t
jam), until the cylinder piston contacts the spring.
4. Insert the screw (item 40) and screw it into the piston
(item 3 / 8) with slight pressure.
5. Remove the fixture, insert the seal (item 17) and fit the cover
(item 37) (see chapter 9, assembly drawing).
Assembly with device for PZN 125 and 160
Start assembly as described above from 1. to 3.
4. Insert the screw (item 40) into the cylinder piston.
5. Attach the workholding fixture 2 and screw it evenly into
device 1 (see illustration).
6. Screw in the screw (item 40) into the piston (item 3 / 8).
7. Remove the device, insert the seal, (item. 17), and fit the
cover, (item 37) (see chapter 9, assembly drawing).
Type PZN 50 PZN 64 PZN 80 PZN 100 PZN 125 PZN 160 PZN 200
Pos./item 10 4 Nm 10 Nm 10 Nm 24 Nm 48 Nm 84 Nm 125 Nm
Pos./item 11 0.8 Nm 0.8 Nm 3.6 Nm 3.6 Nm 7.1 Nm 10 Nm 24 Nm
Pos./item 40 6 Nm 21 Nm 21 Nm 35 Nm 60 Nm 100 Nm –
Anzugsmomente für Schrauben Tightening torques of the screws
Schraube
Screw
Vorrichtung 1
Mounting
Device 1
33
4040
3939
3838
88
Schraube 1
Screw 1
Vorrichtung 1
Mounting
Device 1
33
4040
3838
3939
88
Schraube 2
Screw 2
Vorrichtung 2
Mounting
Device 2