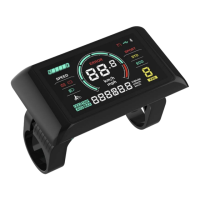
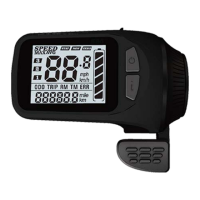
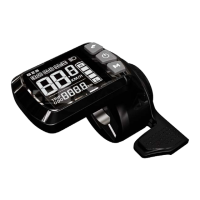
The Sciwil SW900VA is a smart display designed for e-bikes, providing a comprehensive interface for monitoring and controlling various aspects of the bicycle's operation. This manual outlines its features, specifications, and operational guidelines to ensure safe and efficient use.
Function Description
The SW900VA display serves as the central hub for user interaction with the e-bike. It provides real-time information about the bike's status and allows for adjustments to various settings. Key functions include:
- Real-Time Speed Display: Shows the current riding speed in either km/h or mph.
- Distance Tracking: Displays single-trip distance (TRIP) and total travel distance (ODO).
- Speed Metrics: Provides average speed (AVG SPEED) and maximum speed (MAX SPEED) during a ride.
- Assist Level Control: Allows users to toggle between different pedal assist levels (3, 5, or 9 levels available), including a "level 0" for no pedal assist output.
- Walk Assist Mode: Activates a 6km/h walk assist function for easy maneuvering when not riding.
- Battery Indication: Shows the current battery level.
- Front Light Control: If the e-bike's front light is display-controlled, the display can turn it on/off and show a corresponding icon.
- Motor Output Power Indication: Displays real-time motor output power.
- Error Reporting: Indicates error codes for system malfunctions, aiding in troubleshooting.
- System Settings: Provides access to various customizable parameters such as backlight brightness, mileage unit, voltage class, auto-off time, pedal assist level, wheel size, motor magnets number, speed limit, start mode, drive mode, PAS sensor type, PAS start strength, magnet steel number in pedal assist sensor, controller current limit, display low voltage level, clear distance, and cruise function.
- Communication Port: Used for system maintenance and specifications settings.
Important Technical Specifications
The SW900VA display is built to be robust and compatible with a range of e-bike systems.
- Product Name: E-Bike Display
- Product Model: SW-900
- Working Voltage: DC 24V/36V/48V/52V/60V/72V (versatile compatibility)
- Rated Working Current: 12mA (low power consumption)
- Leakage Current: <1uA (minimal standby power drain)
- Screen Size: 3.6" LCD (clear and readable display)
- Communication Type: UART (by default, for reliable data exchange)
- Working Temperature: -20°C ~ 70°C (suitable for various climates)
- Storage Temperature: -30°C ~ 80°C (durable for storage)
- Waterproof Rating: IPX6 (resistant to strong jets of water, suitable for outdoor use)
Cable Connection Diagram:
The display connects to the controller via a standard cable with five wires, each serving a specific function:
- Red (VCC): Display Power Cable
- Blue (K): Controller Power Cable
- Black (GND): Display Ground Cable
- Green (RX): Display Data Receiving Wire
- Yellow (TX): Display Data Sending Wire
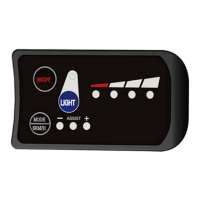
Usage Features
The SW900VA is designed for intuitive operation with a simple key pad and clear interface.
-
Assembly:
- Open the holder ring/rubber spacer of the display and fix it on the handlebar, adjusting to a proper facing angle. Use a M3 Hex Wrench to fix and tighten the screws. Standard fixing torque: 0.8N·m. (Damage due to extra fixing torque is not covered by warranty.)
- Ensure the e-bike is powered off, then plug the connector on the display to the connector on the controller (bus) to finish standard assembly.
-
Key Pad: The display features three buttons:
- Up: Used for Function/Mode selection and Up/Plus adjustments.
- Mode (M): Used for Function/Mode selection.
- Down: Used for Down/Minus adjustments.
-
Switch On/Off:
- To turn on: Press and hold the Mode (M) button for 2 seconds. The display will show the complete interface before entering the riding interface.
- To turn off: When the display is on, press and hold the Mode (M) button for 2 seconds.
- Auto-off: The display will automatically turn off if no operation occurs within 5 minutes (the auto-off interval can be adjusted in the Settings interface).
-
Assist Level Adjustment: Press the Up or Down buttons to toggle between assist levels. The display shows "1" as the default start level.
-
Interface Switching: Press the Mode (M) button to switch between single-trip distance (TRIP), riding time (TRIP TIME), and total distance (ODO).
-
Speed Switching: Press and hold the Mode (M) button and the Down button to switch between Current Speed, Average Speed (AVG), and Max Speed (MAX).
-
Front Light On/Off (if display-controlled): Press and hold the Up button for 1 second to turn the front light on. The dipped beam icon will appear on the riding interface. Press and hold the Up button again for 1 second to turn the front light off, and the icon will disappear.
-
6km/h Walk Assist Mode: Press and hold the Down button for 2 seconds to enter 6km/h walk assist mode. The current speed will be shown in the Assist Level section. Release the Down button to exit walk assist mode.
-
Introduction of Setting Interface:
- To enter settings: Press and hold the Up and Down buttons together for 2 seconds. You can set Working Voltage, Wheel Size (inch), Magnetic Steel Number, Speed Limit, etc. Refer to Settings P01-P17 for available parameters.
- To adjust values in settings: While in the setting interface, press the Up and Down buttons to increase/decrease the setting value. The value will blink after being modified. Press the Mode (M) button to switch to the next item and save the previous changes automatically.
- To exit settings: Press and hold the Up and Down buttons together for 2 seconds again to save the adjusted value and exit the settings interface. Otherwise, the system will automatically exit and save values after 10 seconds.
Settings Parameters (P01-P17):
- P01: Backlight Brightness: (1: darkest; 3: brightest)
- P02: Mileage Unit: (0: km; 1: mile)
- P03: Voltage Class: (24V / 36V / 48V / 60V / 72V)
- P04: Auto-Off Time: (0: never, other value means time interval for display auto-off) Unit: minute
- P05: Pedal Assist Level:
- 0/3 Gear Mode: Gear 1-2V, Gear 2-3V, Gear 3-4V
- 1/5 Gear Mode: Gear 1-2V, Gear 2-2.5V, Gear 3-4V, Gear 4-3.5V, Gear 5-4V
- P06: Wheel Size: (Unit: inch, Precision: 0.1)
- P07: Motor Magnets Number: (for Speed Test; Range: 1-100)
- P08: Speed Limit Range: 0-50km/h, no speed limit if set to 50.
- Communications status (controller-controlled): The driving speed will be kept constant as the limited value.
- Error Value: ±1km/h (applicable to both the PAS/throttle mode).
- Note: The above-mentioned values are measured by metric unit (kilometers). When the measuring unit is set to imperial unit (mile), the speed displayed on the panel will be automatically switched to corresponding imperial unit, however the speed limit value in the imperial unit interface won't change accordingly.
- P09: Direct Start / Kick-to-Start Setting:
- 0: Direct Start
- 1: Kick-to-Start
- P10: Drive Mode Setting:
- 0: Pedal Assist – The specific gear of the assist drive decides the assist power value. In this status, the throttle does not work.
- 1: Electric Drive – The vehicle is driven by the throttle. In this status, the power gear does not work.
- 2: Pedal Assist + Electric Drive – Electric drive does not work in direct-start status.
- P11: Pedal Assist Sensitivity: (Range: 1-24)
- P12: Pedal Assist Starting Intensity: (Range: 0-5)
- P13: Magnets Number in Pedal Assist Sensor: (5 / 8 / 12pcs)
- P14: Current Limit Value: (12A by default; Range: 1-20A)
- P15: Unspecified
- P16: ODO Clearance: Press and hold the Up key for 5 seconds and ODO distance will be cleared.
- P17: Cruise: (0: without cruise function, 1: with cruise function)
Maintenance Features
The SW900VA includes an error reporting system to assist with troubleshooting and maintenance.
-
Error Code Table: The display can report error codes of the electric vehicle. Error codes will be shown when the display detects corresponding error/failure.
- E00: Normal
- E03: Brake Engaged
- E05: Throttle Failure
- E06: Low Voltage Protection
- E07: Over Voltage Protection
- E08: Motor Hall Signal Error
- E09: Motor Phase Error
- E16: Controller Error
- E23: Front Light Error
- E27: Controller Over Current Error
- E30: Communications Error
-
Serial Code: Each Sciwil display product bears a unique Serial Code on the back shell, which is important for identification and warranty purposes. The serial code format is explained as:
- 192: Customer Code
- 2: Protocol Code
- 1: Program can be overridden (0 means can not be overridden)
- 210603011: P.O. (purchase order number)
Safety Notes
To ensure the longevity and safe operation of the SW900VA display, several safety precautions must be observed:
- Power Connection: Please take caution when using; do not plug or unplug the display while your e-bike is powered on.
- Physical Protection: Avoid clashes or bumps to the display.
- Environmental Protection: Avoid using in heavy rains, snows, or long exposure to strong sunlight. Do not tear the water-proof film on the surface of the screen, otherwise the water-tight performance of the product may be degraded.
- System Integrity: Do not plug or unplug the display while the system is powered on. Unauthorized adjustment to default settings is not suggested, otherwise normal use of your e-bike can not be guaranteed.
- Malfunction: When the display product does not work properly, please send it for authorized repair in time.
Quality and Warranty
- Warranty Term: In compliance with local laws, Sciwil provides a limited warranty period covering 24 months after the date of manufacturing (as indicated by the serial number), applies to quality issues during normal operations. The limited warranty shall not be transferred to a third party other than as specified in the agreement with Sciwil. Other situations may be covered, depending on the agreement between Sciwil and the buyer.
- Warranty Exclusions:
- Sciwil products that have been opened, modified, or repaired without authorization.
- Damage on the connectors.
- Damage to the surface after leaving the factory, including shell, screen, buttons, or other appearance parts.
- Damage to wiring and cables after leaving the factory, including breaks and exterior scratch.
- Damage or loss due to force majeure (e.g., fire or earthquake) or natural disaster (e.g., lightening).
- Out of the warranty period.
Version
This display user manual is in compliance with the general software version (A/0) of Changzhou Sciwil E-Mobility Technology Co., Ltd. There are chances that display products on some e-bikes may have a different software version, which should be subject to the actual version in use.