Do you have a question about the Sealey CPG18V and is the answer not in the manual?
Essential safety precautions for electrical products, covering cable inspection, RCD use, and wiring.
General safety guidelines for operating the grease gun, including protective clothing and work area.
Instructions for charging the product's battery pack before first use, including LED indicators.
Steps to connect the battery pack to the main unit and how to release it.
Procedure to prime the grease gun before operation or cartridge loading.
Steps for safely removing an empty grease cartridge from the gun.
Guide on how to insert a new grease cartridge into the canister.
Method for filling the grease gun canister using suction from a grease bucket.
Instructions for filling the grease gun from a bulk grease supply.
Steps to remove trapped air from the grease gun system for proper function.
How to check the remaining battery charge level using the LED display.
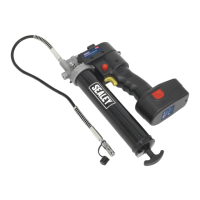
The Sealey CPG18V Cordless Grease Gun is a high-power, professional tool designed for efficient in-field lubrication. It operates on an 18V battery and is capable of developing significant pressure, making it suitable for demanding applications where power and speed are essential. This grease gun is versatile, accommodating 400g cartridges, or it can be filled manually or in bulk.
The primary function of the CPG18V is to dispense grease under pressure, facilitating the lubrication of various mechanical components. It features an LCD battery condition indicator, which allows the user to monitor the remaining charge and plan lubrication tasks accordingly. The display shows the percentage of battery charge left, with five segments each representing 20% of the full charge. An air bleed feature is incorporated to eliminate air pockets within the system, ensuring consistent grease flow and preventing cavitation. The heavy-duty aluminium pressure head contributes to the tool's durability and ability to withstand high pressures.
Before initial use, the battery must be charged for a minimum of 1.5 hours. To charge, the battery slides into the charger's keyways until it clicks into place. A red LED indicates charging, which turns green when fully charged. Attaching the battery to the grease gun involves aligning the battery's ridges with the keyways at the base of the handle and sliding it until it clicks. Removal is achieved by pressing two red release catches simultaneously and sliding the battery off.
Priming the gun is a crucial step before loading with a cartridge or filling via a grease bucket. This involves packing grease into the cavity at the entrance of the gun assembly. Once the filled grease canister is attached, the trigger is operated to induce grease intake.
When using grease cartridges, the empty cartridge is removed by fully drawing back the plunger handle until it locks, then unscrewing the grease canister. To eject the cartridge, the plunger handle is held, the catch plate pressed, and the plunger slowly released. Loading a new cartridge involves unscrewing the canister, drawing back the plunger handle until it locks, removing the base cap from the cartridge, inserting the open end of the cartridge into the canister, and removing the seal or pull tab from the other end. Grease is then packed into the pump head cavity, and the canister is screwed back onto the gun. The plunger rod is released by pressing the catch plate, and air is purged from the system.
For suction filling, the grease tube is unscrewed, and any fitted cartridge is ejected. The plunger rod is ensured to be released. Grease is packed into the pump head cavity. The open end of the grease canister is submerged into a grease bucket, and the plunger rod is slowly pulled out while pushing the canister deeper into the grease to prevent air pockets. This continues until the rod is fully extended and locked. The canister is then screwed back onto the gun, and the plunger rod is released.
Bulk filling involves pressing the catch plate to release the plunger rod. A low-pressure bulk greasing unit is connected to the bulk filler nipple on top of the gun until the plunger rod is fully extended. The catch plate is then pressed and held, and the plunger rod is pushed down until resistance is felt, then released.
During operation, the trigger locking knob is turned to the "unlock" position. The grease tube connector is slid out of its stowage point and pushed onto the chosen grease nipple. The trigger is then operated to dispense the desired amount of grease. When not in use, the trigger locking button is turned to the "lock" position.
Air pockets can occur during operation. To eliminate them, the catch plate is held down, force is exerted on the plunger, and the vent valve is pressed. The trigger is operated in short, sharp bursts until grease flows from the connector. Alternatively, the thumb screw on top of the grease release valve is slowly turned anticlockwise until grease and air escape from the hole in the side of the valve. Once all air is expelled and only grease escapes, the valve is shut by turning the thumb screw clockwise.
Maintaining the grease gun in good condition is essential for its longevity. This includes using an authorized service agent for repairs and replacements. Only recommended parts should be used, as unauthorized parts can be dangerous and invalidate the warranty.
Before any maintenance or accessory changes, the grease gun must be disengaged from the battery. The working area should be kept clean, tidy, and free from unrelated materials, with adequate lighting. Correct balance and footing should be maintained, ensuring the floor is not slippery and non-slip shoes are worn. Children and unauthorized persons should be kept away from the work area. Waste grease must be disposed of according to local authority regulations. When not in use, the battery should be removed, and the unit stored in a dry, safe, childproof area.
Regularly inspect power supply cables and plugs for wear or damage, and check all connections for looseness. Ensure the insulation on all cables and the appliance is safe. Cables should always be protected against short circuit and overload. Do not pull or carry the appliance by the power cable, and do not pull the plug from the socket by the cable. Worn or damaged cables, plugs, or connectors must be repaired or replaced immediately by a qualified electrician.
The battery pack is considered a consumable item, and its ability to accept charge will reduce over time. The warranty covers mechanical and electrical defects for one year, but not fair wear and tear. If the battery is not properly charged before first use or regularly conditioned, its capacity will diminish, and it will not be replaced under warranty if it is less than one year old.
| Voltage | 18V |
|---|---|
| Power Source | Battery |
| Battery Type | Li-ion |
| Max Torque | 45Nm |
| Chuck Size | 10mm |
| Charger Weight | 0.4kg |
| Charger Input | 230V |
| Charger Output | 21V DC |
| Charging Time | 60 minutes |
| Protection Features | Overload |