EasyManua.ls Logo

Sealey VS779 - User Manual

Sealey VS779
2 pages
Print Icon
To Next Page IconTo Next Page
Loading...
!!
WARNING! Ensure Health and Safety, local authority and general workshop practice regulations
are adhered to when using tools and equipment.
" DO NOT use if damaged.
# Maintain in good and clean condition for best and safest performance.
# Keep the work area clean, uncluttered and ensure there is adequate lighting.
# Maintain correct balance and footing. Ensure the floor is not slippery and wear
non-slip shoes.
# Keep children and unauthorised persons away from the work area.
# Always wear eye protection when using this tool.
1. SAFETY INSTRUCTIONS
2. INTRODUCTION & SPECIFICATION
3. OPERATING INSTRUCTIONS
Breaks and rejoins all types of chain quickly and easily. Suitable for most sizes of drive or
cam chain from #35 to #630 including O-ring. Supplied with a range of pins and dies.
IMPORTANT PLEASE READ THESE INSTRUCTIONS CAREFULLY. NOTE THE SAFE OPERATIONAL
REQUIREMENTS, WARNINGS, AND CAUTIONS. USE THIS PRODUCT CORRECTLY AND WITH CARE, FOR
THE PURPOSE FOR WHICH IT IS INTENDED. FAILURE TO DO SO MAY CAUSE DAMAGE AND/OR PERSONAL
INJURY AND WILL INVALIDATE THE WARRANTY.
INSTRUCTIONS FOR:
MOTORCYCLE CHAIN BREAKER/RIVETER
Model No:
VS779
3.1. Breaking Chain (pressing out link pin).
Note: This tool may be used for breaking all chain sizes from number 35 to 630 but it is not recommended for
breaking heavy-duty types of 530 to 630 unless the rivet head is ground off first.
NOTE: If working on cam chain be sure and cover chain tunnel with rag to prevent parts dropping down.
3.1.1. Assemble tool as shown in fig.1 (Anvil not used).
fig.1
fig.2
12
3
4
Thank you for purchasing a Sealey product. Manufactured to a high standard this product will, if used according
to these instructions and properly maintained, give you years of trouble free performance.
Question and Answer IconNeed help?

Do you have a question about the Sealey VS779 and is the answer not in the manual?

Summary

Safety Instructions

Introduction and Specification

Operating Instructions

Breaking Chain (pressing out link pin)

Process for breaking motorcycle chains by pressing out the link pin, including tip selection and tool assembly.

Installing Chain Link Pin (Riveting)

Procedure for installing and riveting chain link pins using the tool, stressing special pins and proper alignment.

Overview

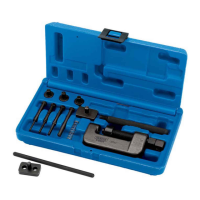
The Sealey Professional Tools Model No. VS779 is a motorcycle chain breaker and riveter designed for quickly and easily breaking and rejoining various types of drive and cam chains. Manufactured to a high standard, this product aims to provide years of trouble-free performance when used according to its instructions and properly maintained.

Function Description:

The primary function of the VS779 is to facilitate the breaking and riveting of motorcycle chains. It achieves this by allowing users to press out link pins to break a chain and then flare new link pins to rejoin a chain. The tool is designed to handle a wide range of chain sizes, from #35 to #630, including O-ring chains.

Key Components and Their Functions:

  • Push (Extractor) Bolt: This is the main screw mechanism used to apply force to either push out a chain pin (breaking) or flare a new pin (riveting). It is tightened with a 14mm wrench or lever bar.
  • Lever: Used in conjunction with the push bolt to apply force.
  • Alignment Bolt: This bolt secures the chain in place during both breaking and riveting operations, ensuring proper alignment of the pin with the breaking tip or rivet tip. It also houses the breaking and rivet tips.
  • Breaking Tips: The tool comes with three different sizes of breaking tips: Ø2.20mm, Ø2.90mm, and Ø3.80mm. These tips are inserted into the alignment bolt and are used to press out chain link pins. The smallest 2.2mm tip is typically for cam chains, the 2.9mm for #25 or #35 chains, and the 3.8mm for most motorcycle drive chains (428 to 530).
  • Rivet Tip: This tip is used to flare the ends of new link pins, securing them in place when rejoining a chain.
  • Upper Guide and Lower Guide: These guides are used specifically when breaking chains with the small 2.2mm tip. The upper guide threads onto the alignment bolt, and the lower guide drops into the tool body, preventing the delicate tip from breaking.
  • Large Anvil and Small Anvil: These components provide support for the chain during riveting operations. The manual indicates the anvil is not used for breaking.
  • Press Plates: These are an alternative or supplementary method for flaring pin ends during riveting. The press plates consist of one with two holes (for the upper jaw) and a grooved press plate (for the lower jaw).
  • Body and Handle: The main structure of the tool, providing grip and housing for the internal mechanisms.

Important Technical Specifications:

  • Chain Compatibility: Suitable for chain sizes from #35 to #630, including O-ring chains.
  • Breaking Tip Sizes: Ø2.20mm, Ø2.90mm, Ø3.80mm.
  • Wrench Size for Push Bolt: 14mm.

Usage Features:

Safety Instructions:

*   Always adhere to Health and Safety, local authority, and general workshop practice regulations.
*   Do not use the tool if it is damaged.
*   Maintain the tool in good and clean condition for optimal performance and safety.
*   Keep the work area clean, uncluttered, and adequately lit.
*   Maintain correct balance and footing, wearing non-slip shoes.
*   Keep children and unauthorized persons away from the work area.
*   Always wear eye protection when using the tool.
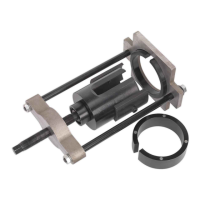
*   **Assembly:** Assemble the tool as shown in fig.1, ensuring the anvil is not used for this operation.
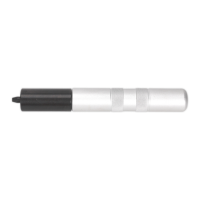
*   **Tip Selection:** Select the correct size breaking tip (Ø2.20mm, Ø2.90mm, or Ø3.80mm) based on the chain size. Insert the tip into the alignment bolt, ensuring the spring is under the head of the breaker pin, and then replace the push (extractor) bolt.
*   **Guide Usage:** If using the 2.2mm tip, the upper and lower guides must be used to prevent tip breakage.
*   **Chain Positioning:** Place the tool over the chain. The breaker pin tip must be withdrawn at least 2mm into the alignment bolt. The chain rivet should be held by the tool's alignment bolt on one end and by the tool body on the other. Tighten the alignment bolt securely against the chain.
*   **Pin Extraction:** Tighten the push (extractor) bolt with a 14mm wrench or lever bar until the chain pin is completely pushed out and drops through the hole in the tool's bottom.
*   **Important Note:** If working on heavy-duty 530 to 630 chains, it is recommended to grind off the rivet head first to prevent damage to the breaking tip. For cam chains, cover the chain tunnel with a rag to prevent parts from dropping.
*   **Troubleshooting:** If the tip does not push down smoothly, check alignment. Misalignment can break the tip.
*   **Anvil and Rivet Tip:** Ensure the rivet tip and anvil are in place in the tool.
*   **Chain Assembly:** Assemble the chain with the new link to be riveted. Special rivet link pins must be used; original pushed-out pins are not recommended due to potential weakening. Avoid split pin type connecting links.
*   **Pin Insertion:** Push the new pin all the way through the chain link. If it's stiff, the pin can be pushed into place by positioning the chain in the tool with the rivet tip withdrawn 2mm into the alignment bolt, then tightening the alignment bolt until the pin is pushed through. Ensure equal pin length on both sides of the link.
*   **Riveting Process:** Position the tool over the pin to be riveted. Ensure the rivet tip is withdrawn 2mm into the alignment bolt. Tighten the alignment bolt securely against the chain. Then, tighten the push (extractor) bolt to flare the chain pin. Both ends of the link pin should be flared to securely hold the pin. Repeat for other link pins.
*   **Verification:** After removing the tool, visually check that both chain link pins show the same flared ends.
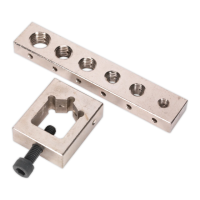
*   **Alternative Riveting Methods:** The press plates can also be used to flare pin ends (fig.4), using the plate with two holes in the upper jaw and the grooved plate in the lower jaw. A combination of the rivet pin and lower press plate can also be used (fig.5).

Maintenance Features:

  • General Condition: The manual emphasizes maintaining the tool in good and clean condition for the best and safest performance.
  • Warranty: A 12-month warranty is provided from the purchase date, requiring proof of purchase for any claim.
  • Product Improvement: Sealey's policy is to continually improve products, reserving the right to alter data, specifications, and component parts without prior notice.

This tool is a specialized device for motorcycle maintenance, requiring careful adherence to instructions for safe and effective operation.

Sealey VS779 Specifications

General IconGeneral
BrandSealey
ModelVS779
CategoryTools
LanguageEnglish

Related product manuals