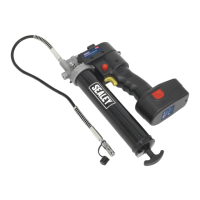
8V CORDLESS GREASE GUN
MODEL NO: CPG8V
Thank you for purchasing a Sealey product. Manufactured to a high standard, this product will, if used according to these
instructions, and properly maintained, give you years of trouble free performance.
PLEA
E READ THE
E IN
TRU
TI
N
AREFULLY. N
TE THE
AFE
PERATI
NAL RE
UIREMENT
, WARNIN
AUTI
N
. U
E
T
RRE
TLY AND WITH
ARE F
R THE P
RP
E F
R WHI
H IT I
INTENDED. FAIL
RE T
D
MAY
A
E DAMA
E AND
R
AL IN
RY AND WILL INVALIDATE THE WARRANTY. KEEP TH
IN
AFE
R F
T
RE
.
1. SAFETY
1.1. ELECTRICAL SAFETY FOR USE OF CHARGER
USE ONLY THE SUPPLIED CHARGER PLUG FOR CONNECTING THE 8V CORDLESS GREASE GUN TO THE POWER SUPPLY
WARNING! It is the user’s responsibility to read, understand and comply with the following instructions:
You must ensure the risk of electric shock is minimised by the installation of appropriate safety devices. An RCCB (Residual Current
Circuit Breaker) should be incorporated in the main distribution board. We also recommend that an RCD (Residual Current Device) is
used with all electrical products, particularly portable equipment which is plugged into an electrical supply not protected by an RCCB.
YOU MUST also read and understand the following instructions concerning electrical safety.
1.1.1. The Electricity At Work Act 1989 requires all portable electrical appliances, if used on business premises, to be tested by a
qualifi ed electrician, using a Portable Appliance Tester (PAT), at least once a year.
1.1.2. THE Health & Safety at Work Act 1974 makes owners of electrical appliances responsible for the safe condition of the appliance
and the safety of the appliance operator. If in any doubt about electrical safety, contact a qualifi ed electrician.
1.1.3. You must ensure that you:
Inspect the charger plug, cable and connector for wear and damage to ensure items are safe before connecting to the power supply.
DO NOT use if worn or damaged.
IMPORTANT: Check that the voltage marked on the charger plug is the same as the power supply to be used.
DO NOT pull the charger plug from the mains socket by the lead.
DO NOT use any other type of charger with this product.
DO NOT try to take the charger apart.
DO NOT use the charger plug to charge or power any other electrical item.
DO NOT get the charger wet, or use in wet, damp conditions (for indoor use only).
WARNING! NEVER substitute a standard 13amp 3 pin plug, or any other type of plug, for the charger plug.
1.2. BATTERY SAFETY
WARNING! To reduce the risk of burns or fi re:
DO NOT attempt to open, dismantle, modify or service the battery.
DO NOT crush, puncture, short external contacts or dispose of in fi re or water.
DO NOT expose to temperatures above 60ºC (140ºF).
Recycle or dispose of used battery as stipulated by local regulation.
1.3. GENERAL SAFETY
WARNING! Disengage the grease gun from the battery before changing accessories, servicing or performing and maintenance.
Maintain gun in good condition (use an authorised service agent).
Replace or repair damaged parts. Use recommended parts only. Unauthorised parts may be dangerous and will invalidate the
warranty.
Wear appropriate protective clothing. When handling lubricants refer to manufacturer’s instructions and conform to local regulations.
Use the gun in a suitable working area. Keep area clean and tidy and free from unrelated materials and ensure there is adequate
lighting.
Maintain correct balance and footing whilst performing the task. Ensure floor is not slippery and wear non-slip shoes.
Keep children and unauthorised persons away from the work area.
Dispose of waste grease in accordance with local authority regulations.
When not in use ensure the battery is removed.
DO NOT allow unauthorised persons to operate the gun.
WARNING! DO NOT tamper with or open pump unit. Doing so will invalidate your warranty.
DO NOT point grease gun at yourself or other persons or animals.
DO NOT pull the grease gun unit by the hose.
DO NOT use the gun for a task it is not designed to perform.
DO NOT operate the gun when you are tired or under the influence of alcohol, drugs or intoxicating medication.
When not in use, clean the unit and store in a dry, safe, childproof area.
CPG8V Issue 3 13/09/21
Original Language Version
© Jack Sealey Limited
Refer to
instructions
Wear eye
protection
Wear protective
gloves