EasyManua.ls Logo

Sealey DJ01 - User Manual

Sealey DJ01
3 pages
Print Icon
To Next Page IconTo Next Page
Loading...
INSTRUCTIONS FOR
UNIVERSAL DOWELLING JIG
MODEL NO: DJ01
Thank you for purchasing a Sealey product. Manufactured to a high standard, this product will, if used according to these instructions,
and properly maintained, give you years of trouble free performance.
IMPORTANT: PLEASE READ THESE INSTRUCTIONS CAREFULLY. NOTE THE SAFE OPERATIONAL REQUIREMENTS, WARNINGS & CAUTIONS. USE
THE PRODUCT CORRECTLY AND WITH CARE FOR THE PURPOSE FOR WHICH IT IS INTENDED. FAILURE TO DO SO MAY CAUSE DAMAGE AND/OR
PERSONAL INJURY AND WILL INVALIDATE THE WARRANTY. KEEP THESE INSTRUCTIONS SAFE FOR FUTURE USE.
1. SAFETY
9 Wear appropriate Personal Protective Equipment. A full range of Personal Protective Equipment is available from your Sealey stockist.
9 Use the tool in a suitable work area. Keep area clean and tidy and free from unrelated materials and ensure that there is adequate lighting.
9 Secure any unstable workpieces with a clamp, vice or other adequate holding device.
8 DO NOT over-reach. Ensure the floor is not slippery and wear non-slip shoes.
8 DO NOT use the tool for a task it is not designed to perform.
8 DO NOT get the tool wet or use in damp or wet locations.
8 DO NOT hold unsecured work in your hand.
8 DO NOT operate the tool if any parts are missing or damaged as this may cause failure and/or personal injury.
8 DO NOT operate the tool when you are tired or under the influence of alcohol, drugs or intoxicating medication.
2. i INTRODUCTION
Jig and clamp dowelling set ideal for making accurate 6, 8 and 10mm dowel holes/joints in MDF and wood. Suitable for a number of
different styles of dowel joint including edge-to-edge, edge-to-corner and edge-to-surface. Set includes aluminium dowelling jig, alignment
clamps, 60 dowel pins and three drill bit depth stops.
3. i SPECIFICATION
Model No: ......................................................................DJ01
Dowel Sizes ............................................. 6mm, 8mm, 10mm
Suitable Thickness MDF/Wood ..................... 12mm to 36mm
4. CONTENTS
5. OPERATION
NOTE: These instructions are guidelines only and cannot cover all aspects of creating perfect joints. It is suggested that the use of a
setsquare,spiritlevelandadditionalclampingwillenhancethenalproduct.Allcutsonthematerialstobedowelledtogethermustbe
squareandtrueorerrorswillcompoundanda󰀨ectthequalityofthejoint.Ifmaterialstobejoinedarenotuniformandconsistentin
thickness, errors may occur in the alignment of jointed surfaces
NOTE: Therearethreedi󰀨erentcommonformsofdowelledjoint:‘EdgetoEdge’,‘EdgetoCornerand‘EdgetoSurface’.
5.1. EDGE TO EDGE JOINTING (g.1)
5.1.1.  Clamptherstboardinpositionontheworkbenchusingdrilljig(g.1.A)andclampblock(g.1.B)thussettingthelocationfortherst
dowel hole.
5.1.2. Restsecondboardontodrilljigandclampblockplatformsandsecurewithupperclamps(g.1.C). TIP: Support the upper board
securely so that the boards lie parallel to each other and ensure that edges are in line.
DJ01 Issue 1 24/01/18
Original Language Version
© Jack Sealey Limited
Refer to
instruction
manual
Wear protective
gloves
Wear eye
protection
Wear face
mask
Wear protective
clothing
Question and Answer IconNeed help?

Do you have a question about the Sealey DJ01 and is the answer not in the manual?

Summary

Safety Precautions

General Safety Advice

Use PPE, maintain a clean work area, secure workpieces, avoid over-reaching, and do not use if damaged or tired.

Introduction

Product Overview

Details the dowelling jig's suitability for making accurate joints in MDF and wood, and its included components.

Specifications

Technical Details

Lists the model number, available dowel sizes, and the suitable thickness range for MDF and wood.

Operation Guide

Edge to Edge Jointing

Step-by-step instructions for creating edge-to-edge dowel joints, including clamping and drilling procedures.

Edge to Corner Jointing

Instructions for creating edge-to-corner dowel joints, focusing on positioning and drilling vertical boards.

Edge to Surface Jointing

Guidance on forming edge-to-surface dowel joints, involving positioning the edge board onto the surface board.

Overview

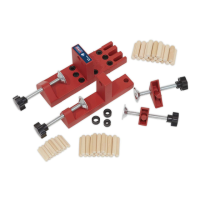
The Sealey Universal Dowelling Jig, Model No: DJ01, is a tool designed for creating accurate dowel holes and joints in MDF and wood. It is suitable for a variety of dowel joint styles, including edge-to-edge, edge-to-corner, and edge-to-surface applications.

Function Description:

The dowelling jig facilitates precise drilling for dowel joints. It allows users to create holes for 6mm, 8mm, and 10mm dowels. The set includes the main aluminium dowelling jig, alignment clamps, 60 dowel pins, and three drill bit depth stops. The jig's design enables consistent hole placement, which is crucial for strong and accurately aligned joints. It is particularly useful for furniture construction, cabinet making, and other woodworking projects where strong, concealed joints are desired. The jig helps in maintaining the correct depth and spacing of dowel holes, preventing issues like dowels bottoming out or misalignment of boards.

Important Technical Specifications:

  • Model No: DJ01
  • Dowel Sizes: 6mm, 8mm, 10mm
  • Suitable Thickness MDF/Wood: 12mm to 36mm
  • Components: Aluminium dowelling jig, alignment clamps, 60 dowel pins, three drill bit depth stops.

Usage Features:

General Safety:

  • Always wear appropriate Personal Protective Equipment (PPE), including protective gloves, eye protection, and a face mask. Protective clothing is also recommended.
  • Work in a suitable, clean, and tidy area with adequate lighting, free from unrelated materials.
  • Secure workpieces with a clamp, vice, or other adequate holding device to prevent movement during drilling.
  • Avoid over-reaching and ensure the floor is not slippery; wear non-slip shoes.
  • Do not use the tool for tasks it is not designed for.
  • Keep the tool dry; do not use in damp or wet locations.
  • Never hold unsecured work in your hand while operating the tool.
  • Do not operate the tool if any parts are missing or damaged, as this could lead to failure or personal injury.
  • Do not operate the tool when tired or under the influence of alcohol, drugs, or intoxicating medication.

Operation Guidelines:

These instructions are guidelines, and additional tools like a set square, spirit level, and extra clamps can enhance the final product. All cuts on materials to be dowelled together must be square and true to avoid compounding errors and affecting joint quality. Inconsistent material thickness can also lead to misalignment.

Edge-to-Edge Jointing (fig.1):

  1. Clamp the first board on the workbench using the drill jig (fig.1.A) and clamp block (fig.1.B) to set the location for the first dowel hole.
  2. Rest the second board onto the drill jig and clamp block platforms, securing it with upper clamps (fig.1.C). Support the upper board securely to ensure boards are parallel and edges are in line.
  3. Select the appropriate dowel size and drill bit. Set the depth gauge on the drill bit to ensure sufficient hole depth, preventing the dowel from bottoming out when jointing. Drill both upper and lower holes.
  4. To prevent swarf build-up, frequently withdraw the drill bit from the work.
  5. To drill further holes, loosen the drill jig clamps and carefully slide the jig to its new position. Spacing can be achieved by placing a dowel into an existing hole and using a spacer-block between this and the drill-jig.
  6. Important: When moving the drill jig, at least one set of clamps must remain in position to prevent movement and misalignment of dowels.

Edge-to-Corner Jointing (fig.2):

  1. Clamp the first board on the workbench using the drill jig (fig.2.A) and clamp block (fig.2.B) to set the location for the first dowel hole.
  2. Stand the second board on edge onto the drill jig and secure with upper clamps. Support the vertical board securely to ensure boards are at right angles and edges are in line. Additional clamping may be needed.
  3. Select the dowel size and drill bit. Set the depth gauge to ensure sufficient hole depth for the horizontal board. Drill all holes in the horizontal board. Spacing can be achieved by placing a dowel into an existing hole and using a spacer-block between this and the drill-jig.
  4. Re-adjust drill depth gauge for the vertical board. To drill further holes, loosen the drill jig clamps and carefully slide the jig to its new position. Alignment of upper and lower holes can be achieved by using a dowel placed in a matching horizontal hole (fig.2C).
  5. To prevent swarf build-up, frequently withdraw the drill bit from the work.
  6. Important: When moving the jig, at least one set of clamps must remain in position to prevent movement and misalignment of dowels.

Edge-to-Surface Jointing (fig.3, fig.4):

  1. Mark the centre line of dowel fixings on the surface board and place it on the workbench (fig.3).
  2. Lay the pre-drilled edge board on top of the surface board (fig.3), ensuring edge alignment. Position the edge board so the centre line of the dowel holes aligns with the relevant guide bush (fig.4). Clamp in place using a clamp block. Additional clamping may be required.
  3. Locate the jig on the protruding dowels (fig.4) using the relevant slot for the guide bush.
  4. Select the dowel size and drill bit. Set the depth gauge to ensure sufficient hole depth, preventing the dowel from bottoming out.
  5. To drill further holes, loosen the drill jig clamps and carefully slide the jig to its new position. Spacing can be achieved by placing a dowel into an existing hole and using a spacer-block between this and the drill-jig.
  6. Important: When moving the jig, at least one set of clamps must remain in position to prevent movement and misalignment of dowels.

Maintenance Features:

  • Environmental Protection: Unwanted materials, tools, accessories, and packaging should be sorted and taken to a recycling centre for disposal in an environmentally compatible manner. When the product becomes unserviceable, drain any fluids (if applicable) into approved containers and dispose of the product and fluids according to local regulations.
  • Product Improvement: Sealey's policy is to continually improve products, so data, specifications, and component parts may be altered without prior notice.
  • Warranty: The product comes with a 12-month guarantee from the purchase date. Proof of purchase is required for any claim. No liability is accepted for incorrect use of the product.

Sealey DJ01 Specifications

General IconGeneral
BrandSealey
ModelDJ01
CategoryTools
LanguageEnglish

Related product manuals