EasyManua.ls Logo

Sealey TSTVRK - User Manual

Sealey TSTVRK
2 pages
Print Icon
To Next Page IconTo Next Page
Loading...
TYRE VALVE REMOVAL/INSTALLATION TOOL
MODEL NO: TSTVRK
Thank you for purchasing a Sealey product. Manufactured to a high standard, this product will, if used according to these
instructions, and properly maintained, give you years of trouble free performance.
IMPORTANT: PLEASE READ THESE INSTRUCTIONS CAREFULLY. NOTE THE SAFE OPERATIONAL REQUIREMENTS, WARNINGS & CAUTIONS. USE
THE PRODUCT CORRECTLY AND WITH CARE FOR THE PURPOSE FOR WHICH IT IS INTENDED. FAILURE TO DO SO MAY CAUSE DAMAGE AND/OR
PERSONAL INJURY AND WILL INVALIDATE THE WARRANTY. KEEP THESE INSTRUCTIONS SAFE FOR FUTURE USE.
1. SAFETY
WARNING! Ensure Health and Safety, local authority and general workshop practice regulations are adhered to when using tools.
WARNING! DO NOT use this tool on an inflated tyre, ensure that all air pressure has been expelled before attempting to replace the
tyre valve.
9 Ensure that a vehicle which has been jacked up is adequately supported with axle stands.
8 DO NOT use tools if damaged.
9 Maintain tools in good and clean condition for best and safest performance.
9 Wear approved eye protection. A full range of personal safety equipment is available from your Sealey Stockist.
9 Wear suitable clothing to avoid snagging. DO NOT wear jewellery and tie back long hair.
8 DO NOT use on wheels with inner tubes.
8 DO NOT use on alloy wheels.
8 DO NOT use this tool when you are tired, under the influence of alcohol, drugs or intoxicating medication.
8 DO NOT use this tool for any purpose other than that for which it is designed.
8 DO NOT use this tool if any part of it is damaged.
8 DO NOT allow untrained persons to use this tool.
9 When not in use, clean and store in a safe, dry, childproof area.
WARNING! The warnings, cautions and instructions in this manual cannot cover all possible conditions and situations that may occur.
It must be understood that common sense and caution are factors which cannot be built into this product, but must be applied by the
operator.
2. INTRODUCTION
Remove and install leaking tyre valves without having to remove the tyre. Works on steel wheels
and especially good for valves on motorcycle or agricultural wheels. Time saving tool. Not
suitable for high pressure valves.
3. SPECIFICATION
Model No:........................................................................................................TSTVRK
Contents: ..................................... Cone, Push/Pull Driver, Valve Hook Tool, Tyre Valve
Nett Weight: ........................................................................................................0.39Kg
4. OPERATION
WARNING! Ensure that you read, understand and apply Section 1 safety instructions.
4.1. REMOVING TYRE VALVE FROM WHEEL
4.1.1. Using a suitable lubricant, lubricate the valve hook tool and the area around the tyre valve.
4.1.2. Pushthetyrevalvebodytoonesideandinsertthevalvehooktoolbetweenthetyrevalveandthevalveholeinthewheelrim(g.2).
4.1.3. Turn the valve hook tool 90° clockwise so that the hook is under the tyre valve.
4.1.4. Lift the valve hook tool and pull the tyre valve from the wheel rim (g.3).
g.1
g.2
g.3
TSTVRKIssue2(HF)15/04/19
Original Language Version
© Jack Sealey Limited
Refer to
instructions
Wear eye
protection

Other manuals for Sealey TSTVRK

Question and Answer IconNeed help?

Do you have a question about the Sealey TSTVRK and is the answer not in the manual?

Summary

Safety

General Safety Precautions

Follow health and safety regulations. Use tool with tyre pressure adhered to. Ensure vehicle is supported by axle stands.

Tool and Personal Safety

Use safety glasses, suitable clothing. Do not wear jewellery. Do not use tool if damaged or with alcohol/intoxicants.

Introduction

Specifications

Operation Instructions

Removing Tyre Valve

Read and understand safety instructions. Lubricate valve stem and wheel rim. Use push/pull driver to remove valve.

Fitting Replacement Tyre Valve

Clean rim, screw valve to driver, lubricate valve body, insert into rim, pull valve into seat, inflate tyre.

Overview

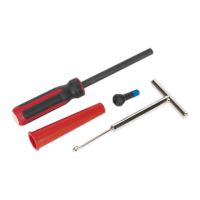
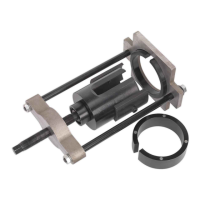
The Sealey TSTVRK is a specialized tool designed for the removal and installation of tyre valves, particularly useful for steel wheels and especially effective for valves on motorcycle or agricultural wheels. This tool allows for the replacement of leaking tyre valves without the need to remove the entire tyre, offering a significant time-saving advantage. It is important to note that this tool is not suitable for high-pressure valves.

Function Description:

The primary function of the TSTVRK is to facilitate the quick and efficient replacement of tyre valves. It comprises a set of components including a Cone, a Push/Pull Driver, a Valve Hook Tool, and a Tyre Valve. The process involves using the Valve Hook Tool to extract old valves and the Push/Pull Driver in conjunction with the Cone to install new ones. This method bypasses the more laborious process of dismounting the tyre, making it a convenient solution for workshops and individuals.

Important Technical Specifications:

  • Model No.: TSTVRK
  • Contents: Cone, Push/Pull Driver, Valve Hook Tool, Tyre Valve
  • Nett Weight: 0.39 Kg

Usage Features:

Safety Precautions:

Before using the TSTVRK, it is crucial to adhere to several safety guidelines to prevent damage, personal injury, and to maintain the product's warranty.

  • Always ensure that Health and Safety, local authority, and general workshop practice regulations are followed.
  • DO NOT use this tool on an inflated tyre. All air pressure must be expelled from the tyre before attempting valve replacement.
  • Ensure that any vehicle being worked on is adequately supported with axle stands.
  • DO NOT use the tools if they are damaged.
  • Maintain tools in good and clean condition for optimal and safe performance.
  • Always wear approved eye protection. A full range of personal safety equipment is available from Sealey Stockists.
  • Wear suitable clothing to avoid snagging; DO NOT wear jewellery and tie back long hair.
  • DO NOT use on wheels with inner tubes.
  • DO NOT use on alloy wheels.
  • DO NOT use this tool when tired, or under the influence of alcohol, drugs, or intoxicating medication.
  • DO NOT use this tool for any purpose other than its intended design.
  • DO NOT use this tool if any part of it is damaged.
  • DO NOT allow untrained persons to use this tool.
  • When not in use, clean and store the tool in a safe, dry, childproof area.
  • The manual emphasizes that common sense and caution are essential factors that must be applied by the operator, as they cannot be built into the product itself.

Removing Tyre Valve from Wheel:

  1. Apply a suitable lubricant to the valve hook tool and the area around the tyre valve.
  2. Push the tyre valve body to one side.
  3. Insert the valve hook tool between the tyre valve and the valve hole in the wheel rim.
  4. Turn the valve hook tool 90° clockwise so that the hook is positioned under the tyre valve.
  5. Lift the valve hook tool and pull the tyre valve from the wheel rim.

Fitting Replacement Tyre Valve:

  1. If necessary, clean any dirt and corrosion from the area around the valve hole in the wheel rim.
  2. Screw the replacement tyre valve onto the push/pull driver.
  3. Generously lubricate the tyre valve body and the inside of the cone with a suitable rubber lubricant. DO NOT use mineral oil or grease, as these can cause the tyre valve body to deteriorate.
  4. Place the thin end of the cone into the valve hole in the wheel rim and align the tyre valve.
  5. Use the push/pull driver to force the tyre valve all the way through the cone until it has entered the wheel.
  6. Pull the tyre valve upwards until it seats securely in the wheel rim.
  7. Unscrew the push/pull driver from the tyre valve and then remove the cone.
  8. Inflate the tyre and thoroughly check for any leaks around the valve body.

Maintenance Features:

  • General Maintenance: Maintain tools in good and clean condition for best and safest performance.
  • Storage: When not in use, clean the tool and store it in a safe, dry, childproof area.
  • Environmental Protection: The manual encourages recycling unwanted materials. All tools, accessories, and packaging should be sorted and taken to a recycling centre. When the product becomes completely unserviceable and requires disposal, any fluids (if applicable) should be drained into approved containers and disposed of according to local regulations.
  • Product Improvement: Sealey's policy is to continually improve products, and as such, they reserve the right to alter data, specifications, and component parts without prior notice.
  • Warranty: The product comes with a 12-month guarantee from the purchase date, with proof of purchase required for any claim. The manufacturer accepts no liability for incorrect use of this product.

Sealey TSTVRK Specifications

General IconGeneral
BrandSealey
ModelTSTVRK
CategoryTools
LanguageEnglish

Related product manuals