EasyManua.ls Logo

Seametrics iMAG 4700 - User Manual

Seametrics iMAG 4700
24 pages
Print Icon
To Next Page IconTo Next Page
Loading...
PROUDLY
MADE
IN THE
USA
C
e
r
t
i
f
i
e
d
C
o
m
p
a
n
y
ISO
9001:2008
iMAG 4700
Municipal/Industrial Magmeter
Instructions

Other manuals for Seametrics iMAG 4700

Questions and Answers

  • W
    wwarrenAug 11, 2025
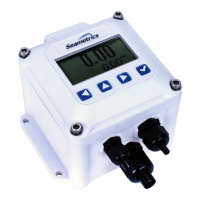
    What to do if my Seametrics Measuring Instruments display is blank?
    • J
      jessicacoffeyAug 11, 2025
      If the display of your Seametrics Measuring Instruments is blank, there are a few potential causes. First, check the wiring from the power source to the meter for any incorrect connections. Use a DMM to measure the voltage where the red and black wires connect to terminal block TB2 inside the meter display head, ensuring correct polarity and a steady voltage between 9Vdc and 32Vdc. Another possibility is that the battery has not been plugged in, so ensure that the battery is properly connected. Finally, the battery may be dead, so try replacing it with a new one.
  • J
    Julian WilliamsAug 18, 2025
    Why is the pulse/frequency output erratic on my Seametrics Measuring Instruments?
    • J
      Juan MaciasAug 19, 2025
      If the flow rate appears correct but the pulse/frequency output is erratic and/or too high in your Seametrics Measuring Instruments, it might be due to electrical noise interfering with the pulse frequency signal; try to isolate, remove, or reduce these noise sources. Another possible cause is using the wrong type of cable; make sure you are using only twisted pair cable and that both signal wires are on the same twisted pair. A grounding problem could also be the reason; improve or try a different grounding method.
  • B
    Billy HardyAug 26, 2025
    How to fix low pulse/frequency output on Seametrics iMAG 4700?
    • T
      troykleinAug 26, 2025
      If the flow rate appears correct, but the pulse/frequency output is low, erratic, or absent on your Seametrics Measuring Instruments, start by checking the wiring to ensure it matches the appropriate wiring recommendations. Another cause may be that the external device input impedance is too low, so use a sourcing rather than a sinking interface connection. Also, a cable that is too long could be the problem, so reduce the interface pull-up resistance.
  • E
    Erica NormanNov 2, 2025
    Why does the flow rate reading fluctuate excessively on my Seametrics iMAG 4700?
    • T
      Thomas Woods IINov 2, 2025
      If the flow rate reading fluctuates excessively when the flow is unchanging in your Seametrics Measuring Instruments, it could be due to several factors. Excessively turbulent or unsteady flow may be caused by partially closed valves or other flow obstructions; in this case, try to minimize flow disturbances or increase meter damping. Another cause may be that the pipe is not full, so provide back pressure to ensure it remains filled. Pulsing flow from multiple upstream sources can also be a factor; try moving the connection point further upstream. Insufficient mixing of upstream chemicals might be the issue, so move the chemical injection point downstream from the meter. A low fluid conductivity (less than 20 µS/cm) may require a different type of meter. Electrical noise can also cause fl...

Summary

General Information

Features

Describes the physical and functional characteristics of the iMAG 4700 flowmeter.

Specifications

Details technical parameters including pipe sizes, pressure, temperature, accuracy, and materials.

Dimensions

Provides physical measurements, flange details, and shipping weight for various meter sizes.

Accuracy

Explains the meter's accuracy performance as a function of flow velocity.

Flow Rate

Lists maximum and cut-off flow rates for different pipe sizes and max flow velocity.

Installation

Straight Pipe Recommendations

Advises on required straight pipe lengths before and after the meter for optimal accuracy.

Full Pipe Recommendations

Explains how to ensure the meter is always filled for accurate readings and to avoid issues.

Positioning the Meter

Details requirements for meter installation orientation and use of check valves/air vents.

Installing Gaskets

Provides instructions and requirements for proper gasket selection and installation.

Chemical Injection Considerations

Advises on placement for chemical injection points relative to the magmeter.

Tightening Flange Bolts

Describes the correct sequence and torque for tightening flange bolts to prevent leaks.

Equalization and Grounding

Explains methods for grounding and equalization for safety and electrical interference.

Connections

General Cable Information

Introduces power/output cables, connector types, and available output options.

Cable Gland Opening and Sealing

Details the process for installing and properly sealing cable glands.

Cable Installation Procedures

Provides step-by-step instructions for connecting cables to the meter.

Wiring Diagrams

Illustrates wiring configurations for different meter types and outputs.

Cable Wiring Table

Presents a table mapping connector pins to outputs for various configurations.

Configuration

Output Configuration Modes

Describes sourcing, sinking, and analog 4-20mA current loop output configurations.

Cable Shield Handling

Advises on proper connection of the cable shield to minimize ground loop problems.

Pulse Output Configuration

Details setting up the pulse output, including K-factors and frequency scaling.

Output Configuration Options

Covers Analog, HART, Modbus, and Digital output configurations and their settings.

High Speed Digital Output K-Factors

Provides K-factors for various pipe sizes for high-speed digital output scaling.

Operation

Home Screen and Navigation

Explains how to navigate the meter's interface using the touch sensors.

Changing Flow Meter Settings

Details accessing and modifying meter settings through the menu system.

Making Selections and Changing Values

Describes the process of selecting parameters and entering new values.

Standard Menu Options

Lists and describes common menu options like T UNIT, R UNIT, SET P, DAMP, and EXIT.

Special SUBMENU Options

Explains access to additional submenus for INFO, COMM, MBID, SAMP, and HPOLL.

Passcode Management

Provides instructions on how to change the meter's access passcode.

Power and Battery Indicators

Explains the meaning of power plug and battery icons on the display.

Battery Powered Unit Operation

Details configuration and operation specifics for battery-powered iMAG 4700 units.

Battery Life and Sample Period

Shows expected battery life based on the selected sensor sample period.

DAMP Settings for Battery Units

Explains how DAMP settings affect display averaging for battery units.

Troubleshooting & Error Messages

Troubleshooting Common Issues

Lists common problems, probable causes, and suggested solutions for the meter.

Understanding Error Messages

Describes various error messages and their corresponding notes or meanings.

Seametrics Limited Warranty

Seametrics Limited Warranty Terms

Outlines the terms, conditions, and exclusions of the manufacturer's limited warranty.

Seametrics iMAG 4700 Specifications

General IconGeneral
BrandSeametrics
ModeliMAG 4700
CategoryMeasuring Instruments
LanguageEnglish

Related product manuals