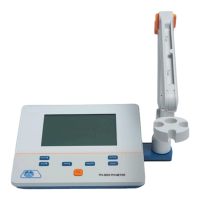
4.2 Instrumentinstallation
4.2.1
Multifunctionalelectrodeholdermounting
1) Pullouttheelectrodeholderfixingplateontherightsideofthemeter.
2) Insertthemultifunctionalelectrodeholderintothefixedshaftoftheelectrodeholderfixedextractorplate.
3) Tightenthesetscrewatthebottomoftheelectrodeholder.
Figure4‐4Installationofthemultifunctionalelectrodeholder
4.2.2
Electrodeinstallation
1) MountthepHelectrodeontheelectrodeholder,
2) FindtheinterfaceoftemperatureelectrodeandmeasurementelectrodeonthebackofpHmeter,unplugQ9
shortcircuitplug.
3) InsertpHelectrode’stemperatureelectrodeandpHelectrodeplugintothecorrespondingelectrodeconnector
respectively.
5 InstrumentOperation
5.1 ScreenIcons
ThemeterusessegmentLCDasthedisplay,andtheoveralldesignisasfollows:theleftisthemainfunctionalarea,
includingthemeasurementfunction,calibrationfunction,settingfunction,andviewingfunction;theupperpartdisplays
thestatuspromptarea;themiddleisthemeasurementresultarea,includingpHvalue,temperaturevalue;Thelower
rightcorneristhecurrentpercentslope.
Fig.5‐1ScreeniconsexplanationTable5‐1SymbolExplanation