MX-C250 SIMULATION 6 – 45
46-21
Purpose
Adjustment
Function (Purpose)
Copy color balance adjustment (Manual
adjustment)
Section
Operation/Procedure
1) Select an item to be set with 10 keys.
2) Press [OK]/[START] key. .
3) Enter the setting value with 10 keys.
4) Press [OK]/[START] key.
When the adjustment value is increased, the image density is
increased, and vice versa.
When [OK]/[START] key is pressed, the check pattern in
printed in the color balance and density corresponding to the
adjustment value.
46-23
Purpose
Adjustment/Setup
Function (Purpose)
Used to set the density correction of copy
high density section (High density tone gap
supported).
Section
Operation/Procedure
1) Enter the set value with 10 keys.
Press [OK]/[START] key. The set value is saved.
* When tone gap is generated in the high density area, set items
A and B to "0.
The density of high density part decreases. However, the tone
gap is better.
* To increase the density in the high density area further, set
items A and B to "1.
The tone gap may occur in high density part.
NOTE:
Do not change the values of items 3, 4, 5, and 6. . If these
values are changed, the density in the high density area is
changed.
46-24
Purpose
Adjustment
Function (Purpose)
Color balance adjustment
(Auto adjustment)
Section
Operation/Procedure
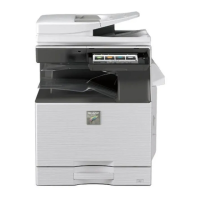
1) Press [OK]/[START] key.
The color patch image (adjustment pattern) is printed out.
2) Plate the printed adjustment pattern on the document table.
3) Press [OK]/[START] key.
The copy color balance automatic adjustment is performed,
then the adjustment result pattern is printed.
4) Press [OK]/[START] key.
The half tone correction target registration is processed.
1) Press [OK]/[START] key.
The half tone correction adjustment is processed.
46-27
Purpose
Adjustment/Setup
Function (Purpose)
Used to adjust the gamma/density of copy
images.
Section
Operation/Procedure
1) Select an item to be set with 10 keys.
2) Enter the set value with 10 keys.
3) Press [OK]/[START] key.
The set value in step 2) is saved.
Item/Display
Density level
(Point)
MIn Max
Default
value
K
POINT1K Point 1
1 255 128 - -
POINT17 K Point 17
C
POINT1C Point 1
1 255 128 - -
POINT17 C Point 17
M
POINT1M Point 1
1 255 128 - -
POINT17 M Point 17
Y
POINT1Y Point 1
1 255 128 - -
POINT17 Y Point 17
0 Enable
1 Inhibit
Item/Display Content
Set-
ting
range
Default
value
1
CMY
(0 : ENABLE
1 : DISABLE)
0
CMY engine high-
est density correc-
tion mode :
Enable
0 - 1 0
1
CMY engine high-
est density correc-
tion mode :
Disable
2
K
(0 : ENABLE
1 : DISABLE)
0
K engine highest
density correction
mode : Enable
0 - 1 1
1
K engine highest
density correction
mode : Disable
3
CYAN MAX TAR-
GET
Scanner target value for
CYAN maximum den-
sity correction
0 - 999 500
4
MAGENTA MAX
TARGET
Scanner target value for
MAGENTA maximum
density correction
0 - 999 500
5
YELLOW MAX
TARGET
Scanner target value for
YELLOW maximum
density correction
0 - 999 500
6
BLACK MAX TAR-
GET
Scanner target value for
BLACK maximum den-
sity correction
0 - 999 500
Item/Display
(Copy mode)
Content MIn Max
1 TEXT (SLOPE)
Character edge gamma
skew adjustment
199
2
TEXT (INTER-
CEPT)
199
3 TEXT PRT(SLOPE)
Character edge / photo
mode gamma skew
adjustment
199
4
TEXT PRT (INTER-
CEPT)
199
Item/Display Content
Set-
ting
range
Default
value