ADM-870C 07/14/0923
5.7.4 SET-UP CONNECTIONS AND OPEN THE APPLICATIONS
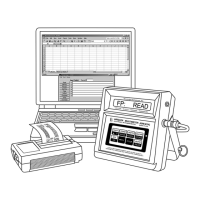
Load the WinWedge software onto the computer. Open the spreadsheet application first, then open the WinWedge window.
Move and/or size the two application windows so they are adjacent or overlapping and both visible on the screen. This
allows for optimal viewing of the applications and use of the cursor.
Click on File > Open in WinWedge to view a list of existing configuration files (if configuration files have been predefined
and saved). Configuration files must be in the same folder as WinWedge or they will not be displayed. Open an existing
configuration file by double clicking the file name or clicking on Open in the WinWedge menu bar.
Connect the serial cable barrel connector to the RS232 jack on the right side of the meter. The red dot on the connector
aligns with the red rectangle on the lower part of the jack. Connect the DB9 connector to a computer port, either COM1
(preferable) or COM2.
If COM1 is not available on the computer being used, COM2 must be selected. Click on Port > Settings in WinWedge and
change the port selection from COM1 to COM2. Click on OK.
Click on Activate > Test Mode in WinWedge. The displayed window will include a field for the record number and a series
of input fields. WinWedge is now ready to communicate with the meter.
Always activate WinWedge in Test Mode during the learning process or while modifying a Configuration File. Test Mode
permits the user to return to the WinWedge Main Menu and change ports or edit any of the configuration parameters. If
WinWedge is activated in Normal Mode, none of the parameters can be modified without quitting WinWedge and beginning
again.
5.7.5 INDIVIDUAL READINGS CONTROLLED FROM COMPUTER KEYBOARD
This method allows the user to control the meter from the computer keyboard while taking individual readings. Select or
define and save the configuration file to be used. Position the cursor in the cell on the spreadsheet where data entry should
begin. Select the appropriate mode on the meter using the predefined computer keyboard function key (see Section 5.7.3
FUNCTION KEY COMMANDS). Then take a reading using the predefined function key for initiating readings. The meter
will take a reading and automatically download the results to the spreadsheet.
The cells will contain the fields which were selected using Define > Input Data Record Structure. Each field is downloaded
into a single cell and the data is easily manipulated. The cursor should automatically relocate to the next vacant cell in the
starting column for the next reading. If it does not, the cursor option in the spreadsheet application will need to be changed.
If using Microsoft Excel, click on Tools > Options > Edit and change the cursor action following ENTER to be Down. If using
QuattroPro, click on Tools > Settings > General and change Move Cell Selector > Enter Key to Down.
5.7.6 DOWNLOAD READINGS FROM MEMORY USING COMPUTER KEYBOARD
This method downloads all readings stored in the meter’s memory. The number of stored readings may be any number
up to 200. Disconnect the RS232 cable from the meter. Press SHIFT/CLEAR on the meter keypad, then select the desired
measurement mode. Select the STORE mode and store as many readings as required.
Return to the computer and connect the meter to the RS232 cable. Position the cursor in the cell on the spreadsheet where
data entry should begin. Press the predefined function key which initiates the download from meter memory. The readings
will be downloaded as numerical entries that can be readily manipulated using the spreadsheet functions.
The readings will remain stored in the meter memory until the memory is cleared by pressing the SHIFT key, followed by
the CLEAR key.
5.7.7 CONTROL BUTTONS, CURSOR CONTROL, AND FILE PATHS
Control Buttons may be defined when a WinWedge configuration file is being set-up. These buttons use the same meter
commands as the Function Keys (D<CR> changes mode to Differential Pressure). The defined Control Buttons are then
displayed to the left of the Input Field(s) when Activate > Test Mode is selected and act just like the Hot Keys/Function Keys
discussed in Section 5.7.3 FUNCTION KEY COMMANDS.
However, clicking on the Control Buttons will cause the cursor focus to shift from the spreadsheet to the active WinWedge
window. When this occurs, the data will not be downloaded into the spreadsheet. WinWedge can be configured to
automatically assign the cursor focus to the spreadsheet application as needed. Select Mode > Send Keystrokes To in the
WinWedge Setup window and enter the spreadsheet application title into the application title bar text space in the dialog
box. It may be adequate to enter only the name of the spreadsheet from the Application Title Bar, or it may also be
necessary to enter the complete file path to the application. When this is done, the commands to the meter can be
 Loading...