8
3 Montage
3.1 Verlegungsanweisung für die Seilzüge
Die Seilzüge sind werkseitig in der jeweils erforderlichen
Anzahl und erwarteten Vorzugslänge bereits am Empfänger
- Baustein montiert und eingestellt (Fig. 6).
Vorgesehen sind für Zusatz Z:
S 50 -> 1 Seilzug à 3 m
S 51 -> 2 Seilzüge à 3 m
S 53 -> 2 Seilzüge à 3 m
S 54 -> 1 Seilzug à 3 m, 1 Seilzug à 6 m
S 55 -> 1 Seilzug à 3 m, 1 Seilzug à 6 m
Die Verlegeradien sollten nicht kleiner als ca. 100 mm sein,
größtmögliche Radien sind anzustreben.
Seilzüge sind von allen stromführenden Teilen fernzuhalten
oder geeignet zu isolieren.
3.2 Einbau der Seilzüge am Geber - Baustein
3.21 Schalter in den Einschubrahmen einschieben und
jeweils Abdeckplatte links vom Bedienpult abnehmen
(4 Sechskantschrauben).
3.22 Seilzüge ausrollen und unter Beachtung ausreichen-
der Biegeradien verlegen, gegebenenfalls Schutzrohre auf-
schieben und in den Einschubrahmen einführen.
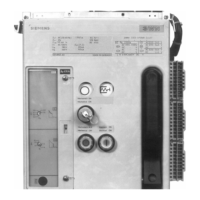
3.23 Seilzüge am Geber - Baustein befestigen (Fig. 7),
Schalter A und B sind ausgeschaltet.
- Beginn der Befestigung des Seilzuges des Schalters B
am Geber - Baustein des Schalter A, um Einschaltbar-
keit des Schalters B zu gewährleisten.
- Konfektionierte Drahtseilklemme (17, Fig. 7) in den Schlitz
des Zugbolzens (3, Fig. 7) einbringen und mit der
Scheibe (18, Fig. 7) DIN 125-4 3-140 HV-A2L sowie SL-
Sicherung (19, Fig. 7) 4SXN 08-002 sichern.
- Seilbefestigungsschraube (20, Fig.5) in die Gabel (4,
Fig. 5) einlegen und mit der Befestigungsmutter (21, Fig.
5) festschrauben.
- Maß 20 mm ist werkseitig eingestellt.
- Schutzhülle (22, Fig. 5) wie dargestellt mit Kabelbinder
(23, Fig. 5) 30D an der Selbstklebeplatte (24, Fig. 5)
29x29 befestigt.
- Schalter B zum Test einschalten.
- Schalter B ausschalten und am Geber des Schalters B
mit der Seilbefestigung des Schalters A fortfahren.
Achtung !
Vor der Entnahme des Schalters aus dem Einschubrah-
men, Teil (18 und 19, Fig. 7) lösen und Seilzug entkoppeln.
3 Installation
3.1 Installation instructions for the cable pulls
The cable pulls are factory-fitted and adjusted on the receiv-
er module (Fig. 6), in the required quantity and with the
expected pulling length.
Scheduled for supplement Z:
S50 -> 1 cable pull a 3 m
S51 -> 2 cable pulls a 3 m
S53 -> 2 cable pulls a 3 m
S54 -> 1 cable pull a 3 m, 1 cable pull a 6 m
S55 -> 1 cable pull a 3 m, 1 cable pull a 6 m
The installation radii should not be less than around 100mm;
the largest possible radii should be aimed for.
Cable pulls must be kept clear from all live parts or suitably
insulated.
3.2 Fitting the cable pulls on the transmitter
module
3.21 Push circuit-breaker into guide frame and remove
cover plate from left-hand side of control panel (4 hexagon-
head screws).
3.22 Unroll cable pulls and install them taking account of
adequate bending radii; push on protective sleeves if nec-
essary, and fit them into the guide frame.
3.23 Fasten cable pulls on transmitter module (Fig. 7);
circuit-breakers A and B are open.
- Start fastening cable pull of circuit-breaker B on transmit-
ter module of circuit-breaker A, so as to assure read-
ness to close of circuit-breaker B.
- Insert made-up cable clamp (17, Fig. 7) in slot of pulling
bolt (3, Fig. 7) and secure with washer (18, Fig. 7)
DIN125-4 3-140 HV-A2L and split pin (19, Fig. 7)
4SXN 08-002.
- Place cable fastening screw (20, Fig. 5) in fork (4, Fig. 5)
and screw tight with fastening nut (21, Fig. 5).
- The dimension 20mm is factory-set.
- Fix protective sleeve (22, Fig.5) as shown with cable
binder (23, Fig. 5) 30D on self-adhesive plate (24, Fig. 5)
29x29.
- Test-close circuit-breaker B.
- Open circuit-breaker B and continue on transmitter of
circuit-breaker B with cable pull fastening for circuit-
breaker A.
Caution !
Before removing the circuit-breaker from the guide frame,
undo parts 18 and 19 (Fig. 7) and uncouple cable pull.
3.24 Einstellung des Stößels am Schalter
Betätigungsstößel am Schalter sind werkseitig justiert.
3.24 Setting the plunger on the circuit-breaker
The actuating plungers on the circuit-breaker are adjusted
at the works.
Fig. 7
Y
(s. Seite 6 /
see page 6)
19 18
17
3
2
2 Wipphebel, kpl. / Rocker, complete
3 Zugbolzen / Pulling bolt
17 Drahtseilklemme / Cable clamp
18 Scheibe / Washer
19 SL - Sicherung / Split pin
 Loading...