Do you have a question about the Siemens HN978GQB1 and is the answer not in the manual?
Read manual carefully, keep for future reference, do not use if damaged.
Covers risks of fire, burns, scalding, and injury from hot parts and sharp edges.
Warnings cover fire risk, explosion, burns, scalding, and electric shock.
Warnings for electric shock and injury due to sharp probe.
Warnings for fire, health risks from high temperatures and fumes.
Avoid acidic food, water on floor, objects on floor, and silicone items.
Compartment and exterior get very hot; do not open door or touch.
Metal contact causes sparks; keep metal 2cm from walls.
Cookware with rust spots causes corrosion; use cold water.
Set water hardness correctly for descaling reminders.
Configure settings like language, Home Connect, and water hardness.
Clean the cooking compartment and accessories before first use.
Select heating type, set temperature, and other options.
Set cooking duration for up to 24 hours.
Delay the operation start time up to 24 hours.
Warning about scalding risk from hot steam.
Step-by-step guide to filling the water tank.
Choose steam heating type, temperature, and cooking time.
Use microwave for fast cooking, heating, baking, or defrosting.
Microwave-only operation and combining with other modes.
Select microwave output, cooking time, and adjust settings.
Precise cooking using meat probe for core temperature.
Set core temperature and cooking compartment temperature.
Choose dish, category, method, and adjust settings.
Adjust settings like display brightness, standby screen, clock, etc.
Fire risk during remote operation; do not store combustible objects.
Use suitable cleaning agents; avoid harsh/abrasive products.
Lists suitable agents for stainless steel, plastic, and glass.
Clean the appliance body and parts carefully.
Appliance parts get hot; remove dirt before cleaning.
Remove items, coarse dirt; ensure door seal is intact.
Select cleaning level and start the self-cleaning cycle.
Procedure for descaling to maintain appliance performance.
Warnings for injury and electric shock risks during repairs.
Lists common faults like 'appliance not working' and 'electronics fault'.
Troubleshooting display language, operation start/interruption, heating.
Addressing flashing buttons, plopping sounds, and error codes.
Warning about hot steam when opening roasting lids.
Warnings for burn risk from popcorn packaging.
Warning about delayed boiling of liquids; exercise caution.
Follow instructions for professional installation; check for damage.
Do not use extension cords or non-approved adapters.
Do not carry or hold appliance by the door handle.
Insert plug into correctly installed protective socket.
Only licensed specialists; connect according to diagram.
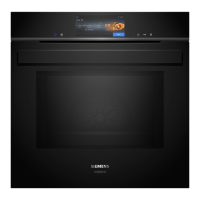
| Type | Built-in oven |
|---|---|
| Energy efficiency class | A+ |
| Maximum temperature | 300 °C |
| Number of cooking functions | 13 |
| Control type | Electronic |
| Integrated Cleaning system | Yes |
| Cleaning system | Pyrolytic |
| Temperature control | Yes |
| Dimensions (H x W x D) | 595 x 594 x 548 mm |
| Power | 3.6 kW |
| Voltage | 220-240 V |
| Frequency | 50/60 Hz |
| Weight | 47 kg |
| Color | Black |
| Cooling fan | Yes |
| Child lock | Yes |
| Self-cleaning | Yes |
| Timer | Yes |
| Oven capacity | 71 liters |
| Usable volume (of cavity) | 71 liters |