10
GB
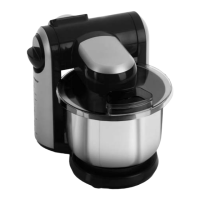
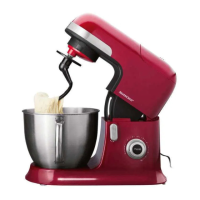
7. Using the mixing
tools
Lifting up the drive arm
1. Turn the unlocking lever|10 to point up-
wards (in the direction of the arrow)
and lift up the drive arm|22 until it
clicks into place and the unlocking le-
ver|10 snaps back into its locked posi-
tion.
Inserting the mixing bowl
2. Place the mixing bowl|15 into the base
unit|19 in such a way that the metal
pins on the lower edge fit into the re-
cesses in the base unit.
3. Lock the mixing bowl|15 by rotating it
clockwise slightly, until it is firmly in
place.
Mounting the splash guard
CAUTION:
~ Never use the mixing bowl|15 without
the splash guard attached|21. The ma-
terial you are mixing could otherwise
be ejected.
4. Place the splash guard|21 onto the
drive arm|22 from below. The filling
opening with flap|20 should point in
the direction of the speed control|11.
5. Rotate the splash guard|21 in the direc-
tion of the closed lock symbol until it
clicks into place.
Inserting the mixing tool
6. Select the appropriate mixing tool:
- Dough hook|14: for heavy doughs,
e.g. bread dough
-Whisk|16: for whipping cream, egg
white etc.
- Beater|17: for light dough or batter,
e.g. cake mix or pancake batter.
For further information: see “Overview
of functions” on page 9.
7. Place the mixing tool onto the axle|23
from below.
Ensure that the small metal pins on the
axle|23 slot into the recesses in the mix-
ing tool.
8. Figure A: press the mixing tool up-
wards slightly and rotate it anticlock-
wise until it stops.
__288190_Kuechenmaschine_Profi_B6.book Seite 10 Montag, 7. August 2017 11:09 11
 Loading...