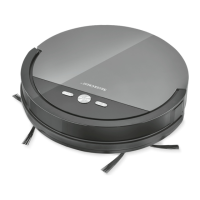
35 GB/IE
Place the microfibre cloth
13
over the frame
14
.
The six hook-and-loop fasteners
35
ensure that
the microfibre cloth
13
remains in place (see
Fig. C).
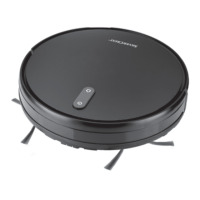
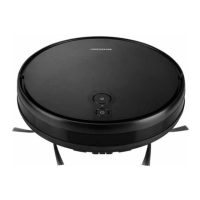
Flip up the cover
7
to open it (see Fig. B).
Remove the dust collector
19
by pulling on the
carrying handle
25
.
Fill the water tank
20
using the water filling
port
24
. Please note the markings denoting the
maximum filling level (300 ml).
Then put the water tank
20
back in the robot
vacuum cleaner and close the cover
7
.
Press the “Start / Pause“ button on the robot
vacuum cleaner
2
or the remote control
38
to start mopping.
Note: The device will not vacuum when mopping.
Press the “Start / Pause“ button again on the robot
vacuum cleaner
2
or the remote control
38
to
finish mopping.
When finished, flip open the cover
7
.
Remove the water tank
20
by pulling on the
carrying handle
23
. Empty out any remaining
water.
Now put the dust collector
19
back in the
robot vacuum cleaner and close the cover
7
.
Note: the different vacuum modes can also be
used for the mop function.
Setting a vacuuming schedule
You can set a schedule so that the robot vacuum
cleaner will clean automatically.
Note: Be aware that all pre-set times will be erased
if the robot vacuum cleaner is switched off (power
switch
5
in position “O”).
Note: Beep tones will sound if the time and schedule
have been successfully set. If this does not happen,
the settings were not saved.
Setting the time:
Make sure that the robot vacuum cleaner is
switched on and point the remote control at it.
Press the button
44
and use the direction
keys
37
to set the time.
Press the button
44
again to save the entry.
To delete the time entry, set the clock to “00:00”.
Setting the schedule:
Note: The robot vacuum cleaner will always start
vacuuming at the scheduled time, unless it is switched
off.
Make sure that the robot vacuum cleaner is
switched on and point the remote control at it.
Press the button
39
and use the direction
keys
37
to set the time.
Press the button
39
again to save the entry.
To delete the time entry, set the clock to “00:00”.
Cleaning and storage
Set the power switch
5
to position “O” before
cleaning the product.
Unplug the mains cable
11
from the mains
socket before cleaning the product.
Do not rinse the product directly with water.
Do not wipe the product with a cloth soaked in
water.
Disconnect the power supply if the product will
not be used for an extended period.
Part Cleaning intervals
Dust collector
19
Depends on usage
Primary filter
26
,
high performance
filter
27
Weekly, 2 x weekly
if very dirty
Side brushes
30
Every 4 weeks
Anti-drop sensors
31
Every 2 weeks
Front wheel
34
Every 4 weeks
Cleaning the dust collector and filter
Clean the dust collector
19
by tapping out the
dust and then rinsing with water. You can like-
wise tap the dirt out of the primary filter
26
and
clean it with water. Please dry the dust collec-
tor
19
and the primary filter
26
fully before
re-installing them in the product. Please tap the
dirt out of the high performance filter
27
and
 Loading...