17GB/IE/NI
Use a dry lint-free cloth or
cotton swab to clean the
contacts on the battery/
rechargeable battery and
in the battery compartment
before inserting!
Remove exhausted batteries/
rechargeable batteries from
the product immediately.
This product features a built-in
rechargeable battery which
cannot be replaced by the
user. The rechargeable battery
must be removed or replaced
by the manufacturer or their
service centre or a similarly
qualified person to avoid
hazards. When disposing
of the product, you must
indicate this product contains a
rechargeable battery.
Clean the product and its
accessories (see “Cleaning
and care”).
Initial use
Charging the product
m
CAUTION! Position the charging dock[5]
out of direct sunlight.
NOTES:
o Fully charge the product before using it for
the first time. It takes approx. 4–6hours to
charge.
o Keep 1m from the left/right and 2m from
the front of the charging dock
[5] clear of
other objects (Fig.C).
o Keep 15cm from the top of the charging
dock
[5] clear of mirrors or other highly
reflective objects. If necessary, cover any
mirrors or highly reflective objects.
o The product sometimes corrects its position in
the charging dock
[5].
o Try not to change the position of the
charging dock
[5]. A fixed position makes it
easier for the product to find its way back to
the charging dock.
o Charge the product when the indicator lights
on the
button[2] and the button[3]
flash white.
o Before charging: Remove the water tank[]
from the product (see “Using the mop
function”).
1. Connect the DCplug of the mains
adapter
[] to the charging dock[5].
2. Connect the mains adapter
[] to a socket-
outlet. The indicator light
[6] lights up.
3. Place the charging dock
[5] flush against a
wall.
4. Switching on:
– Set the on/off switch
[] at the bottom of
the product to Iposition (on).
– Press and hold
[2] for 3seconds. The
indicator light on the
button flashes for
1minute and then goes off.
5. Place the product on the charging dock
[5]
(Fig.D).
Align the charging contacts
[] at the bottom
of the product with the charging contacts
[7]
on the charging dock.
The indicator lights on the
button[2]
and the button[3] light up white with a
breathing effect.
6. Once charging is completed, the indicator
lights on the
button[2] and the
button[3] go off.
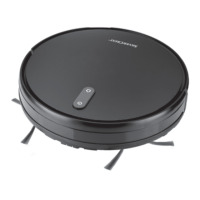
Attaching the side brushes
NOTE: When attaching the side
brushes
[] [], make sure that the markings
L and R on the bottom of the product and on
the side brushes match.