6
Accessories (not shown):
• 1 x Sanding Belt 100 Grit
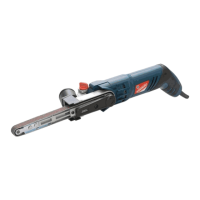
Intended Use
Beltsanderforlighttomediumdutyremovaloflargeramountsofmaterial,usedonsoftaswellas
hardwood,andsimilarmaterials.
Unpacking Your Tool
• Carefullyunpackandinspectyournewtool.Familiariseyourselfwithallitsfeaturesandfunctions
• Ensure that all parts of the tool are present and in good condition. If any parts are missing or
damaged, have such parts replaced before attempting to use this tool
Before Use
WARNING: Ensurethetoolisdisconnectedfromthepowersupplybeforeattachingor
changinganyaccessories,ormakinganyadjustments.
Fitting a sanding belt
1. Placethesanderupsidedownonaworkbenchorasimilarsecure,atsurface
2. PullouttheBeltReleaseLever(10).ThisretractstheFrontRoller(8)andslackensthesanding
belt.Thewornbeltcannowberemoved
3. Fitthenewsandingbelt,positioningitsquarelyovertherollers
4. ClosetheBeltReleaseLever.Thebeltshouldnowbetautandsecure
5. Oncetted,itmaybenecessarytoadjusttheBeltTrackingAdjuster(6)toensurethebeltruns
true
6. Keepthesanderinvertedandconnectittothepowersupply
7. HoldthesanderrmlybytheRearHandle(3)anddepresstheOn/OffTrigger(7).Observeany
sidewaysmotionofthebelt
8. Ifneeded,turntheBeltTrackingAdjusterclockwisetomovethebeltleft,oranti-clockwiseto
move the belt right until the belt runs true
9. Disconnectthesanderfrompowersupply
Fitting the Dust bag
• PushttheDustbag(12)ontotheDustExtractionPort(4)
• Tomaintainanefcientdustremovalprocess,donotallowthedustbagtobecomegreaterthan
twothirdsfull
Operation
WARNING: ALWAYSweareyeprotection,adequaterespiratoryandhearingprotection,aswell
assuitablegloves,whenworkingwiththistool.
Switching ‘ON’ and ‘OFF’
• Tostartthetool,squeezetheOn/OffTrigger(7).Tostopthetool,releasethetrigger
• Forextendedcontinuoususe,theOn/OffTriggercanbelockedinthe'on'position:
1. SqueezetheOn/OffTriggeranddepresstheLockOnButton(2);themachinewillcontinuetorun
whentheOn/OffTriggerisreleased
2. Tostopthemachine,squeezeandreleasetheOn/OffTrigger
Sanding
• Beforestartingtosand,ensuretheworkpieceisadequatelysecured.Useclampsasnecessary,
andalwayskeepbothhandsonthemachine
• Toachieveahighqualitynishefciently,startwithacoarsegradeofsandingbelt,andwork
throughtonergradesuntilthedesirednishisachieved
• Beforeconnectingthemachinetothepowersupply,checktheOn/OffTrigger(7)isintheoff
position,andthesandingbeltisproperlytted
1. Connectthesandertothepowersupply
2. Raisethesanderofftheworksurfaceandswitchon.SqueezetheOn/OffTriggerandallowthe
sander to reach its full operating speed
3. Keepingasecureholdofthemachine,lowerthesanderontotheworksurface.Toavoid
unnecessarydamagetotheworksurface,keepthemovementdirectionofthesandingbelt
parallelwiththenaturalgrainofthewood
4. Movethesanderslowlyacrossthesurfaceoftheworkpieceuntilthedesiredamountofmaterial
has been removed
5. Alwaysliftthesanderawayfromthesurfaceoftheworkpiecebeforestoppingthemotor
6. Ensurethemotorhascometoacompletestopbeforeplacingthemachinedown
7. Alwaysdisconnectthemachinefromthepowersupplybeforeleavingitunattended
Bench-mounted use
• Thesandercanbeinvertedforbench-mountedusewhencombinedwiththeInversionAdaptor
(14) and Inversion Clamps (13)
1. Placethesanderonasecureatsurface,suchasaworkbench
2. CentretheInversionAdaptorontheFrontHandle(1),andturnthesanderupsidedownsoitis
resting on the Inversion Adaptor
3. ClampthesandertotheworksurfacebylocatingtheInversionClampsinthefasteningholesof
thesander,whilstpositioningtheplasticgripsbeneaththetablesurface
4. FastenthewingnutsontheInversionClampstoxthesandersecurelytothesurface
Emptying the dust bag
WARNING: Alwaysswitchoffanddisconnectfromthepowersupplybeforedetachingthedust
extraction system.
1. RemovetheDustBag(12)bygrippingtheneckandpullingthebagawayfromtheDust
Extraction Port (4)
2. Openthebag,emptyandret(see‘Fittingthedustbag’)
Note: If the sanding dust contains harmful substances, such as particles from old paint, varnish,
surfacecoatingsetc,alwaysdisposeofaccordingtolawsandregulations.
WARNING: Foroptimumdustremoval,emptythedustbagwhenitisnomorethantwo-thirdsfull.
Accessories
• A range of accessories and consumables, including 40 Grit Sanding Belts 75 x 533mm,
120GritSandingBelts75x533andSandingBeltCleaningBlockisavailablefromyour
Silverlinestockist.Sparepartscanbeobtainedfromtoolsparesonline.com
Maintenance
WARNING: ALWAYSdisconnectfromthepowersupplybeforecarryingoutanyinspection,
maintenance or cleaning.
Drive belt replacement
• If the drive belt needs to be replaced:
1. Placethesanderonitsside,withtheDriveBeltHousingCover(5)facingupwards
2. RemovethetwoscrewssecuringtheDriveBeltHousingCover,andremovethecovertoreveal
the drive belt and gears
3. Removetheolddrivebeltandtthenewdrivebeltbyloopingitoverthelargergear,thenonto
thesmallergear.Ensuringtheteethsitwithinthegroovesonthegears
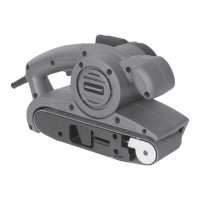
1 Front Handle
2 Lock On Button
3 Rear Handle
4 Dust Extraction Port
5 Drive Belt Housing Cover
6 Belt Tracking Adjuster
7 On/Off Trigger
8 Front Roller
9 Base
10 Belt Release Lever
11 Framing Slots
12 Dust Bag
13 Inversion Clamps
14 Inversion Adaptor
Product Familiarisation
631320_Manual.indd 6 23/05/2017 17:24