LUBRICATION
Pour
"TYPE
H"
OIL
into
Oil Filler Cup
~
Keep
Oil
ih
Sight
Gaug,!.at
''FULL''
MARK
\
f
QS
Check
Oil
Level
DAILY
BEFORE
STARTING
MACHINE
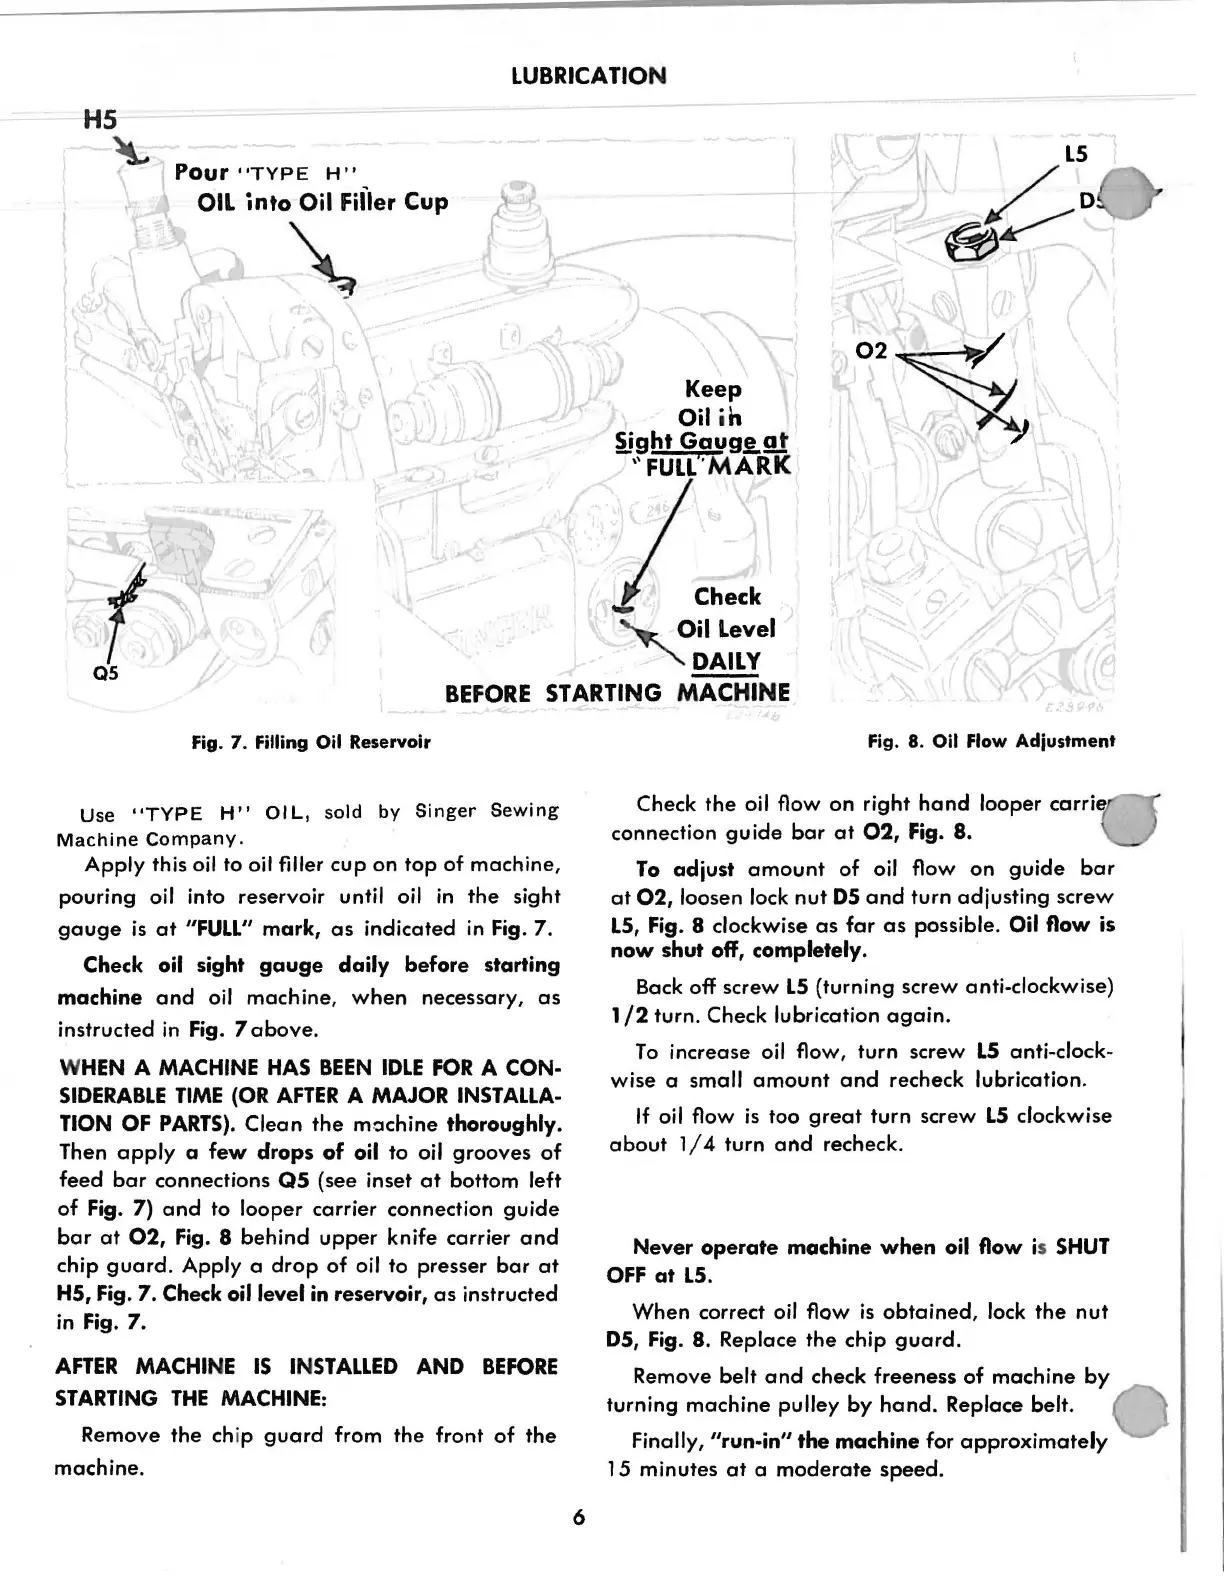
Fig. 7. Filling Oil Reservoir
Use
"TYPE
H"
OIL,
sold
by
Singer
Sewing
Machine
Company.
Apply this oil to oil filler
cup
on
top
of machine,
pouring
oil into reservoir until oil
in
the
sight
gauge
is
at
"FULL"
mark,
as
indicated
in
Fig. 7.
Check oil sight
gauge
daily
before
starting
machine
and
oil machine,
when
necessary,
as
instructed
in
Fig. 7
above.
W
HEN
A
MACHINE
HAS
BEEN
IDLE
FOR
A CON-
SIDERABLE
TIME
(OR
AFTER
A MAJOR
INSTALLA-
TION OF
PARTS).
Clean
the
machine
thoroughly.
Then
apply
a
few
drops
of
oil to oil
grooves
of
feed
bar
connections
QS
(see inset
at
bottom left
of Fig. 7)
and
to looper carrier connection
guide
bar
at
02,
Fig. 8
behind
upper
knife carrier
and
chip
guard.
Apply a
drop
of
oil to presser
bar
at
HS, Fig.
7.
Check oil level in reservoir,
as
instructed
in
Fig. 7.
AFTER
MACHINE
IS
INSTALLED
AND
BEFORE
STARTING
THE
MACHINE:
Remove
the
chip
guard
from the front
of
the
machine.
6
Fig. 8. Oil Flow Adjustment
Check
the
oil flow on right
hand
looper
carrie
connection
guide
bar
at
02,
Fig. 8.
To
adjust
amount
of
oil flow on
guide
bar
at
02,
loosen lock
nut
DS
and
turn
adjusting
screw
LS,
Fig. 8 clockwise
as
far
as
possible. Oil flow is
now
shut
off, completely.
Back off screw
LS
(turning screw anti-clockwise)
1
/2
turn. Check lubrication
again.
To
increase oil flow, turn screw
LS
anti-clock-
wise a small
amount
and
recheck lubrication.
If
oil flow
is
too
great
turn screw
LS
clockwise
about
1/4
turn
and
recheck.
Never
operate
machine
when
oil flow is
SHUT
OFF
at
LS.
When correct oil flow
is
obtained,
lock
the
nut
DS,
Fig. 8. Replace the chip
guard.
Remove belt
and
check
freeness
of machine
by
turning
machine
pulley
by
hand.
Replace belt.
Finally,
"run-in"
the
machine
for
approximately
15 minutes
at
a
moderate
speed.
From the library of: Superior Sewing Machine & Supply LLC