Do you have a question about the Singer 4671 and is the answer not in the manual?
Highlights features like defined thread path, speed control, auto tension, and one-step pattern selection.
Instruction to record the machine's serial number for future reference.
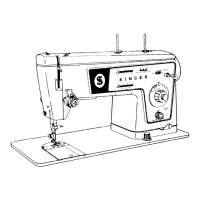
Diagram showing and labeling the key components of the sewing machine.
Details on general purpose, zipper, darning, buttonhole, and other specialized presser feet.
Information on seam guides, lint brush, needles, and bobbins for sewing.
Table recommending appropriate needles and threads for different fabric types.
Instructions on how to properly store the sewing machine's handle.
Guidelines for choosing and changing sewing machine needles.
Procedure for converting the machine to free arm sewing for hard-to-reach areas.
Essential safety rules for operating and maintaining the sewing machine.
Information on safe electrical connections and wiring color codes for safety.
Steps for connecting the foot controller and electrical power cord.
Instructions for using slide and rocker power switches to turn the machine on/off.
Guidance on how to use the foot pedal to control sewing speed.
Instructions on how to detach the currently attached presser foot.
Steps for securely snapping a new presser foot onto the machine shank.
Procedure to remove a presser foot that includes its own shank.
Steps to attach a replacement presser foot with its integral shank.
Instructions for attaching the Darning and Embroidery Foot for free motion work.
Steps for installing the feed cover for specific sewing operations.
Description of the machine's internal threading path for ease of use.
Detailed instructions and diagrams for correctly threading the sewing machine.
Steps to prepare the machine and thread for winding a bobbin.
Instructions on how to wind thread onto the bobbin and remove it.
Steps to prepare the machine for bobbin insertion, including raising the needle.
Detailed steps for correctly placing the wound bobbin into the bobbin case.
Instructions on how to close the slide plate after inserting the bobbin.
Step-by-step guide to bring the bobbin thread up through the needle plate.
Explanation of the pattern display panel and how to use the selector dial.
Details on recommended stitch selection, width, length, foot, and needle plate.
How to adjust the stitch length lever for different fabric types and stitch densities.
Explanation of how tension affects stitches and how to adjust the tension lever.
Methods for temporary basting seams before machine sewing.
Instructions for correctly positioning fabric under the presser foot.
How to reinforce seams by stitching in reverse.
Using guidelines on the needle plate for straight stitching.
Method for turning square corners accurately while sewing.
Instructions for attaching and using the seam guide for straight seams.
Tips for sewing curved seams, including basting and using the seam guide.
Instructions for mending worn or torn areas using the Darning and Embroidery Foot.
Guide to free motion embroidery using an embroidery hoop and specific stitch settings.
Settings for stitch selection, width, length, foot, and needle plate for zipper insertion.
Instructions for sewing close to zipper teeth using the appropriate zipper foot.
General guidance on using special stitches and recommended settings.
How to adjust the stitch width lever for various special stitch patterns.
How to set stitch length for dense or open special stitches, including color-coded ones.
Guidance on adjusting thread tension for optimal results with special stitches.
How to adjust stitch balance for special color-coded stitches for proper appearance.
Using the zig-zag stitch to finish seam edges and prevent unraveling.
Settings for stitch selection, width, length, foot, and needle plate for zig-zag stitch.
Using blindstitch for a durable hem finish on various fabric weights.
Using the stitch for mending, overcasting, joining, or reinforcing.
Instructions for mending tears using this stitch and recommended settings.
Applying lace trim to garments using the "M" stitch.
Settings for stitch selection, width, length, foot, and needle plate for "M" stitch.
Using the Crescent stitch for borders, edges, smocking, and embroidery.
Stitching and finishing seams in one step for stretch fabrics.
Settings for stretch overedge stitch, including width, length, foot, and needle plate.
Using fagoting stitch for joining fabric pieces with an open, lacy seam.
Using these stitches for topstitching, including in hard-to-reach areas.
Settings for Ric-Rac and Straight Stretch stitches, including width and length.
Using Honeycomb stitch for smocking, mending, and sewing stretch fabrics.
Using the slant overedge stitch for decorative edging and applique.
Settings for slant overedge stitch, including width, length, and foot.
Using the arrow stitch for decorative and secure finish on seams, pleats, and pockets.
Converting to free arm sewing for buttonholes on hard-to-reach areas.
Tips for sewing buttonholes on delicate fabrics using paper overlay.
Settings for stitch selection, width, length, foot, and needle plate for buttonholes.
First step in four-step buttonholing: positioning and initial stitches.
Second step in four-step buttonholing: stitching down to a specific point.
Third step in four-step buttonholing: making additional stitches to complete a side.
Final step in buttonholing, including stitching, removing garment, and cutting opening.
How to adjust the stitch balance ring for unequal buttonhole sides.
Detailed instructions for removing and reinserting the bobbin case.
Steps for correctly guiding and locking the bobbin case into position.
Instructions for safely changing the sewing machine's light bulb.
Guidance on cleaning various parts of the sewing machine using a lint brush.
Troubleshooting guide for common sewing difficulties and their potential causes.
Details on additional accessories like Blindstitch Presser Foot, Button Sewing Foot, and Seam Guide.
Information on accessories such as Seam Ripper, Twin Needle, Needle Threader, and Hemmer Foot.
| Type | Mechanical |
|---|---|
| Built-in Free Arm | Yes |
| Maximum Stitch Length | 4mm |
| Maximum Stitch Width | 5mm |
| Included Presser Feet | All-Purpose Foot, Zipper Foot, Buttonhole Foot, Button Sewing Foot |
| Stitch Options | stretch, decorative |