, .
Maximum Throttle Opening
With engine
OFF,
unscrew the Idle Speed
Adjusting screw
until a gap exists be-
tween screw end and carburetor shaft
lever.
Depress
the
throttle
lever
at
handlebar and hold. Throttle butterfly
should
be horizontal when the lever gent-
ly
touches the handlebar grip.
To
adjust for maximum opening, loosen
screw at point where cable joins carbu-
retor
lever.
With finger, hold carburetor throttle lever
in
fully open position (UP), pull cable
downward until taut. Retighten screw,
ensuring throttle
is
fully depressed.
WARNING: Before starting engine,
make sure carburetor throttle
lever
returns
to
idle position when handlebar
throttle
lever
is
released.
Idle Mixture Adjustment
A primary adjustment (with engine OFF)
should
be made by first turning idle mix-
ture screw fully
clockwise until closed.
Back off screw
3f4
of a turn counter-
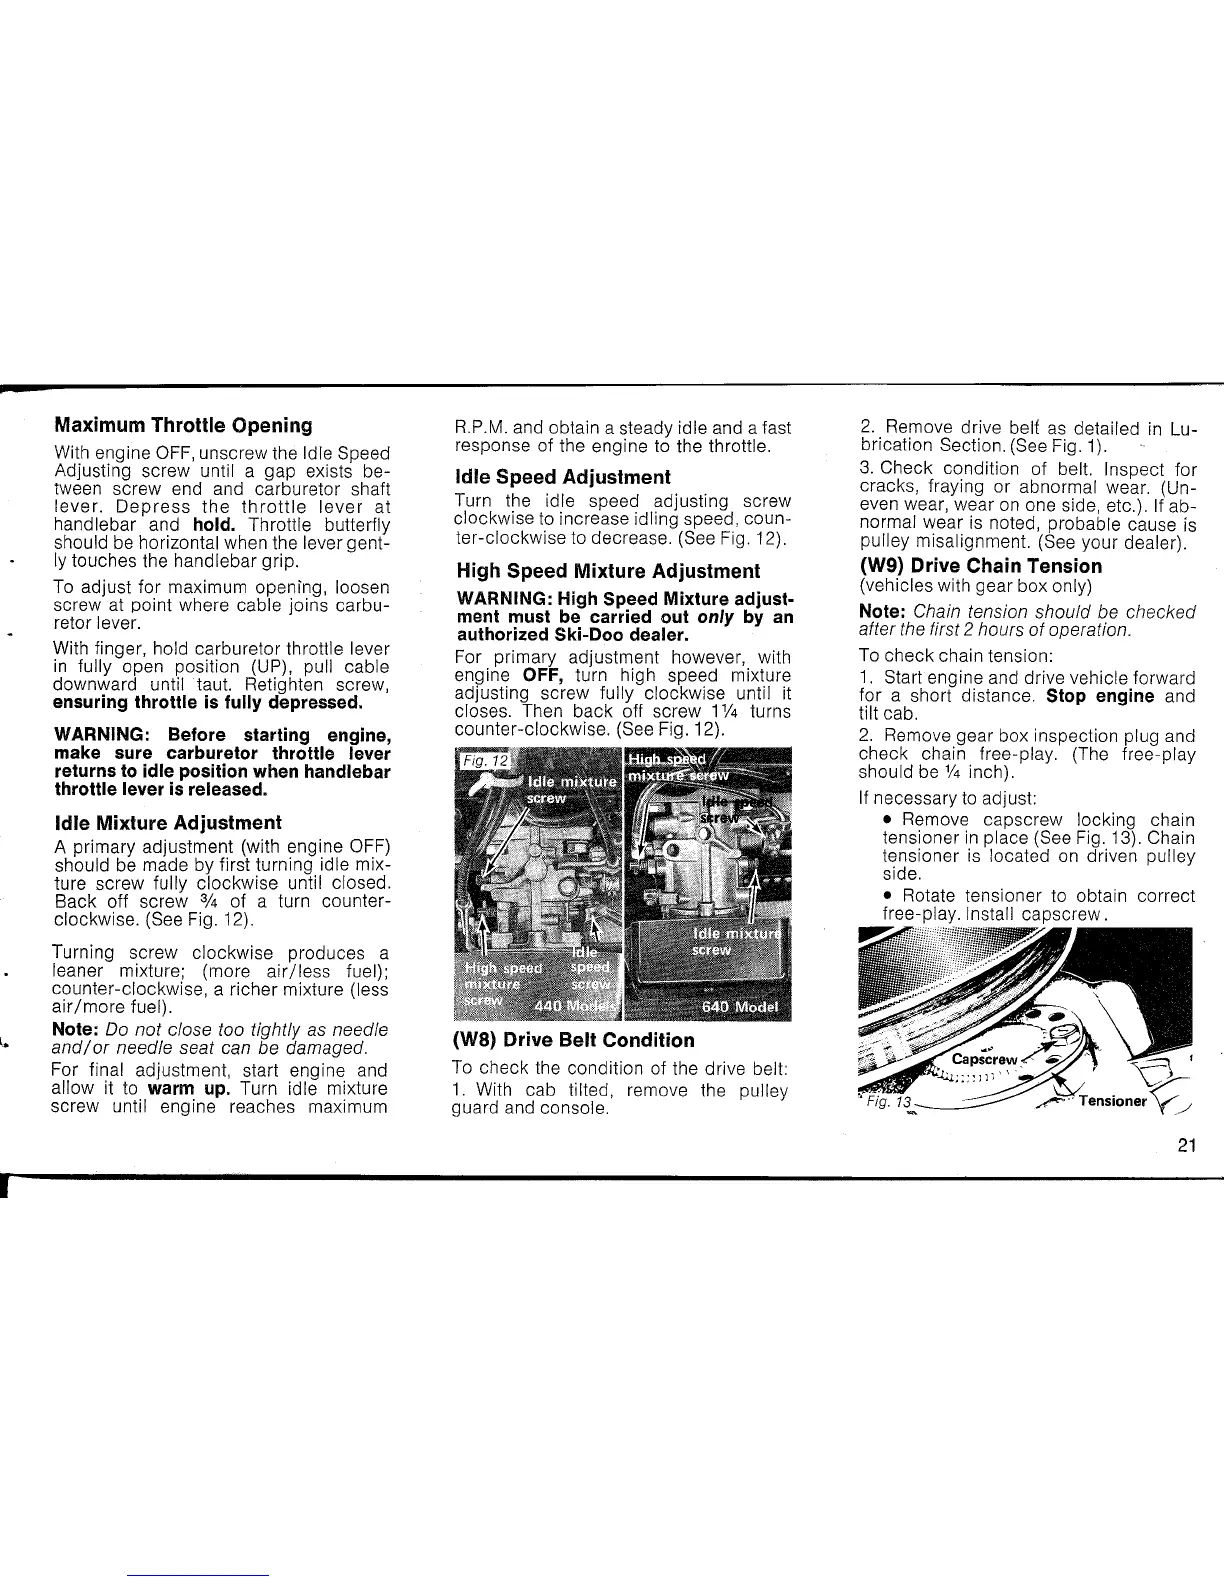
clockwise. (See Fig. 12).
Turning screw
clockwise produces a
leaner mixture; (more
air/less
fuel);
counter-clockwise, a richer mixture (less
air/more
fuel).
Note: Do
not
close too tightly as needle
and/or
needle seat can
be
damaged.
For final adjustment, start engine and
allow it to
warm
up.
Turn idle mixture
screw
until engine reaches maximum
R.P.M. and obtain a steady
idle and a fast
response of the engine to the
throttle.
Idle Speed Adjustment
Turn the idle speed adjusting screw
clockwise to increase idling speed, coun-
ter-clockwise to decrease. (See Fig. 12).
High Speed Mixture Adjustment
WARNING: High Speed Mixture adjust-
ment must be carried out only
by
an
authorized Ski-Doo dealer.
For primary adjustment however, with
engine OFF, turn high speed mixture
adjusting screw fully
clockwise until it
closes. Then back off screw 1
V4
turns
counter-clockwise. (See Fig. 12).
(W8) Drive Belt Condition
To
check the condition of the drive belt:
1.
With cab tilted, remove the pulley
guard and
console.
2.
Remove drive belt
as
detailed
in
Lu-
brication Section. (See Fig. 1).
3.
Check condition of belt. Inspect for
cracks, fraying or
abnormal wear. (Un-
even wear, wear
on
one side, etc.). If ab-
normal wear
is
noted, probable cause
IS
pulley misalignment. (See your dealer).
(W9) Drive Chain Tension
(vehicles with gear box only)
Note: Chain tension should be
checked
after the first 2 hours
of
operation.
To check chain tension:
1.
Start engine and drive vehicle forward
for a short distance.
Stop engine and
tilt cab.
2.
Remove gear box inspection plug and
check chain
free-play. (The free-play
should
be
V4
inch).
If necessary
to
adjust:
• Remove capscrew locking chain
tensioner
in
place (See Fig. 13). Chain
tensioner
is
located
on
driven pulley
side.
21