Do you have a question about the Smart Openers ECO and is the answer not in the manual?
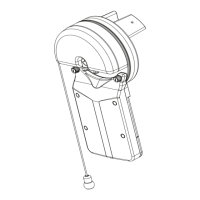
Used to store transmitter codes for the opener.
Used to open, stop, or close the garage door.
Used to set travel limits and save settings.
Flashes during open cycle, indicates photo beam mode.
Flashes during close cycle, indicates force margin.
For connecting safety beams or external push buttons.
Ensures door, environment, and electrical supply are ready for installation.
Mandatory label to inform users about entrapment hazards.
Specifies the minimum clearance needed above the door track.
Pre-assembly of the track, shuttle insertion, and bolt placement.
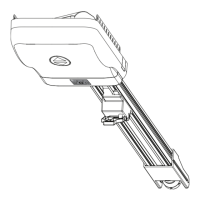
Locating, mounting, and securing the opener track and power head.
Caution to securely fix opener to noggins, not just plasterboard.
Guides selection based on door type: Sectional, Tilt, or Jamb Type.
Attaches the door bracket to the top rail of the garage door.
Assembles and connects the hockey stick to the door bracket and shuttle.
Locates and secures the shuttle stop for manual operation.
Suggests key release for garages with single entry.
Inspects cable and connects power to initiate setup.
Explains the functions of CODE, PB, and SET buttons.
Details direct and remote coding procedures for transmitters.
Outlines the process to clear all stored transmitter codes.
Explains how transmitter button assignments are managed.
Sets the opener for Sectional or Tilt door operation.
Sets open and close limits via controller or transmitter.
Opener measures force needed for travel to ensure safety.
Options to abort or re-enter the limits setting process.
Adjusts sensitivity for detecting obstructions during operation.
Enables safety beam functionality to stop closing doors.
Details wiring for a voltage-free dry contact push button.
Tests the door's reversal response to an obstruction.
Steps to disengage the door for manual operation.
Procedure to re-engage the door for automatic operation.
Informs users about operation, risks, and maintenance responsibilities.
Recommends regular checks for door balance and reversing sensitivity.
Details power input, motor, frequency, and storage capacity.
Outlines the 12-month warranty period and purchaser obligations.
Lists causes that void the warranty or are not covered.
Specifies Smart Openers' liability limits and exclusions.
| Horsepower | 1/2 HP |
|---|---|
| Speed | 7 inches per second |
| Voltage | 120V |
| Wireless Technology | Wi-Fi |
| Maximum Door Height | 7 feet |
| Security | Rolling Code |
| Warranty | 1 year |