Door
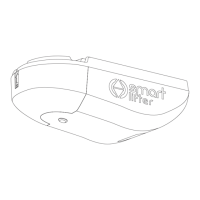
Sectional Door
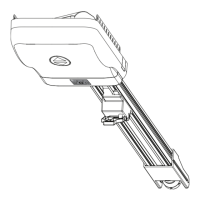
One-Piece Tilt Jamb Type Door
Track
Door
Door
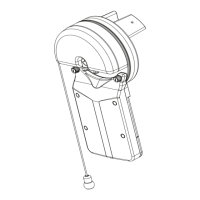
One-Piece Track Tilt Door
Track
-6-
Hockey Stick & Door
Bracket
1 Determine the door type - see below.
2 Attach door bracket to top rail of door using
Tek screw or appropriate fasteners Fig 6.
3 Assemble hockey stick as per Fig. 6 using
bolts and nuts provided and connect to
shuttle. Connect other end to door bracket
as required for particular door type.
Sectional Door
a) Fit the hockey stick with curved end at
door bracket.
b) Ensure hockey stick is at 10º from
perpendicular.
c) Position that door bracket approximately
1/3 distance (160-200mm) from the top of
the door panel.
One-Piece Track Tilt Door
a) Fit the hockey stick with curved end at
shuttle.
b) Ensure hockey stick is as long as
possible.
c) Position that door bracket as close as
possible to the top of the door frame.
One-Piece Tilt Jamb Type Door
a) Fit the hockey stick with curved end at
shuttle.
b) Ensure hockey stick is as long as
possible. If practical extend the hockey
stick by as much as 1000mm to
accommodate the door’s wave action.
c) Position that door bracket as close as
possible to the top of the door frame.
Fig. 6a
Fig. 6b
Fig. 6c
© September 2011 Smart Openers Pty Ltd
 Loading...