EasyManua.ls Logo

Smiths Medical level 1 HOTLINE HL-90 User Manual

Smiths Medical level 1 HOTLINE HL-90
2 pages
To Next Page IconTo Next Page
Page #1 background imageLoading...
Page #1 background image
2
HOTLINE
®
Fluid Warmer (HL-90)
HOTLINE
®
Fluid Warming Sets (L-70)
Step-by-Step Guide
Plug the Twin-Tube Connector on the HOTLINE
®
fluid
warming set into the socket
Connect the IV fluid and the intravenous administration set to
the HOTLINE
®
fluid warming set
Fully prime the intravenous administration set and the
HOTLINE
®
fluid warming set prior to connecting to the patient
After use, turn OFF the power switch
Remove the HOTLINE
®
fluid warming set and insert the reflux
plug into the socket
Turn ON the power switch
Inspect the patient end of the HOTLINE
®
fluid warming set for
leaks to confirm the integrity of the intravenous pathways
IMPORTANT: Please refer to the Operator’s Manual supplied
with the product for detailed instructions, contraindications,
warnings and cautions and the appropriate IFU for specific
information on using disposable sets.
Warning: Prime the recirculating solution path before
connecting to the intravenous extension set, to confirm there
is no breach between the recirculating solution path and the
intravenous path.
1
3 4
HL-90 L-70
Question and Answer IconNeed help?

Do you have a question about the Smiths Medical level 1 HOTLINE HL-90 and is the answer not in the manual?

Smiths Medical level 1 HOTLINE HL-90 Specifications

General IconGeneral
BrandSmiths Medical
Modellevel 1 HOTLINE HL-90
CategoryMedical Equipment
LanguageEnglish

Summary

HOTLINE Fluid Warmer Operation Guide

Connecting the Fluid Warming Set

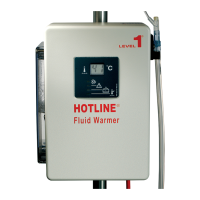
Plug the Twin-Tube Connector of the HOTLINE fluid warming set into the socket.

Power On and Leak Inspection

Turn on the power switch and inspect the patient end for leaks to confirm pathway integrity.

IV Fluid and Line Priming

Connect the IV fluid and administration set, then fully prime both before connecting to the patient.

Power Off and Disconnect

Turn off the power, remove the fluid warming set, and insert the reflux plug into the socket.

Troubleshooting Common Issues

No Power Troubleshooting

Check plug connection and power switch status; ensure green or red LED illuminates.

Disposables Alarm Resolution

Verify set installation, push connector firmly, replace set if alarm persists.

Recirculating Solution Alarm

Check reservoir level and add solution to maximum level.

Over Temperature Alarm

Inspect set for restrictions, check for air lock, and remove warmer from service if needed.

Electrical Interference

Move warmer away from source or use a separate electrical circuit.

Related product manuals