EasyManua.ls Logo

SolarEdge SE7k - User Manual

SolarEdge SE7k
114 pages
Print Icon
To Next Page IconTo Next Page
Loading...
Installation Guide
SolarEdge System
Installation Guide
For Europe and APAC
Version 4.1

Table of Contents

Questions and Answers

  • M
    Michael BrewerAug 21, 2025
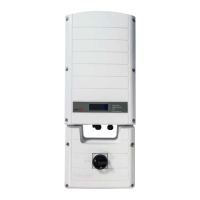
    Why SolarEdge SE7k Inverter has no Internet connection?
    • C
      Claudia WoodsAug 21, 2025
      If your SolarEdge Inverter has no internet connection, it may be due to a failed ping to google.com. Connect a laptop to the network to check for internet connectivity. If there is no internet access, contact your IT administrator or internet provider. If you are using Wi-Fi, make sure the username and password match those defined in your internet provider's access point or router.
  • A
    Amber RayAug 22, 2025
    What to do if SolarEdge SE7k gateway not responding?
    • J
      Jessica GarciaAug 22, 2025
      If the gateway on your SolarEdge Inverter is not responding, it could be due to a failed ping to the router. Check the physical connection to the switch or router and ensure the link LED at the router/switch is lit, indicating a physical link. If the connection is OK, contact your network IT. Otherwise, replace the cable or change it from a cross to a straight connection.
  • W
    wbennettAug 25, 2025
    How to fix SolarEdge Inverter pairing failed?
    • W
      William CummingsAug 25, 2025
      If pairing fails on your SolarEdge Inverter, it might be because the power optimizers are shaded. If you've connected the inverter to the monitoring platform, try pairing remotely during sunlight. Ensure the inverter's ON/OFF switch is ON and that S_OK appears on the status screen.
  • C
    Christopher PattersonAug 27, 2025
    What to do if my SolarEdge Inverter has an Ethernet communication error?
    • M
      Mark ClarkAug 27, 2025
      If you're experiencing an Ethernet communication error with your SolarEdge Inverter, begin by ensuring the Ethernet cable is properly connected, paying attention to the cable pin-out assignment. Also, verify that the DHCP IP is configured correctly by checking both the router and inverter configurations. If the internet connection is not operating, this may also cause the error. Communication issues with the SolarEdge server can be resolved by checking the server address.
  • B
    Bradley CookAug 28, 2025
    How to fix DHCP Failed or Invalid DHCP Config on SolarEdge SE7k?
    • C
      coreyfloresAug 28, 2025
      If your SolarEdge Inverter shows 'DHCP Failed' or 'Invalid DHCP Config', it indicates an issue with the IP settings. To resolve this, check both the router and inverter configurations.
  • M
    mhillAug 29, 2025
    How to fix LAN Disconnected on SolarEdge SE7k?
    • S
      Sarah JonesAug 29, 2025
      If your SolarEdge Inverter shows 'LAN Disconnected', it indicates a fault with the physical connection. Check the cable pin-out assignment and cable connection.
  • H
    Hannah MillerAug 31, 2025
    Why SolarEdge SE7k Inverter has no connection to SolarEdge servers?
    • J
      Joshua ScottAug 31, 2025
      If your SolarEdge Inverter cannot connect to SolarEdge servers, the ping or connection to the SolarEdge server may have failed. Verify the SolarEdge server address under the LAN Configuration sub-menu. The address should be prod.solaredge.com and the port should be 22222. Check with your network administrator to see if a firewall or other device is blocking the transmission.
  • E
    Erin Roberts MDSep 2, 2025
    What to do if string voltage is lower than number of optimizers in SolarEdge SE7k Inverter?
    • K
      Kirk EllisonSep 2, 2025
      If the string voltage of your SolarEdge Inverter is not 0V but lower than the number of optimizers, it could be due to several reasons. First, ensure all power optimizers are properly connected in the string. Second, verify that all modules are correctly connected to the power optimizer inputs. Lastly, check the string polarity using a voltmeter and correct it if necessary.
  • T
    Tammy RogersSep 4, 2025
    Why is string voltage higher than number of optimizers in SolarEdge SE7k?
    • A
      Aimee FitzgeraldSep 4, 2025
      If the string voltage of your SolarEdge Inverter is higher than the number of optimizers, there could be a few reasons. First, check if an extra power optimizer is connected in the string. Next, verify that only power optimizers are connected in the string and that no module outputs are connected without a power optimizer. If the issue persists, follow these steps: 1. Disconnect the wires connecting the power optimizers in the string. 2. Measure the output voltage of each power optimizer to locate any that aren't outputting the 1V safety voltage. Check the connections, polarity, module, and voltage of any malfunctioning power optimizers.
  • M
    mallisonSep 6, 2025
    What to do if Gateway Ping Failed on SolarEdge SE7k Inverter?
    • S
      Stephanie WrightSep 6, 2025
      If your SolarEdge Inverter shows 'Gateway Ping Failed', the ping to the router has failed. Check the physical connection to the switch or router and ensure the link LED at the router or switch is lit, indicating a physical link. If the connection is fine, replace the cable or change it from cross to straight connection.

Summary

Handling and Safety Instructions

Important Safety Instructions

Critical Safety Precautions

Critical warnings about electrical hazards, component handling, and system operation.

Chapter 1: Introducing the SolarEdge Power Harvesting System

Power Optimizer

Function, features, and safety voltage of SolarEdge power optimizers.

Inverter

Role of the inverter in converting DC to AC power and data transmission.

Installation Procedure

Chapter 2: Installing the Power Optimizers

Optimizer Installation Safety

Safety notes and critical warnings specific to power optimizer installation.

Optimizer Installation Guidelines

Step 1: Mounting the Power Optimizers

Mounting Caution

Warning about drilling vibrations damaging power optimizers and voiding warranty.

Step 2: Connecting a PV Module to a Power Optimizer

Step 3: Connecting Power Optimizers in Strings

Step 4: Verifying Proper Power Optimizer Connection

Chapter 3: Installing the Inverter

Mounting the Inverter

Inverter Mounting Precautions

Chapter 4: Connecting the AC and the Strings to the Inverter

Grid Connection Guidelines

Guidelines for connecting the inverter to the AC grid.

Connecting the AC Grid to the Inverter

Connecting the Strings to the Inverter

Chapter 5: Commissioning the Installation

Step 1: Activating the System

Procedure for activating the inverter and the complete system.

Activation Electrical Hazard

Electrical shock hazard warning during inverter cover removal for activation.

Step 2: Pairing Power Optimizers to the Inverter

Pairing Process Warning

Warning about DC cables carrying high voltage during ON/OFF switch activation.

Step 3: Verifying Proper Activation

The Monitoring Platform

Chapter 6: User Interface

Setup Mode Configuration

Error Message Display

Inverter Configuration - Setup Mode

Internal LCD Configuration

Steps for configuring the inverter via internal LCD buttons.

Setup Mode Safety Warning

Warning about DC voltage safety before opening cover during setup.

Configuration Menu Options

Communication Configuration

Options for configuring inverter communication methods.

Status Screens - Operational Mode

Telemetry Status Display

Server Communication Status

Chapter 7: Setting Up Communication

Communication Options

Overview of supported communication types for data transfer.

RS485 Communication Setup

Wi-Fi Communication Setup

Cellular Communication Setup

ZigBee Communication Setup

Removing the Inverter Cover

Inverter Cover Removal Safety

Warning about DC voltage safety before opening cover for access.

Creating an Ethernet (LAN) Connection

Connecting the Ethernet Cable

Step-by-step instructions for connecting the Ethernet cable to the inverter.

Creating an RS485 Bus Connection

Connecting RS485 to Monitoring Platform

Configuring the RS485 Communication Bus

Verifying the Connection

Appendix A: Errors and Troubleshooting

Troubleshooting Communication

Steps to troubleshoot communication issues between devices.

Troubleshooting Ethernet Communication

Specific steps for troubleshooting Ethernet communication errors.

Additional Troubleshooting Steps

Power Optimizer Troubleshooting

Appendix C: Connecting the AC and DC Strings to the DC Safety Unit

Connecting the AC Grid to the Inverter via DC Safety Unit

Connecting the Strings to the DC Safety Unit

Appendix D: SafeDC

SafeDC Voltage Compliance Warning

Warning about worst-case SafeDC voltage compliance with IEC60947-3.

Appendix E: External Fan Maintenance and Replacement

Fan Replacement Safety Warning

Warning about capacitor discharge time before panel access for fan replacement.

Appendix F: Replacing and Adding System Components

Replacing the DC Safety Unit

DC Safety Unit Removal Warning

Warning about capacitor discharge time before panel access for DC Safety Unit removal.

Installing a New DC Safety Unit

Connecting the DC Safety Unit to the Inverter

Adding, Removing, or Replacing Power Optimizers

Optimizer Replacement Safety Warning

Warning about capacitor discharge time before panel access for optimizer replacement.

Appendix G: Determining the Circuit Breaker Size

Determining the Size of an Inverter Circuit Breaker

Table 1: Circuit Breaker Criteria

Technical Specifications - Single Phase Inverters (Europe & APAC)

Technical Specifications - Three Phase Inverters (Europe & APAC)

SolarEdge SE7k Specifications

General IconGeneral
ManufacturerSolarEdge
ModelSE7k
CategoryInverter
Max. DC Power9450 W
Max. AC Power Output7000 W
Rated AC Power7000 W
AC Frequency50/60 Hz
TopologyTransformerless
Warranty12 years
Communication InterfacesRS485, Ethernet
CoolingConvection
Operating Temperature Range-25°C to 60°C

Related product manuals