This document provides a quick start guide for the Electronic Control System used with Somfy StruXure Outdoor products, focusing on programming and troubleshooting.
Device Function Description
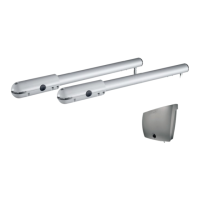
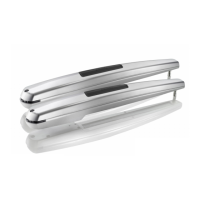
The Somfy StruXure Outdoor Electronic Control System manages the operation of motorized louvers, typically found in pergolas or similar outdoor structures. It integrates various control methods, including remote transmitters, wall switches, and environmental sensors (rain, wind, temperature) to automate louver movement. The system allows for individual motor control, "All Zone" control, and the ability to set specific positions for conditions like ice and snow.
Important Technical Specifications
Control Board:
- Input Power: Main 24V DC input, supplied by a converter.
- Motor Connections: Dedicated motor connectors for S1 and S2 outputs.
- Sensor Inputs: Wired Rain Sensor Connector.
- DIP Switches:
- 1: Encoder for S1
- 2: Encoder for S2
- 4: Temperature Sensor Switch
- 5: Wind Sensor Switch
- Indicator LEDs:
- YELLOW: Function Indicator LEDs (S: General Activity Indicator, D: Board On-Board Diagnostics LEDs).
- Wind Activity Indicator: ON (sensor triggered), FLASHING (waiting 15 minutes post-trigger).
- Rain Activity Indicator: ON (sensor triggered), FLASHING (waiting 15 minutes post-trigger).
- Snow Activity Indicator: ON (sensor triggered), FLASHING (waiting 15 minutes post-trigger).
- ORANGE: Program button and motor indicator LEDs (indicate which motor is being programmed).
- Antenna: Features an Antenna I/O, with instructions for installing an extended range antenna by removing the stock antenna.
Transmitters/Switches:
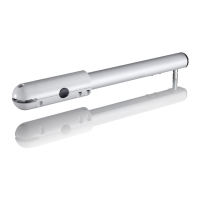
- Telis 1 RTS Transmitter: Features UP, STOP, DOWN buttons, MY button, and an LED Channel Indicator.
- Telis 4 RTS Transmitter: Features UP, STOP, DOWN buttons, MY button, an LED Channel Indicator, and a Channel Selector.
- Smoove® 1 RTS Wall Switch: Features UP, MY/STOP, DOWN buttons.
- DecoFlex WireFree™ RTS Switch (Standard): Features UP, DOWN buttons.
Sensors:
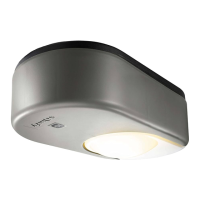
- Rain Sensor:
- Requires charging in the sun before programming.
- Features a small blue and white dial on the back for sensitivity adjustment.
- DIP switch #3 on the control board must be in the "ON" position for the sensor to close louvers on rain for StruXure Systems.
- Wind Sensor:
- Activates to close all louvers by default.
- DIP switch #5 on the control board can be changed to open louvers for high wind protection.
- Adjustable wind sensitivity on the underside of the sensor.
Usage Features
Remote Control Operation:
- Basic Control: UP, STOP, DOWN buttons for louver movement.
- "MY" Position: Allows setting a preferred intermediate louver position.
- Channel Selection: Telis 4 and DecoFlex remotes allow selection of specific channels for individual or grouped motor control.
- "All Zone" Control: A dedicated zone (Zone 5) can be programmed to control all motors simultaneously.
Programming:
- Motor Programming:
- Hold "PROG" button on the board until S1/S2 LEDs flash and motor jogs.
- Briefly press "PROG" to select desired output (S1 or S2).
- Select desired channel on RTS control.
- Press "Up" and "Down" simultaneously on RTS control until motor jogs.
- Check motor direction: Press "Up" (louvers open = correct). If incorrect, press and hold "My" until motor jogs, then recheck.
- Briefly press "Up" and "Down" simultaneously to initiate "Self learning phase" for end-limits. Do not interrupt.
- Move louvers to desired ice/snow position using "Up" or "Down", then press and hold "My" until motor jogs to confirm.
- Briefly press Programming Button on the back of the RTS control to complete programming for the motor.
- "All Zone" Programming:
- Select a desired zone on the remote.
- Press and hold the Programming button on the back of the remote until motor jogs.
- Select Zone 5 on the remote.
- Briefly press the Programming button.
- Copying Remotes:
- Select the zone to copy on the source remote.
- Press and hold the programming button on the back of the source remote.
- On the target remote, select the desired zone and briefly press the programming button on the back.
- Note: "All" zone may need to be programmed separately if copying fails.
Sensor Programming:
- Rain Sensor:
- Select the desired zone on the remote.
- Press and hold "PROG" on the back of the remote until motors jog.
- Briefly press "PROG" on the back of the sensor.
- Wind Sensor:
- Select the "ALL" zone on the remote.
- Press and hold "PROG" on the back of the remote until motors jog.
- Briefly press "PROG" on the back of the sensor.
Maintenance Features
Troubleshooting:
- Programming Mode Issues (S1/S2 not changing):
- Check motor plug: Ensure it's flat and flush with the housing.
- Check wire connections at the terminal strip: Verify correct wiring, proper insulation stripping.
- Check field wiring for breaks, kinks, or scrapes.
- Quick Test: Disconnect motor wire from terminal block, apply 24V DC directly to actuate motor. If motor extends/retracts, control board should be programmable.
- After checks, cycle power off/on.
- Motor Not Opening/Closing After Programming:
- Check if S1 or S2 programming light is still lit (indicates still in programming mode).
- Kill power to the board for 10 seconds, then plug back in.
- Repeat the programming sequence exactly, without skipping steps.
Factory Reset:
- Press and hold the "PROG" button on the control board for at least 10 seconds until all indicator LEDs flash and turn off. Unplug and plug in the board to complete the reset.