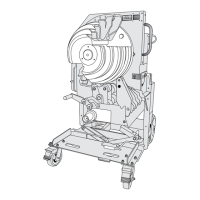
7
• Single shoe bending of 3/4" to 2" EMT, IMC, and Rigid conduit.
• Four large wheels for easy transportability.
• Adjustable elevation control allows for ergonomic working height.
• Squeeze adjustment allows for variations in conduit.
• Back lite digital display for easy viewing.
• Fork tubes provided for easy forklift mobility.
• Onboard conduit support stand for easy feeding of conduit into bender.
• Front locking casters to securely keep bender in place during use.
• Quick release lock handle to easily pivot bender between vertical
and horizontal positions.
• Billet aluminum hand pendent for durability.
• 2 Degree fine adjustment for easy leveling.
• Programmable spring back setting for accurate bending.
Refer to the “Identification” section of this manual.
To transport the BEND
MAX
™
on the ground
1. Ensure bender is in the vertical position. If bender is in the horizontal position,
loosen locking tilt handle (15) by turning counter clockwise and lift up on bender
support handle (6). Once in the vertical position align base of locking tilt handle
into slot and turning the handle clockwise till tight.
2. Ensure the bender is in the lowest setting.
Refer to section labeled “ELEVATION OF THE BEND
MAX
™
”
to insure bender is in the lowest position for transport.
3. If not already installed, place conduit support stand (23) on the back of the
bender in supplied hooks.
4. Unlock caster brakes (27) and use push cart handle (21) to maneuver bender
to desired location.
5. Lock caster brakes (27) by pushing down with foot once transport is complete.
To transport this bender by fork lift
1. Ensure caster brakes (27) are locked by pressing down with foot.
2. Ensure the bender is in the lowest setting.
Refer to section labeled “ELEVATION OF THE BEND
MAX
™
”
to insure bender is in the lowest position for transport.
3. Insert the forks into the fork tubes (11) at bottom of bender.
Adjust fork spacing to match fork tubes on bender.
Ensure front wheel brakes are engaged before inserting forks into fork tubes
Failure to observe this warning could result in severe injury or death.
FEATURES
TRANSPORTING OF BENDER