Frequency of Tension Monitor Calibrations:
Typically, precision equipment is calibrated once a year, more
frequently if heavy use. Key times to re-calibrate are at year-end
or year-beginning, before major cable-pulls, and before placing
into storage.
1. Inspect case for damage. If damaged, carefully open and inspect
contents inside. Note any damage, if applicable.
2. If all appears to be in good order, continue with Pre-Use Set-Up and Test.
3. Familiarize yourself with function buttons, especially the
ACTIVE/PAUSED mode. (See Identification chart for reference).
4. If using Data-Logger, have Flash Drive available. Ensure that the
Flash Drive is clear to receive new data. *Usually best to tag each
Flash Drive for specific pulls. *Do not plug into USB port until ready to use.
5. Press the Power Button located on the front of the Unit.
6. Digital displays should light-up blue. Display will say “BUSY” as
it boots up and will read “00,000 lbs” when ready and the unit
will be in the “PAUSED” state.
7. Set the Job number. A four-digit numerical job number can be
set in two ways: The first way is to use the “SCROLL LEFT” or
“SCROLL RIGHT” buttons to move to the digit the user would like
to change. While the digit is flashing the desired value can be
selected by using the “INCREASE VALUE” or “DECREASE VALUE”
buttons. Press center button to confirm value. (See Identification
chart for reference).The second way is to scroll to the “NEXT”
indicator and press the center button to increase the job number by one.
8. “MAX TENSION ALARM” DISPLAY: Set or adjust to desired max
tension you want the unit to alert you when reached. (Audible
alarm will sound, and screen will turn orange.) To set the alarm,
use the “SCROLL LEFT” or “SCROLL RIGHT” buttons to move to
the digit the user would like to change. While the digit is flashing
the desired value can be selected by using the “INCREASE VALUE”
or “DECREASE VALUE” buttons. Press center button to confirm value.
9. ‘’DATE/TIME’’ DISPLAY: Check displayed date and time for
accuracy. If adjustment is required, use the “SCROLL LEFT” or
“SCROLL RIGHT” buttons to move to the digit the user would like
7 8
PRE-USE SET-UP AND TEST
Performing a Cable Pull
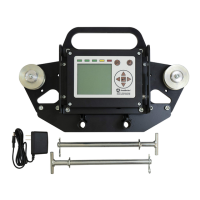
1. Confirm how you plan to mount the Southwire® Extreme Duty
Tension Monitor – 10K.
2. To mount to the Southwire
®
MAXIS
®
Extreme Duty Cable Puller
(XD10), use the included adapter that can be bolted onto the
Tension Monitor using 4 bolts at the bottom and then use the two
pins to attach the Tension Monitor to the arm of the XD10.
(Figure 1 and 2)
PRE-USE SET-UP AND TEST
to change. While the digit is flashing the desired value can be
selected by using the “INCREASE VALUE” or “DECREASE VALUE”
buttons. Press center button to confirm value.
10. ACTIVE/PAUSED Button controls flow of data to USB Drive.
Data-logging is operating when the screen says “ACTIVE” in the
top right of the screen. Data-logging is not operating when the
screen says “PAUSED” in the top right of the screen.
11. Plug-in Flash Drive with Tension Monitor in PAUSED mode.
Press ACTIVE/PAUSED button for 5 seconds, this will put it in
ACTIVE mode. In ACTIVE mode the Tension Monitor will
automatically record the pull to the USB Drive.
12. Test downward force on center rollers. Screen should display
exact TENSION as digital display. Data will also record to Flash
Drive. *Check and confirm data is syncing to flash drive before
placing into service.
13. To check data-logging: Press the ACTIVE/PAUSED button for 5
seconds to put tension monitor into PAUSED mode. Remove Flash
Drive from Tension Monitor and plug USB drive into a computer.
You will then be able to access the pull data in an excel spreadsheet.
Recommend setting a new Job Number per pull to eliminate confusion.
Using a computer, we recommend transferring data from Flash Drive
to computer and save as specific file name. If this is done correctly
and data is stored in a safe, secure location other than Flash Drive,
OK to delete data on Flash Drive and re-use for another cable-pull.
Do not plug-in or remove flash drive while Tension Monitor is in
ACTIVE mode.
PRE-USE SET-UP AND TEST
 Loading...