Quick start guide
v1.0
P INTSPY INTPSPY
Surveillance
camera
LIVE series
Model:
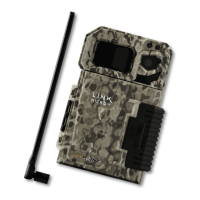
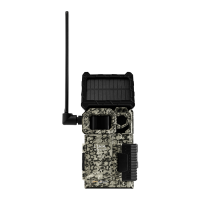
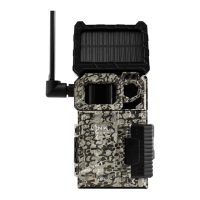
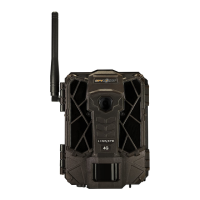
mini-LIVE
mini-LIVE-4G
mini-LIVE-4GV
1-888-779-7646
www.spypoint.com
under Support section
k
L
K
tech@spypoint.com
In the box
1
2
3
5
4
6
8
7
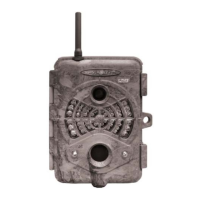
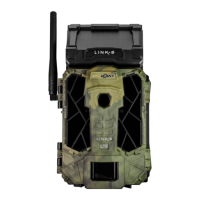
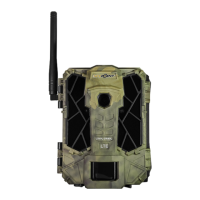
Components
Installation
strap
USB
cable
Note: Memory card and batteries are sold separately.
Camera
Quick start
guide
SIM card*
* mini-LIVE and mini-LIVE-4G only
Included for United-Stated, Canada and United Kingdom only
Navigation buttons
Microphone
(mini-LIVE-4G
and mini-LIVE-4GV)
Power button
12V/Solar panel jack
USB port
SIM card slot
(mini-LIVE and
mini-LIVE-4G)
SD card slot
Built-in speaker
(mini-LIVE-4G
and mini-LIVE-4GV)
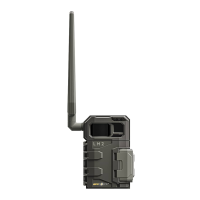
Photo lens
Invisible LEDs
Test light
Battery case
Detection lens
Mounting bracket
Slot for installation strap
Tripod mount
Cable lock hole
BUSY LED
Viewing screen
1
2
3
4
5
6
7
8
9
10
11
12
9
10 11 12 13 14
13
14
15 17 1916
18
15
16
17
18
19
3. INSERT THE MEMORY CARD
Insert an SD/SDHC memory card (up to 32
GB capacity) in the card slot, gold contacts
facing up. The card is inserted correctly
when a click is heard.
Before inserting or removing a me-
mory card, always turn off the came-
ra to prevent loss or damage of the photos
already recorded.
4. INSERT THE SIM CARD (MINI-LIVE AND MINI-LIVE-4G)
A SIM card is required to use cellular func-
tions. Carefully insert a SIM card in the card
slot, gold contact area facing down. The card
is inserted correctly when a click is heard.
Before inserting or removing a SIM
card, always turn off the camera.
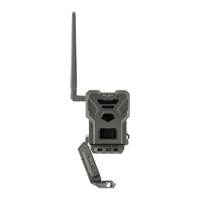
5. INSTALL THE CAMERA WITH THE SUPPLIED STRAP
Recommended installation height: about 3 feet above the ground.
Do not place the camera facing the sun.
Guide de
démarrage rapide
v1.0
P INTSPY INTPSPY
Caméra de
surveillance
Série LIVE
Modèles :
mini-LIVE
mini-LIVE-4G
mini-LIVE-4GV
1-888-779-7646
www.spypoint.com
sous la section Support
k
L
K
tech@spypoint.com
Dans la boîte
1
2
3
5
4
6
8
7
Composants
Courroie
d'installation
Câble
USB
Note: Carte mémoire et piles sont vendues séparément.
Caméra
Guide de
démarrage rapide
Carte SIM*
* mini-LIVE et mini-LIVE-4G seulement
Incluse pour les États-Unis, le Canada et Royaume-Uni seulement
Écran de visionnement
Boutons de navigation
Microphone
(mini-LIVE-4G
et mini-LIVE-4GV)
Bouton de mise sous tension
Prise 12V/panneau solaire
Port USB
Fente pour carte SIM
(mini-LIVE et mini-LIVE-4G)
Fente pour carte SD
Haut-parleur
(mini-LIVE-4G
et mini-LIVE-4GV)
Lentille photo
DEL invisibles
Lumière de test
Compartiment à piles
Lentille de détection
Socle
Fente pour courroie
d’installation
Support pour trépied
Ouverture pour câble
cadenas
Lumière BUSY
1
2
3
4
5
6
7
8
9
10
11
12
9
10 11 12 13 14
13
14
15 17 1916
18
15
16
17
18
19
1. RETIRER LA CAMÉRA DU SOCLE
$3RXVVHUVXUODODQJXHWWHD¿QGHGpJDJHU
la caméra du socle.
B. Retirer la caméra.
2. INSÉRER DES PILES
1RXV UHFRPPDQGRQV O¶XWLOLVDWLRQ GH SLOHV QHXYHV D¿Q
d’assurer un rendement maximal de la caméra. Les piles
AA rechargeables sont déconseillées.
A.
B.
Mise en route
3. INSÉRER UNE CARTE MÉMOIRE
Insérer une carte mémoire de type SD/
SDHC (jusqu’à une capacité de 32 Go) dans
la fente pour carte SD, contacts dorés vers
le haut. La carte est correctement insérée
lorsqu’un clic se fait entendre.
Avant d’insérer ou de retirer une carte
mémoire, toujours mettre la caméra
à OFF pour éviter que les images
présentes sur la carte soient supprimées ou
endommagées.
4. INSÉRER UNE CARTE SIM (MINI-LIVE ET MINI-LIVE-4G)
Une carte SIM est requise pour les fonctions
cellulaires. Insérer délicatement une carte
SIM dans la fente pour carte SIM, zone de
contacts dorée vers le bas. La carte est cor-
rectement insérée lorsqu’un clic se fait en-
tendre.
Avant d’insérer ou de retirer une carte
SIM, toujours mettre la caméra à OFF.
5. INSTALLER LA CAMÉRA À L’AIDE DE LA COURROIE
FOURNIE
Hauteur d’installation recommandée : environ 1 mètre du sol.
Ne pas installer la caméra face au soleil.
1. REMOVE CAMERA FROM THE MOUNTING BRACKET
A. Push the tab to release the camera from
the mounting bracket.
B. Remove the camera.
2. INSERT THE BATTERIES
We recommend the use of new batteries to ensure a
maximum performance of the camera. Rechargeable AA
batteries are not recommended.
A.
B.
Getting started
Lithium battery pack
LIT-09/LIT-C-8
6 alkaline AA
batteries
or
Bloc pile lithium
LIT-09/LIT-C-8
6 piles AA
alcalines
ou