0478-131-9959-A
113
English
6 Charging the Battery, LEDs
► Fully charge the battery, @ 6.1.
► Clean the lawn mower, @ 17.2.
► Check the blade, @ 12.2.
► Attach the handlebar, @ 7.1.
► Fold up and adjust the handlebar, @ 8.1.
► If mowing and the mown grass is to be collected in the
grass catcher box: attach the grass catcher box, @ 7.2.2.
► If mowing and the mown grass is to be ejected to the rear:
detach the grass catcher box, @ 7.2.3.
► Set the cutting height, @ 13.2.
► Check the controls, @ 12.1.
► If the 3 LEDs flash red during the check of the controls:
pull out the activation key, remove the battery and
consult a STIHL specialist dealer.
There is a fault in the lawn mower.
► If the steps cannot be performed: do not use the lawn
mower and consult a STIHL specialist dealer.
6.1 Charging the Battery
The charging time depends on several factors, e.g.
temperature of the battery or the ambient temperature. The
actual charging time may differ from the specified charging
time. For specified charging times see
www.stihl.com/charging-times.
► Recharge the battery fully as described in the instruction
manual for the STIHL AL 101, 300, 500 chargers.
6.2 Displaying the Charge State
► Press button (1).
The LEDs illuminate green for approx. 5 seconds to
indicate the charge state.
► If the right LED flashes green: charge the battery.
6.3 LEDs on Battery
The LEDs can show the state of charge or malfunctions. The
LEDs can glow or flash green or red.
The state of charge is indicated when the LEDs glow or flash
green.
► If the LEDs glow or flash red: Troubleshooting, @ 20.1.
There is a malfunction in the mower or battery.
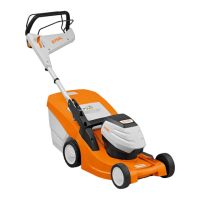
7.1 Attaching the Handlebar
► Switch the lawn mower off, pull out the activation key and
remove the battery.
► Place the lawn mower on a level surface.
6 Charging the Battery, LEDs
7 Assembling the Lawn Mower
1
20-40%
40-60%
60-80%
80-100%
0-20%
 Loading...