Section 5
MAINTENANCE
29
of the housing. Should faulty gaskets be evident,
correct the condition immediately.
3. If the clean element is to be stored for later use,
it must be stored in a clean container.
4. After the element has been installed, inspect and
tighten all air inlet connections prior to resuming
operation.
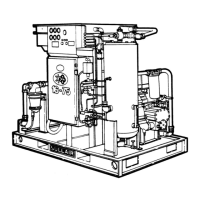
SEPARATOR ELEMENT REPLACEMENT
Refer to Figure 5-3. When fluid carry over is evident
after the fluid return line strainer and orifice as well
as the blowdown valve seal has been inspected
and found to be in satisfactory condition, separator
element replacement is necessary. Use separator
element part number no. 250034-112 and follow
the procedure explained below.
1. Remove all piping connected to the sump cover
to allow removal (return line, service line, etc.).
2. Remove the fluid return line from the fitting in the
cover.
3. Remove the eight (8) cover bolts and washers
and lift the cover from the sump.
4. Remove the separator element.
5. Scrape the old gasket material from the cover
and the flange on the sump. Be sure to keep all
scrapings from falling inside tank.
6. Install the new element.
7. Replace the sump cover and bolts. Run the cover
bolts in finger tight, then gradually tighten in a
crisscross pattern in 4 to 5 steps. Always tighten
the bolts alternately at opposite sides of the
cover. Never tighten bolts adjacent to each
other. Torque bolts to 60 ft.-lbs. (81 Nm).
8. Reconnect all piping. The fluid return line tube
should extend to the bottom of the separator ele-
ment. This will assure the proper fluid return
flow.
9. Clean the fluid return line strainer and clear the
orifice prior to restarting the compressor.
10. After 24 hours of operation, tighten sump cover
bolt to torque specification listed in step number
7.
PROCEDURE FOR SETTING SPEED AND PRES-
SURE CONTROLS ON PORTABLE COMPRES-
SORS WITH POPPET VALVE
Refer to Figure 5-4A or 5-4B. Prior to adjusting the
Control System, it is necessary to determine the
rated full load pressure and the high/low RPM set-
tings for your particular compressor. This informa-
tion can be obtained from the Operator’s Manual
(Specifications Section) or by contacting your local
authorized Sullair Representative. The following
explanation applies to a compressor with 100 psig
(6.9 bar) rated full load pressure.
1. Start the compressor and allow the engine to
warm-up to normal operating temperature with
the service valve closed.
Figure 5-2 Air Filter
*Filter Element Kit P/N 02250102-158 (2 required)
Figure 5-3 Air / Fluid Separator
*Replacement Element Kit P/N 250034-112